Before you can start using on-demand Spark clusters on Domino, you must enable and configure the functionality on your deployment.
Your Domino administrator must set ShortLived.SparkClustersEnabled
to true to enable on-demand Spark functionality.
By default, Domino does not come with a Spark compatible compute environment that can be used for the components of the cluster. Without at least one such environment available, you cannot create a cluster.
When using on-demand Spark in Domino, you need one environment for the Spark cluster (base or worker environment) and one environment for the workspace/job execution (compute environment).
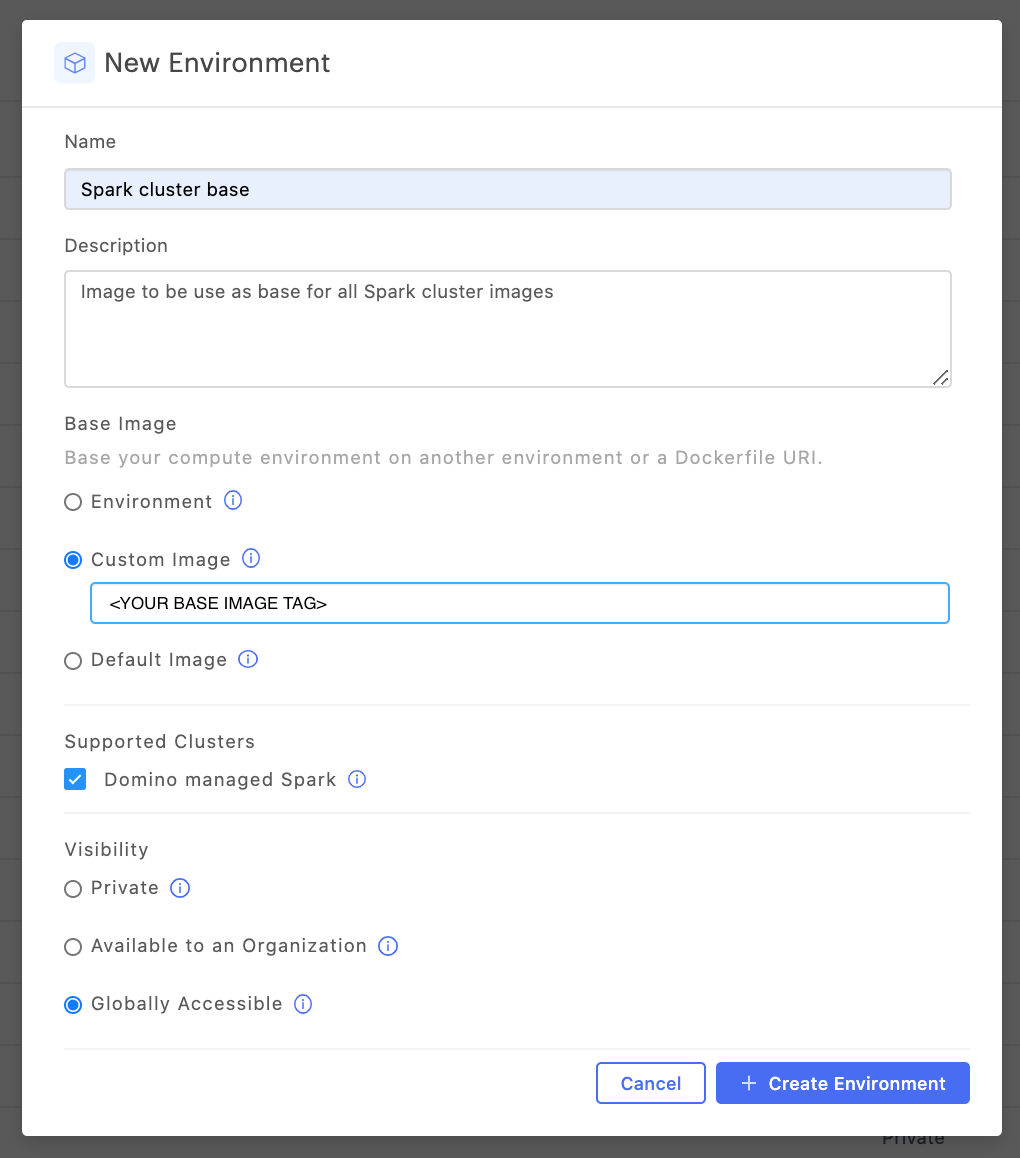
Create a new base Spark cluster environment
-
Follow the instructions to create an environment.
-
In the Base image section, select Custom Image and specify an image URI that points to a deployable Spark image.
Domino recommends that you use Bitnami Spark images that are re-published by Domino for versions of Spark, Hadoop, and Python.
NoteImage compatibility:
Domino’s on-demand Spark functionality has been developed and tested using open-source Spark images from Bitnami. While it has not been explicitly verified, you might be able to use a different base image, as long as that image is compatible with the Bitnami Spark Helm Chart.
For more information about the benefits, see the Why use Bitnami images section of the Bitnami image distribution page.
Domino currently republishes the Spark base images from
bitnami/spark, since these images only provide support for Python 3.6. -
Required: In the Supported clusters area, select the Domino managed Spark checkbox. This ensures that the environment is available for use when you create Spark clusters from workspaces and jobs.
-
Set the Visibility.
You can set this attribute the same way you would for any other compute environment.
-
Leave the Dockerfile Instructions blank to use the Hadoop client libraries included with the image or follow the instructions to configure custom Hadoop client libraries.
You can include additional dependencies (JARs and packages) that should be available on the cluster nodes of any cluster.
See Manage dependencies to learn more.
-
Leave Pluggable Notebooks / Workspace Sessions blank as the Spark base environments are not intended to also include notebook configuration.
Base Spark cluster environment (Advanced) - custom Hadoop client libraries
The Hadoop client libraries pre-bundled with your Spark version might not be appropriate for your needs. This is common if you want to use cloud object store connector improvements introduced post Hadoop 2.7.
Add the following to the Docker Instructions section, and adjust the Spark and Hadoop version as needed.
### need if using the recommended Bitnami base image
USER root

### Make sure wget is available
RUN apt-get update && apt-get install -y wget && rm -r /var/lib/apt/lists /var/cache/apt/archives

### Modify the Hadoop and Spark versions below as needed.
### NOTE: The HADOOP_HOME and SPARK_HOME locations should not be modified
ENV HADOOP_VERSION=3.1.1
ENV HADOOP_HOME=/opt/bitnami/hadoop
ENV HADOOP_CONF_DIR=/opt/bitnami/hadoop/etc/hadoop
ENV SPARK_VERSION=3.2.0
ENV SPARK_HOME=/opt/bitnami/spark
ENV PATH="$PATH:$SPARK_HOME/bin:$HADOOP_HOME/bin"

### Enable access to AWS and ADLS Gen2. Can modify as needed
ENV HADOOP_OPTIONAL_TOOLS="hadoop-aws,hadoop-azure,hadoop-azure-datalake"

### Remove the pre-installed Spark since it is pre-bundled with hadoop but preserve the python env
WORKDIR /opt/bitnami
RUN [ -d ${SPARK_HOME}/venv ] && mv ${SPARK_HOME}/venv /opt/bitnami/temp-venv
RUN rm -rf ${SPARK_HOME}

### Install the desired Hadoop-free Spark distribution
RUN wget -q https://archive.apache.org/dist/spark/spark-${SPARK_VERSION}/spark-${SPARK_VERSION}-bin-without-hadoop.tgz && \
    tar -xf spark-${SPARK_VERSION}-bin-without-hadoop.tgz && \
    rm spark-${SPARK_VERSION}-bin-without-hadoop.tgz && \
    mv spark-${SPARK_VERSION}-bin-without-hadoop ${SPARK_HOME} && \
    chmod -R 777 ${SPARK_HOME}/conf

### Restore the virtual python environment
RUN [ -d /opt/bitnami/temp-venv ] && mv /opt/bitnami/temp-venv ${SPARK_HOME}/venv

### Install the desired Hadoop libraries
RUN wget -q http://archive.apache.org/dist/hadoop/common/hadoop-${HADOOP_VERSION}/hadoop-${HADOOP_VERSION}.tar.gz && \
    tar -xf hadoop-${HADOOP_VERSION}.tar.gz && \
    rm hadoop-${HADOOP_VERSION}.tar.gz && \
    mv hadoop-${HADOOP_VERSION} ${HADOOP_HOME}

### Setup the Hadoop libraries classpath
RUN echo 'export SPARK_DIST_CLASSPATH="$(hadoop classpath):'"${HADOOP_HOME}"'/share/hadoop/tools/lib/*"' >> ${SPARK_HOME}/conf/spark-env.sh
ENV LD_LIBRARY_PATH="${LD_LIBRARY_PATH}:$HADOOP_HOME/lib/native"

### This is important to maintain compatibility with Bitnami
WORKDIR /
RUN /opt/bitnami/scripts/spark/postunpack.sh
WORKDIR ${SPARK_HOME}

USER 1001You must configure the PySpark compute environments for workspaces and/or jobs that will connect to your cluster.
Domino recommends that you use the following base image to create a compatible workspace: quay.io/domino/spark-environment.
See Domino Spark environment for more information about this base image.
PySpark execution compute environment - Hadoop client libraries without cloud storage tools
When installing PySpark you will not automatically get the Hadoop binaries required for cloud storage access. If this is appropriate, you can use the simplified instructions that follow. If you expect to use cloud provider storage such as S3, ADLS, or GCS, Domino recommends that you install full Hadoop libraries.
|
Note
|
|
### Clear any existing PySpark install that may exist
### Omit if you know the environment does not have PySpark
RUN pip uninstall pyspark &>/dev/null

### Install PySpark matching the Spark version of your base image
### Modify the version below as needed
RUN pip install pyspark==3.1.1

### Set SPARK_HOME on the driver to point to the version installed by pyspark
RUN \
  SPARK_HOME=$(pip show pyspark | grep "Location" | awk '{print $2}')/pyspark && \
  chown -R ubuntu:ubuntu ${SPARK_HOME} && \
  echo "export SPARK_HOME=${SPARK_HOME}" >> /home/ubuntu/.domino-defaults && \
  echo "export PATH=\$PATH:${SPARK_HOME}/bin" >> /home/ubuntu/.domino-defaults

### Optionally copy spark-submit to spark-submit.sh to be able to run from Domino jobs
RUN spark_submit_path=$(which spark-submit) && \
    cp ${spark_submit_path} ${spark_submit_path}.sh
PySpark execution compute environment (Advanced) - full Hadoop client libraries
In some cases, the Hadoop libraries pre-bundled with your desired Spark version may not be appropriate for your needs. This would typically be the case if you want to utilize cloud object store connector improvements introduced post Hadoop 2.7.
You can follow the instructions below to configure your environment with PySpark and a custom Hadoop client libraries version.
RUN mkdir -p /opt/domino

### Modify the Hadoop and Spark versions below as needed.
ENV HADOOP_VERSION=3.2.0
ENV HADOOP_HOME=/opt/domino/hadoop
ENV HADOOP_CONF_DIR=/opt/domino/hadoop/etc/hadoop
ENV SPARK_VERSION=3.1.1
ENV SPARK_HOME=/opt/domino/spark
ENV PATH="$PATH:$SPARK_HOME/bin:$HADOOP_HOME/bin"

### Enable this for access to some of the optional cloud tools. Change as needed
ENV HADOOP_OPTIONAL_TOOLS="hadoop-aws,hadoop-azure,hadoop-azure-datalake"

### Install the desired Hadoop-free Spark distribution
RUN pip uninstall pyspark &>/dev/null
RUN rm -rf ${SPARK_HOME} && \
    wget -q https://archive.apache.org/dist/spark/spark-${SPARK_VERSION}/spark-${SPARK_VERSION}-bin-without-hadoop.tgz && \
    tar -xf spark-${SPARK_VERSION}-bin-without-hadoop.tgz && \
    rm spark-${SPARK_VERSION}-bin-without-hadoop.tgz && \
    mv spark-${SPARK_VERSION}-bin-without-hadoop ${SPARK_HOME} && \
    chmod -R 777 ${SPARK_HOME}/conf

### Install the desired Hadoop libraries
RUN rm -rf ${HADOOP_HOME} && \
    wget -q http://archive.apache.org/dist/hadoop/common/hadoop-${HADOOP_VERSION}/hadoop-${HADOOP_VERSION}.tar.gz && \
    tar -xf hadoop-${HADOOP_VERSION}.tar.gz && \
    rm hadoop-${HADOOP_VERSION}.tar.gz && \
    mv hadoop-${HADOOP_VERSION} ${HADOOP_HOME}

### Complete the PySpark setup from the Spark distribution files
WORKDIR $SPARK_HOME/python
RUN PYSPARK_HADOOP_VERSION="without" python setup.py install

### Setup the Hadoop libraries classpath and Spark related envars for proper init in Domino
RUN echo "export SPARK_HOME=${SPARK_HOME}" >> /home/ubuntu/.domino-defaults
RUN echo "export HADOOP_HOME=${HADOOP_HOME}" >> /home/ubuntu/.domino-defaults
RUN echo "export HADOOP_CONF_DIR=${HADOOP_CONF_DIR}" >> /home/ubuntu/.domino-defaults
RUN echo "export LD_LIBRARY_PATH=\$LD_LIBRARY_PATH:${HADOOP_HOME}/lib/native" >> /home/ubuntu/.domino-defaults
RUN echo "export PATH=\$PATH:${SPARK_HOME}/bin:${HADOOP_HOME}/bin" >> /home/ubuntu/.domino-defaults
RUN echo "export PYTHONPATH=\$(ZIPS=(\"${SPARK_HOME}\"/python/lib/*.zip); IFS=:; echo \"\${ZIPS[*]}\"):\$PYTHONPATH" >> /home/ubuntu/.domino-defaults
RUN echo "export SPARK_DIST_CLASSPATH=\"\$(hadoop classpath):${HADOOP_HOME}/share/hadoop/tools/lib/*\"" >> ${SPARK_HOME}/conf/spark-env.sh

### Optionally copy spark-submit to spark-submit.sh to be able to run from Domino jobs
RUN spark_submit_path=$(which spark-submit) && \
    cp ${spark_submit_path} ${spark_submit_path}.sh

### Optionally install boto3 which can help working with AWS credential file profiles
### Can omit if not needed
RUN pip install boto3