domino logo
Tech Ecosystem
Get Started
Get started with Python
Step 0: Orient yourself to DominoStep 1: Create a projectStep 2: Configure your projectStep 3: Start a workspaceStep 4: Get your files and dataStep 5: Develop your modelStep 6: Clean up WorkspacesStep 7: Deploy your model
Get started with R
Step 0: Orient yourself to Domino (R Tutorial)Step 1: Create a projectStep 2: Configure your projectStep 3: Start a workspaceStep 4: Get your files and dataStep 5: Develop your modelStep 6: Clean up WorkspacesStep 7: Deploy your model
Get Started with MATLAB
Step 1: Orient yourself to DominoStep 2: Create a ProjectStep 3: Configure Your ProjectStep 4: Start a MATLAB WorkspaceStep 5: Fetch and Save Your DataStep 6: Develop Your ModelStep 7: Clean Up Your Workspace
Step 8: Deploy Your Model
Scheduled JobsLaunchers
Step 9: Working with Datasets
Domino Reference Projects
Search in Deployments
Security and Credentials
Secure Credential Storage
Store Project CredentialsStore User CredentialsStore Model Credentials
Get API KeyUse a Token for AuthenticationCreate a Mirror of Compute Environments
Collaborate
Share and Collaborate on Projects
Set Project VisibilityInvite CollaboratorsCollaborator Permissions
Add Comments
Reuse Work
Set Up ExportsSet Up Imports
Organizations
Organization PermissionsTransfer Projects to an Organization
Projects
Domino File System Projects
Domino File SystemOrganize Domino File System Project AssetsImport Git RepositoriesWork from a Commit ID in GitCopy a ProjectFork ProjectsMerge Projects
Manage Project Files
Upload Files to DominoCompare File RevisionsExclude Project Files From SyncExport Files as Python or R Package
Archive a Project
Revert Projects and Files
Revert a FileRevert a Project
Git-based Projects
Git-based Project Directory StructureCreate a Git-based ProjectCreate a New RepositoryOrganize Git-based Project AssetsDevelop Models in a WorkspaceSave Artifacts to the Domino File System
Project FilesSet Project SettingsStore Project Credentials
Project Goals
Add GoalsEdit GoalsLink Work to Goals
Organize Projects with TagsSet Project Stages
Project Status
Set Project as BlockedSet Project as CompleteSet Project as Unblocked
View Execution DetailsView Project ActivityTrack Project StatusRename a Project
Share and Collaborate
Set Project VisibilityInvite CollaboratorsCollaborator Permissions
Export and Import Project Content
Set Up ExportsSet Up Imports
See the Assets for Your ProjectPromote Projects to ProductionTransfer Project OwnershipIntegrate Jira
Domino Datasets
Manage Large DataDatasets Best PracticesCreate a DatasetUse an Existing DatasetFile Location of Datasets in Projects
Datasets and Snapshots
Update a DatasetAdd Tags to SnapshotsCreate a Snapshot of a DatasetDelete Snapshots of DatasetsDelete a Dataset
Upgrade from Versions Prior to 4.5
External Data
Considerations for Connecting to Data Sources
External Data Volumes
Mount an External VolumeView Mounted VolumesUse a Mounted VolumeUmount a Volume
Tips: Transfer Data Over a Network
Workspaces
Create a Workspace
Open a VS Code WorkspaceSet Custom Preferences for RStudio Workspaces
Workspace Settings
Edit Workspace SettingsChange Your Workspace's Volume SizeConfigure Long-Running Workspaces
Save Work in a WorkspaceSync ChangesView WorkspacesStop a WorkspaceResume a WorkspaceDelete a WorkspaceView Workspace LogsView Workspace UsageView Workspace HistoryWork with Legacy Workspaces
Use Git in Your Workspace
Commit and Push Changes to Your Git RepositoryCommit All Changes to Your Git RepositoryPull the Latest Changes from Your Git Repository
Run Multiple Applications in a Workspace
Clusters
Spark on Domino
Hadoop and Spark Overview
Connect to a Cloudera CDH5 cluster from DominoConnect to a Hortonworks cluster from DominoConnect to a MapR cluster from DominoConnect to an Amazon EMR cluster from DominoRun Local Spark on a Domino ExecutorUse PySpark in Jupyter WorkspacesKerberos Authentication
On-Demand Spark Overview
Validated Spark VersionConfigure PrerequisitesWork with your ClusterManage DependenciesWork with Data
On-Demand Ray Overview
Validated Ray VersionConfigure PrerequisitesWork with your ClusterManage DependenciesWork with Data
On-Demand Dask Overview
Validated Dask VersionConfigure PrerequisitesWork with Your ClusterManage DependenciesWork with Data
Environments
Set a Default EnvironmentCreate an EnvironmentEdit Environment DefinitionView Your EnvironmentsView Environment RevisionsDuplicate an EnvironmentArchive an Environment
Environments
Example: Create a New Environment
Customize Environments
Install Custom Packages with Git Integration
Add Packages to Environments
Use Dockerfile InstructionsUse requirements.txt (Python only)Use the Execution to Add a Package
Add Workspace IDEsAdd a Scala KernelAccess Additional Domains and HostnamesUse TensorBoard in Jupyter Workspaces
Use Partner Environments
Use MATLAB as a WorkspaceUse Stata as a WorkspaceAdd an NVIDIA NGC to DominoUse SAS as a Workspace
Executions
Execution StatesDomino Environment Variables
Jobs
Start a JobScheduled Jobs
Launchers
Launchers OverviewCreate a LauncherRun a LauncherCopy Launcher Definitions
View Job DetailsCompare JobsTag JobsStop JobsView Execution Performance
Execution Notifications
Set Notification PreferencesSet Custom Execution Notifications
Execution Results
Download Execution ResultsCustomize the Results DashboardAutomate Complex Pipelines with Apache Airflow
Model APIs
Configure a Model for Deployment
Scale Models
Scale Python ModelsScale Model Versions
Configure Compute ResourcesRoute Your ModelProject Files in ModelsEnvironments for ModelsShare and Collaborate on Models
Publish
Model APIs
Publish a ModelSend Test Calls to the ModelPublish a New Version of a ModelSelect How to Authorize a Model
Domino Apps
Publish a Domino AppHost HTML Pages from DominoGrant Access to Domino AppsView a Domino AppView All Domino AppsIdentify Resources to WhitelistPublish a Python App with DashPublish an R App with ShinyPublish a Project as a Website with FlaskOptimize App Scalability and PerformanceGet the Domino Username of an App Viewer
Launchers
Create a LauncherRun a LauncherCopy Launcher Definitions
Model Monitoring
Model Monitoring APIsAccessing The Model MonitorGet Started with Model MonitoringModel Monitor DeploymentIngest Data into The Model MonitorModel RegistrationMonitoring Data DriftMonitoring Model QualitySetting Scheduled Checks for the ModelConfigure Notification Channels for the ModelUse Model Monitoring APIsProduct Settings
Domino Command Line Interface (CLI)
Install the Domino Command Line Interface (CLI)Domino CLI ReferenceDownload Files with the CLIForce-Restore a Local ProjectMove a Project Between DeploymentsUse the Domino CLI Behind a Proxy
Troubleshooting
Troubleshoot Domino ModelsWork with Many FilesTroubleshoot Imports
Get Help
Additional ResourcesGet Domino VersionContact Technical SupportSupport BundlesBrowser SupportUser Guide Updates
domino logo
About Domino
Domino Data LabKnowledge BaseData Science BlogTraining
User Guide
>
Get Started
>
Get started with R
>
Step 2: Configure your project

Step 2: Configure your project

Every project has its own settings. The following options are important to consider when configuring a new project:

  • Hardware Tier

  • Environment

  • Collaborators

Step 2.1: Select your hardware tier

A Hardware Tier represents the compute resources that will be available for your run. You can specify memory, CPU cores, and GPUs with hardware tiers.

The hardware tier dropdown menu lists your available options. The selected hardware tier will be used by default for all subsequent executions of code in the project. It can also be changed at any point in the future.

  1. In the Project menu, click Settings.

  2. Click the Hardware tier menu to select the compute resource from which to execute your code. Choose the smallest or default hardware tier for this tutorial. Your options might look different from the following image.

    Hardware tier dropdown

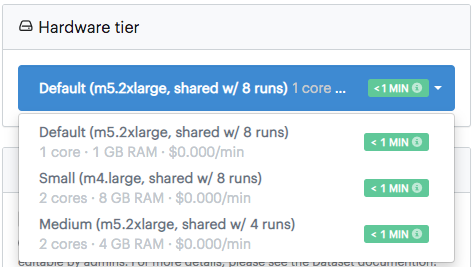
    This list of available hardware tiers is customizable by your Domino administrators. If you want additional resources, contact your Domino administrator.

Step 2.2: Configure your environment

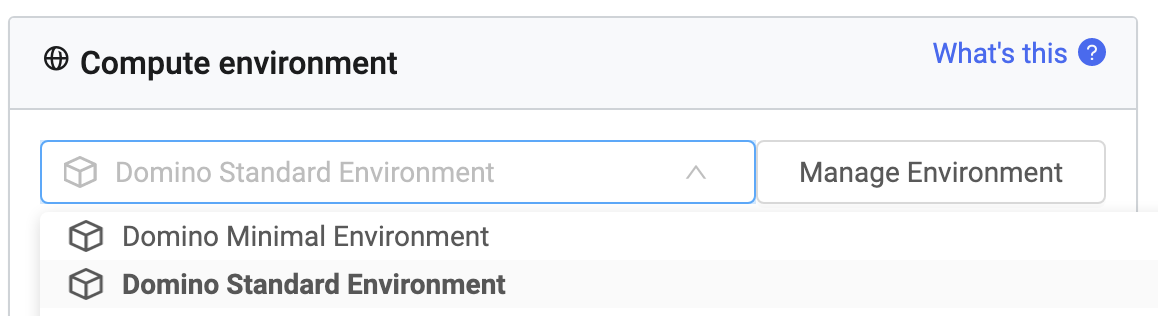
An Environment is a Domino abstraction on top of a Docker image that provides additional flexibility and versioning. You can configure the software, packages, libraries, and drivers that you need in your environment.

Domino comes with a default environment called the Domino Standard Environment, which includes Python, R, Jupyter, RStudio, and key data science related packages and libraries.

  1. Click the Compute Environment menu to select the default project Environment.

Compute environment dropdown

Your compute environment dropdown will likely have different options. If you’re interested in learning how to add more packages and customize or create your own Environment, see the help article on Domino Environments.

Compute environment dropdown

Step 2.3: Configure the project permissions

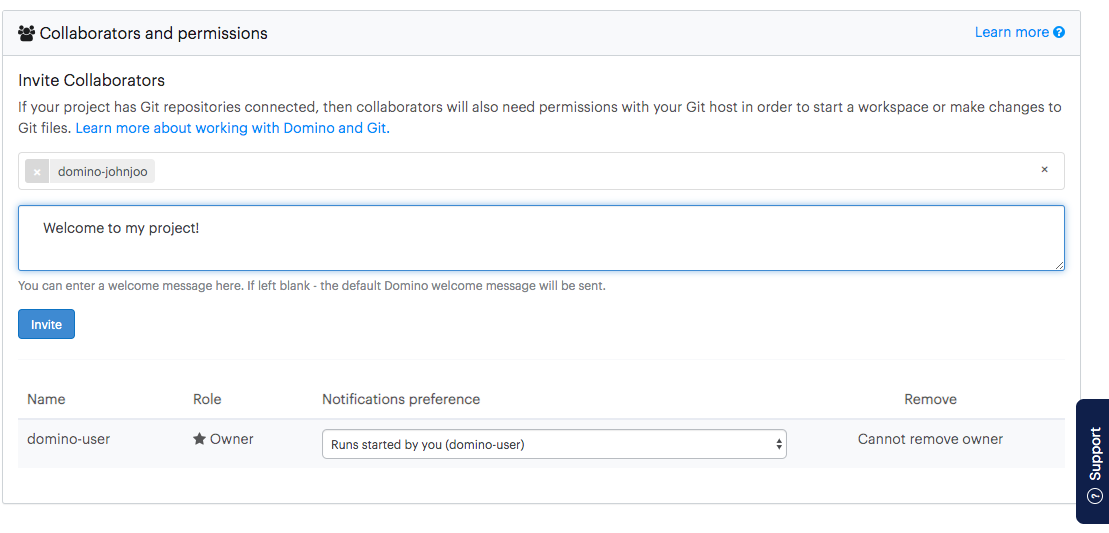
As the owner of the project, you can set different access levels for collaborators and colleagues. Feel free to invite a colleague to be a Contributor to your project.

  1. Click the Access & Sharing tab.

    collaborator panel

  2. (Optional) Enter the email or the username of the user that you would like to invite.

  3. (Optional) Enter a welcome message to be sent to your collaborator.

The Contributor role allows the invited user to read, write, and execute code in this project.

See Collaborator Permissions for more information about permissions for each collaborator role.

Domino Data LabKnowledge BaseData Science BlogTraining
Copyright © 2022 Domino Data Lab. All rights reserved.