domino logo
Tech Ecosystem
Get started with Python
Step 0: Orient yourself to DominoStep 1: Create a projectStep 2: Configure your projectStep 3: Start a workspaceStep 4: Get your files and dataStep 5: Develop your modelStep 6: Clean up WorkspacesStep 7: Deploy your model
Get started with R
Step 0: Orient yourself to Domino (R Tutorial)Step 1: Create a projectStep 2: Configure your projectStep 3: Start a workspaceStep 4: Get your files and dataStep 5: Develop your modelStep 6: Clean up WorkspacesStep 7: Deploy your model
Get Started with MATLAB
Step 1: Orient yourself to DominoStep 2: Create a Domino ProjectStep 3: Configure Your Domino ProjectStep 4: Start a MATLAB WorkspaceStep 5: Fetch and Save Your DataStep 6: Develop Your ModelStep 7: Clean Up Your Workspace
Step 8: Deploy Your Model
Scheduled JobsLaunchers
Step 9: Working with Domino Datasets
Domino Reference
Projects
Projects OverviewProjects PortfolioReference ProjectsProject Goals in Domino 4+
Git Integration
Git Repositories in DominoGit-based ProjectsWorking from a Commit ID in Git
Jira Integration in DominoUpload Files to Domino using your BrowserFork and Merge ProjectsSearchSharing and CollaborationCommentsDomino File SystemCompare File Revisions
Revert Projects and Files
Revert a FileRevert a Project
Archive a Project
Advanced Project Settings
Project DependenciesProject TagsRename a ProjectSet up your Project to Ignore FilesUpload files larger than 550MBExporting Files as a Python or R PackageTransfer Project Ownership
Domino Runs
JobsDiagnostic Statistics with dominostats.jsonNotificationsResultsRun Comparison
Advanced Options for Domino Runs
Run StatesDomino Environment VariablesEnvironment Variables for Secure Credential StorageUse Apache Airflow with Domino
Scheduled Jobs
Domino Workspaces
WorkspacesUse Git in Your WorkspaceRecreate A Workspace From A Previous CommitUse Visual Studio Code in Domino WorkspacesPersist RStudio PreferencesAccess Multiple Hosted Applications in one Workspace Session
Spark on Domino
On-Demand Spark
On-Demand Spark OverviewValidated Spark VersionConfigure PrerequisitesWork with your ClusterManage DependenciesWork with Data
External Hadoop and Spark
Hadoop and Spark OverviewConnect to a Cloudera CDH5 cluster from DominoConnect to a Hortonworks cluster from DominoConnect to a MapR cluster from DominoConnect to an Amazon EMR cluster from DominoRun Local Spark on a Domino ExecutorUse PySpark in Jupyter WorkspacesKerberos Authentication
On-Demand Ray
On-Demand Ray OverviewValidated Ray VersionConfigure PrerequisitesWork with your ClusterManage DependenciesWork with Data
On-Demand Dask
On-Demand Dask OverviewValidated Dask VersionConfigure PrerequisitesWork with Your ClusterManage DependenciesWork with Data
Customize the Domino Software Environment
Environment ManagementDomino Standard EnvironmentsInstall Packages and DependenciesAdd Workspace IDEsAdding Jupyter Kernels
Partner Environments for Domino
Use MATLAB as a WorkspaceUse Stata as a WorkspaceUse SAS as a WorkspaceNVIDIA NGC Containers
Advanced Options for Domino Software Environment
Install Custom Packages in Domino with Git IntegrationAdd Custom DNS Servers to Your Domino EnvironmentConfigure a Compute Environment to User Private Cran/Conda/PyPi MirrorsUse TensorBoard in Jupyter Workspaces
Publish your Work
Publish a Model API
Model Publishing OverviewModel Invocation SettingsModel Access and CollaborationModel Deployment ConfigurationPromote Projects to ProductionExport Model Image
Publish a Web Application
App Publishing OverviewGet Started with DashGet Started with ShinyGet Started with FlaskContent Security Policies for Web Apps
Advanced Web Application Settings in Domino
App Scaling and PerformanceHost HTML Pages from DominoHow to Get the Domino Username of an App Viewer
Launchers
Launchers OverviewAdvanced Launcher Editor
Assets Portfolio Overview
Model Monitoring and Remediation
Monitor WorkflowsData Drift and Quality Monitoring
Set up Monitoring for Model APIs
Set up Prediction CaptureSet up Drift DetectionSet up Model Quality MonitoringSet up NotificationsSet Scheduled ChecksSet up Cohort Analysis
Set up Model Monitor
Connect a Data SourceRegister a ModelSet up Drift DetectionSet up Model Quality MonitoringSet up Cohort AnalysisSet up NotificationsSet Scheduled ChecksUnregister a Model
Use Monitoring
Access the Monitor DashboardAnalyze Data DriftAnalyze Model QualityExclude Features from Scheduled Checks
Remediation
Cohort Analysis
Review the Cohort Analysis
Remediate a Model API
Monitor Settings
API TokenHealth DashboardNotification ChannelsTest Defaults
Monitoring Config JSON
Supported Binning Methods
Model Monitoring APIsTroubleshoot the Model Monitor
Connect to your Data
Data in Domino
Datasets OverviewProject FilesDatasets Best Practices
Connect to Data Sources
External Data VolumesDomino Data Sources
Connect to External Data
Connect to Amazon S3 from DominoConnect to BigQueryConnect to DataRobotConnect to Generic S3 from DominoConnect to IBM DB2Connect to IBM NetezzaConnect to ImpalaConnect to MSSQLConnect to MySQLConnect to OkeraConnect to Oracle DatabaseConnect to PostgreSQLConnect to RedshiftConnect to Snowflake from DominoConnect to Teradata
Work with Data Best Practices
Work with Big Data in DominoWork with Lots of FilesMove Data Over a Network
Advanced User Configuration Settings
User API KeysDomino TokenOrganizations Overview
Use the Domino Command Line Interface (CLI)
Install the Domino Command Line (CLI)Domino CLI ReferenceDownload Files with the CLIForce-Restore a Local ProjectMove a Project Between Domino DeploymentsUse the Domino CLI Behind a Proxy
Browser Support
Get Help with Domino
Additional ResourcesGet Domino VersionContact Domino Technical SupportSupport Bundles
domino logo
About Domino
Domino Data LabKnowledge BaseData Science BlogTraining
User Guide
>
Domino Reference
>
Model Monitoring and Remediation
>
Set up Model Monitor
>
Set up Model Quality Monitoring

Set up Model Quality Monitoring

Ground truth data consists of known correct outputs for each input. Model quality monitoring compares the model’s predicted values against the actual results (or labels for the predictions) using ground truth data to generate quality metrics.

After you set up your model to capture prediction data, you can ingest the model’s ground truth data to monitor the quality of predictions made by the model. For this analysis, you must have declared a row_identifier column for the prediction data schema. This row_identifier column must also be present in the ground truth data to map a prediction uniquely to the ground truth.

When you apply a date filter, Domino uses the timestamp values in the prediction data to filter the results. Then, it matches the filtered predictions with the ground truth labels ingested in the last 90 days and calculates the model quality metrics for the matched predictions.

Ingest ground truth data

You can use the Domino application or a REST API to ingest ground truth data. For details, see Model Monitoring APIs.

  1. In the navigation pane, click Model Monitor.

  2. Click the model for which you want to ingest ground truth data.

  3. Click Model Quality.

    Note
  4. On the Model Quality page of the registered model, click Register Ground Truth < Upload Ground Truth Config.

    In the Register Ground Truth window, you can upload a Ground Truth Config file or paste a JSON config. This JSON must capture all the information needed to register ground truth data.
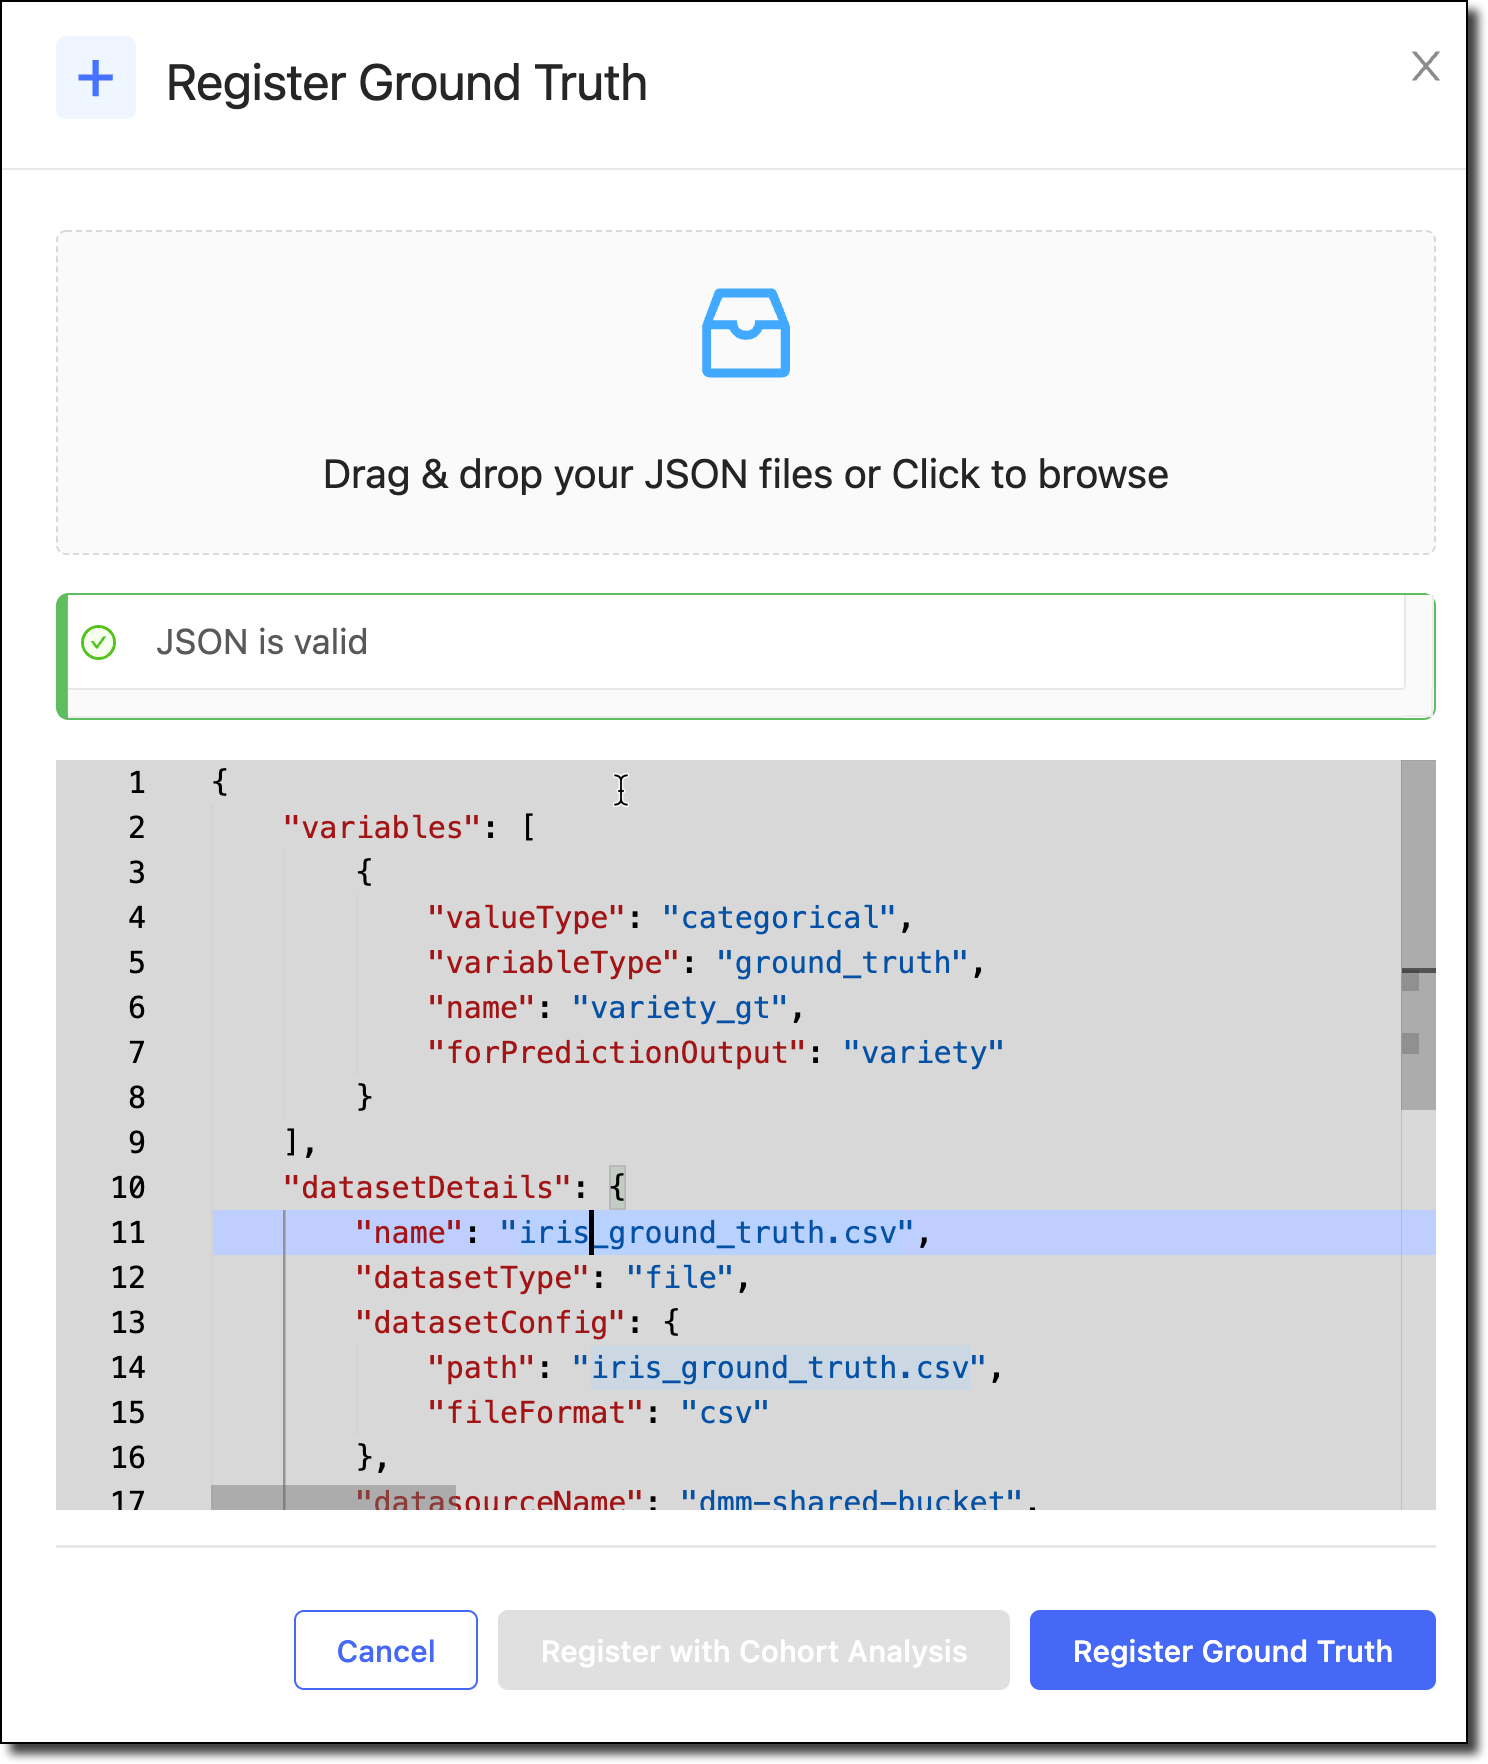
    Upload a file or add JSON to the Register Ground Truth window.

    The following is a sample file. Your file must define the variableType as ground_truth. Do not include any other variableTypes. The configuration must always include the datasetDetails and modelMetadata information. See Monitoring Config JSON for details about each field in the JSON.

    {
    "variables": [
      {
        "name": "y_gt",
        "variableType": "ground_truth",
        "valueType": "categorical",
        "forPredictionOutput": "y"
      }
    ],
    "datasetDetails": {
      "name": "GT-labels.csv",
      "datasetType": "file",
      "datasetConfig": {
        "path": "GT-labels.csv",
        "fileFormat": "csv"
      },
      "datasourceName": "abc-shared-bucket",
      "datasourceType": "s3"
    }
    }
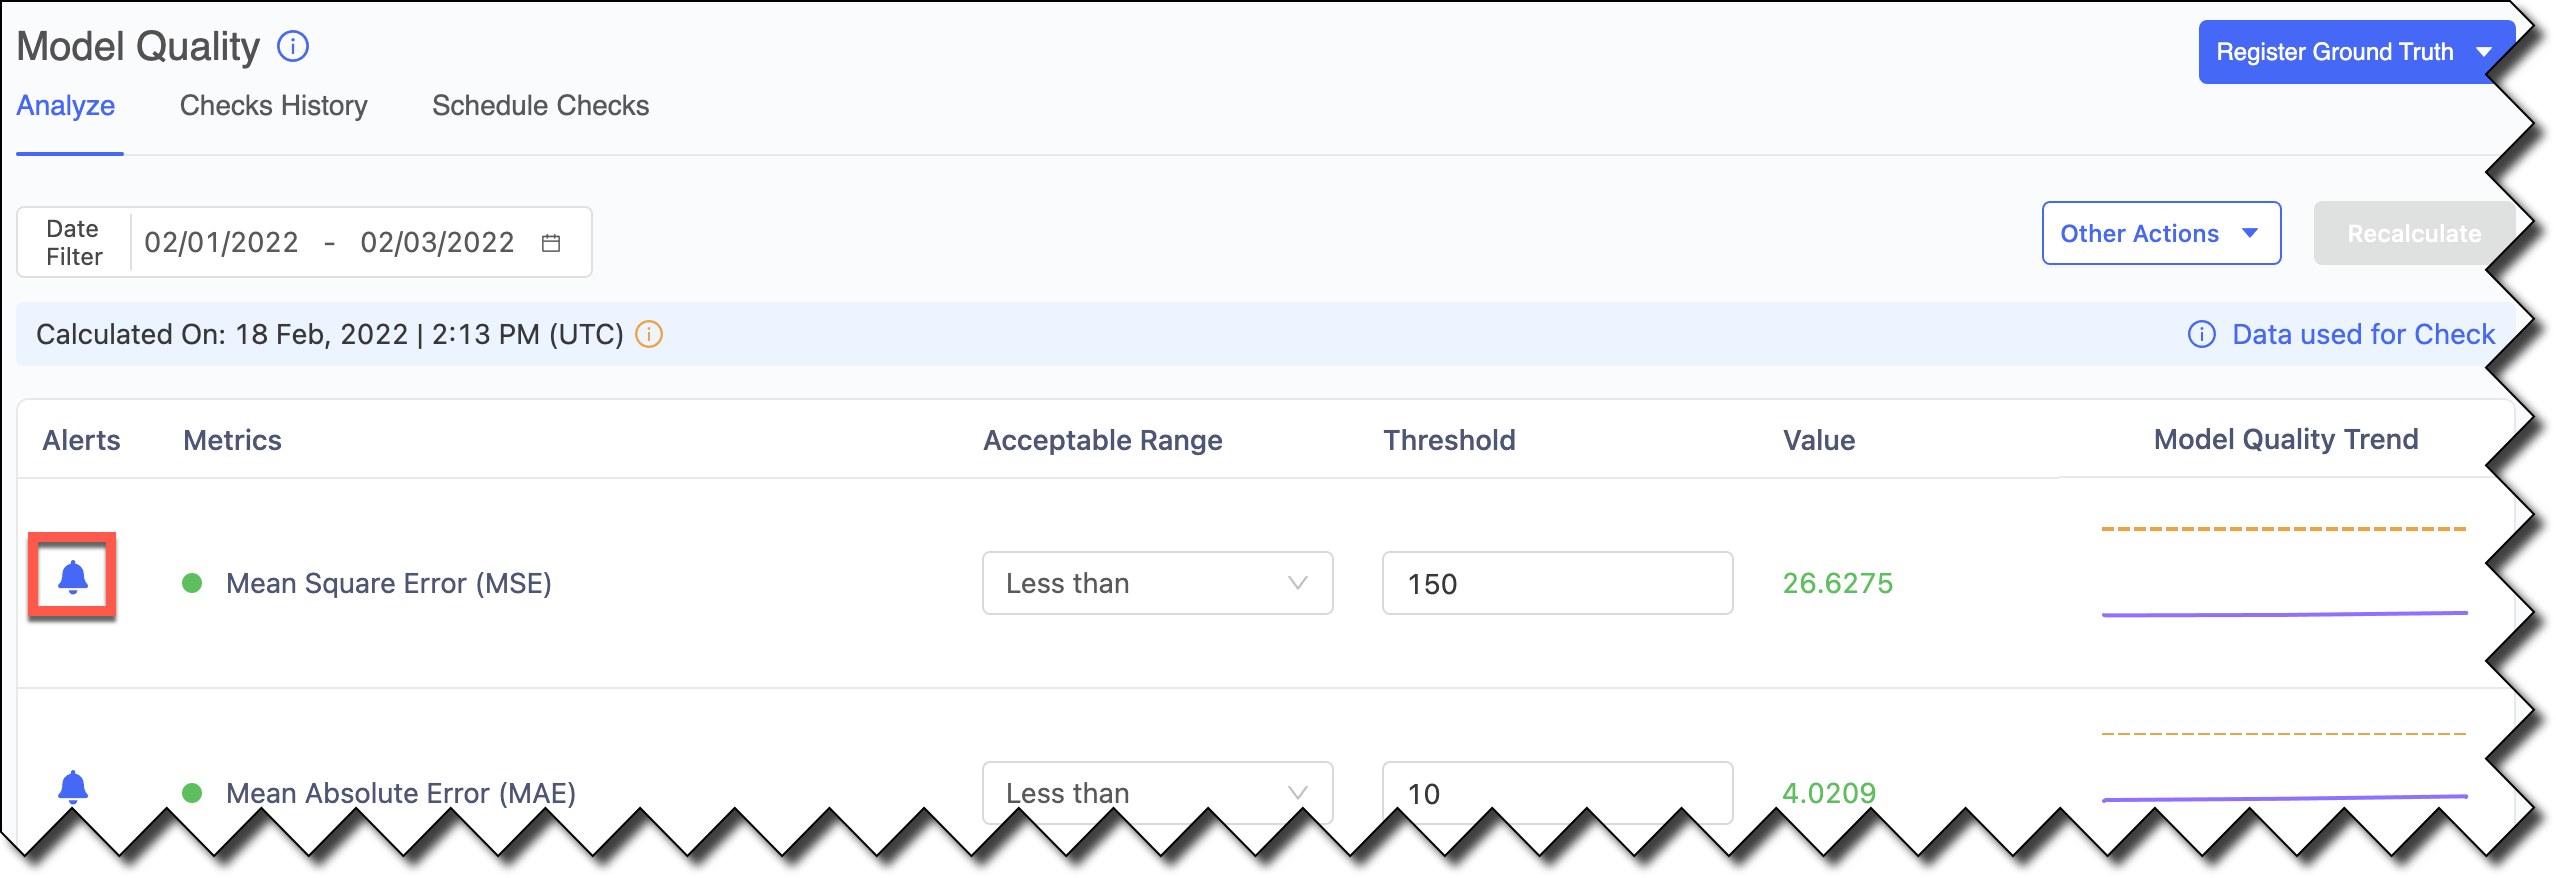
  5. Click Register Ground Truth. On the Model Quality Analyze page, the Model Monitor starts to calculate model quality metrics for this dataset.

    The Model Quality window has a bell icon to enable and disable alerts.

  6. Click the bell icon to disable the alerts. Doing this reduces noise by controlling the metrics included in the Scheduled Checks.

Check the status of ground truth data

After you register the ground truth data for ingestion, you might want to check its status.

  1. From the navigation pane, click Model Monitor.

  2. Click the name of the model for which you set up ground truth data ingestion.

  3. On the Overview page’s Data Traffic tab, you can see the history of the ingested data and review the model’s metadata and schema.

  4. Click Ingest History to check to see if the status is Done. The following are other statuses you might see:

    Completed with Warnings

    Click the three vertical dots at the end of the row and click View Details.

    Failed

    Click the three vertical dots at the end of the row and click View Details.

    If the ingestion failed, Domino stops the continuous ingestion. After you fix the issue, re-register the prediction data and Domino restarts continuous ingestion from this point.

    Note
    Skipped

    The dataset had no rows to fetch.

    You can click Status to select checkboxes to filter by status.

  5. Click Refresh to see a graph of the Data Ingest Timeline.

    After the data is ingested, you can perform an ad-hoc model quality analysis to validate your setup. Then, set up a schedule to perform model quality analysis automatically.

Domino Data LabKnowledge BaseData Science BlogTraining
Copyright © 2022 Domino Data Lab. All rights reserved.