domino logo
Tech Ecosystem
Get started with Python
Step 0: Orient yourself to DominoStep 1: Create a projectStep 2: Configure your projectStep 3: Start a workspaceStep 4: Get your files and dataStep 5: Develop your modelStep 6: Clean up WorkspacesStep 7: Deploy your model
Get started with R
Step 0: Orient yourself to Domino (R Tutorial)Step 1: Create a projectStep 2: Configure your projectStep 3: Start a workspaceStep 4: Get your files and dataStep 5: Develop your modelStep 6: Clean up WorkspacesStep 7: Deploy your model
Get Started with MATLAB
Step 1: Orient yourself to DominoStep 2: Create a Domino ProjectStep 3: Configure Your Domino ProjectStep 4: Start a MATLAB WorkspaceStep 5: Fetch and Save Your DataStep 6: Develop Your ModelStep 7: Clean Up Your Workspace
Step 8: Deploy Your Model
Scheduled JobsLaunchers
Step 9: Working with Domino Datasets
Domino Reference
Projects
Projects OverviewProjects PortfolioReference ProjectsProject Goals in Domino 4+
Git Integration
Git Repositories in DominoGit-based ProjectsWorking from a Commit ID in Git
Jira Integration in DominoUpload Files to Domino using your BrowserFork and Merge ProjectsSearchSharing and CollaborationCommentsDomino File SystemCompare File Revisions
Revert Projects and Files
Revert a FileRevert a Project
Archive a Project
Advanced Project Settings
Project DependenciesProject TagsRename a ProjectSet up your Project to Ignore FilesUpload files larger than 550MBExporting Files as a Python or R PackageTransfer Project Ownership
Domino Runs
JobsDiagnostic Statistics with dominostats.jsonNotificationsResultsRun Comparison
Advanced Options for Domino Runs
Run StatesDomino Environment VariablesEnvironment Variables for Secure Credential StorageUse Apache Airflow with Domino
Scheduled Jobs
Domino Workspaces
WorkspacesUse Git in Your WorkspaceRecreate A Workspace From A Previous CommitUse Visual Studio Code in Domino WorkspacesPersist RStudio PreferencesAccess Multiple Hosted Applications in one Workspace Session
Spark on Domino
On-Demand Spark
On-Demand Spark OverviewValidated Spark VersionConfigure PrerequisitesWork with your ClusterManage DependenciesWork with Data
External Hadoop and Spark
Hadoop and Spark OverviewConnect to a Cloudera CDH5 cluster from DominoConnect to a Hortonworks cluster from DominoConnect to a MapR cluster from DominoConnect to an Amazon EMR cluster from DominoRun Local Spark on a Domino ExecutorUse PySpark in Jupyter WorkspacesKerberos Authentication
On-Demand Ray
On-Demand Ray OverviewValidated Ray VersionConfigure PrerequisitesWork with your ClusterManage DependenciesWork with Data
On-Demand Dask
On-Demand Dask OverviewValidated Dask VersionConfigure PrerequisitesWork with Your ClusterManage DependenciesWork with Data
Customize the Domino Software Environment
Environment ManagementDomino Standard EnvironmentsInstall Packages and DependenciesAdd Workspace IDEsAdding Jupyter Kernels
Partner Environments for Domino
Use MATLAB as a WorkspaceUse Stata as a WorkspaceUse SAS as a WorkspaceNVIDIA NGC Containers
Advanced Options for Domino Software Environment
Install Custom Packages in Domino with Git IntegrationAdd Custom DNS Servers to Your Domino EnvironmentConfigure a Compute Environment to User Private Cran/Conda/PyPi MirrorsUse TensorBoard in Jupyter Workspaces
Publish your Work
Publish a Model API
Model Publishing OverviewModel Invocation SettingsModel Access and CollaborationModel Deployment ConfigurationPromote Projects to ProductionExport Model Image
Publish a Web Application
App Publishing OverviewGet Started with DashGet Started with ShinyGet Started with FlaskContent Security Policies for Web Apps
Advanced Web Application Settings in Domino
App Scaling and PerformanceHost HTML Pages from DominoHow to Get the Domino Username of an App Viewer
Launchers
Launchers OverviewAdvanced Launcher Editor
Assets Portfolio Overview
Model Monitoring and Remediation
Monitor WorkflowsData Drift and Quality Monitoring
Set up Monitoring for Model APIs
Set up Prediction CaptureSet up Drift DetectionSet up Model Quality MonitoringSet up NotificationsSet Scheduled ChecksSet up Cohort Analysis
Set up Model Monitor
Connect a Data SourceRegister a ModelSet up Drift DetectionSet up Model Quality MonitoringSet up Cohort AnalysisSet up NotificationsSet Scheduled ChecksUnregister a Model
Use Monitoring
Access the Monitor DashboardAnalyze Data DriftAnalyze Model QualityExclude Features from Scheduled Checks
Remediation
Cohort Analysis
Review the Cohort Analysis
Remediate a Model API
Monitor Settings
API TokenHealth DashboardNotification ChannelsTest Defaults
Monitoring Config JSON
Supported Binning Methods
Model Monitoring APIsTroubleshoot the Model Monitor
Connect to your Data
Data in Domino
Datasets OverviewProject FilesDatasets Best Practices
Connect to Data Sources
External Data VolumesDomino Data Sources
Connect to External Data
Connect to Amazon S3 from DominoConnect to BigQueryConnect to DataRobotConnect to Generic S3 from DominoConnect to IBM DB2Connect to IBM NetezzaConnect to ImpalaConnect to MSSQLConnect to MySQLConnect to OkeraConnect to Oracle DatabaseConnect to PostgreSQLConnect to RedshiftConnect to Snowflake from DominoConnect to Teradata
Work with Data Best Practices
Work with Big Data in DominoWork with Lots of FilesMove Data Over a Network
Advanced User Configuration Settings
User API KeysDomino TokenOrganizations Overview
Use the Domino Command Line Interface (CLI)
Install the Domino Command Line (CLI)Domino CLI ReferenceDownload Files with the CLIForce-Restore a Local ProjectMove a Project Between Domino DeploymentsUse the Domino CLI Behind a Proxy
Browser Support
Get Help with Domino
Additional ResourcesGet Domino VersionContact Domino Technical SupportSupport Bundles
domino logo
About Domino
Domino Data LabKnowledge BaseData Science BlogTraining
User Guide
>
Domino Reference
>
Connect to your Data
>
Connect to Data Sources
>
Connect to External Data
>
Connect to Snowflake from Domino

Connect to Snowflake from Domino

Snowflake is a cloud-based data-warehouse. This topic describes how to connect to Snowflake from Domino.

Prerequisites

You must have network connectivity between Snowflake and your Domino deployment.

To use Snowflake code integrations, such as Snowpark, you must agree to the Snowflake third party terms. To agree to these terms, you must have a Snowflake account with the ORGADMIN role. If you don’t have access to a Snowflake account with the ORGADMIN role, submit a Snowflake support ticket.

Create a Snowflake data source

Domino recommends that you use a Domino data source to connect to a Snowflake instance from Domino.

  1. From the navigation pane, click Data.

  2. Click Create a Data Source.

  3. In the New Data Source window, from Select Data Store, select Snowflake.
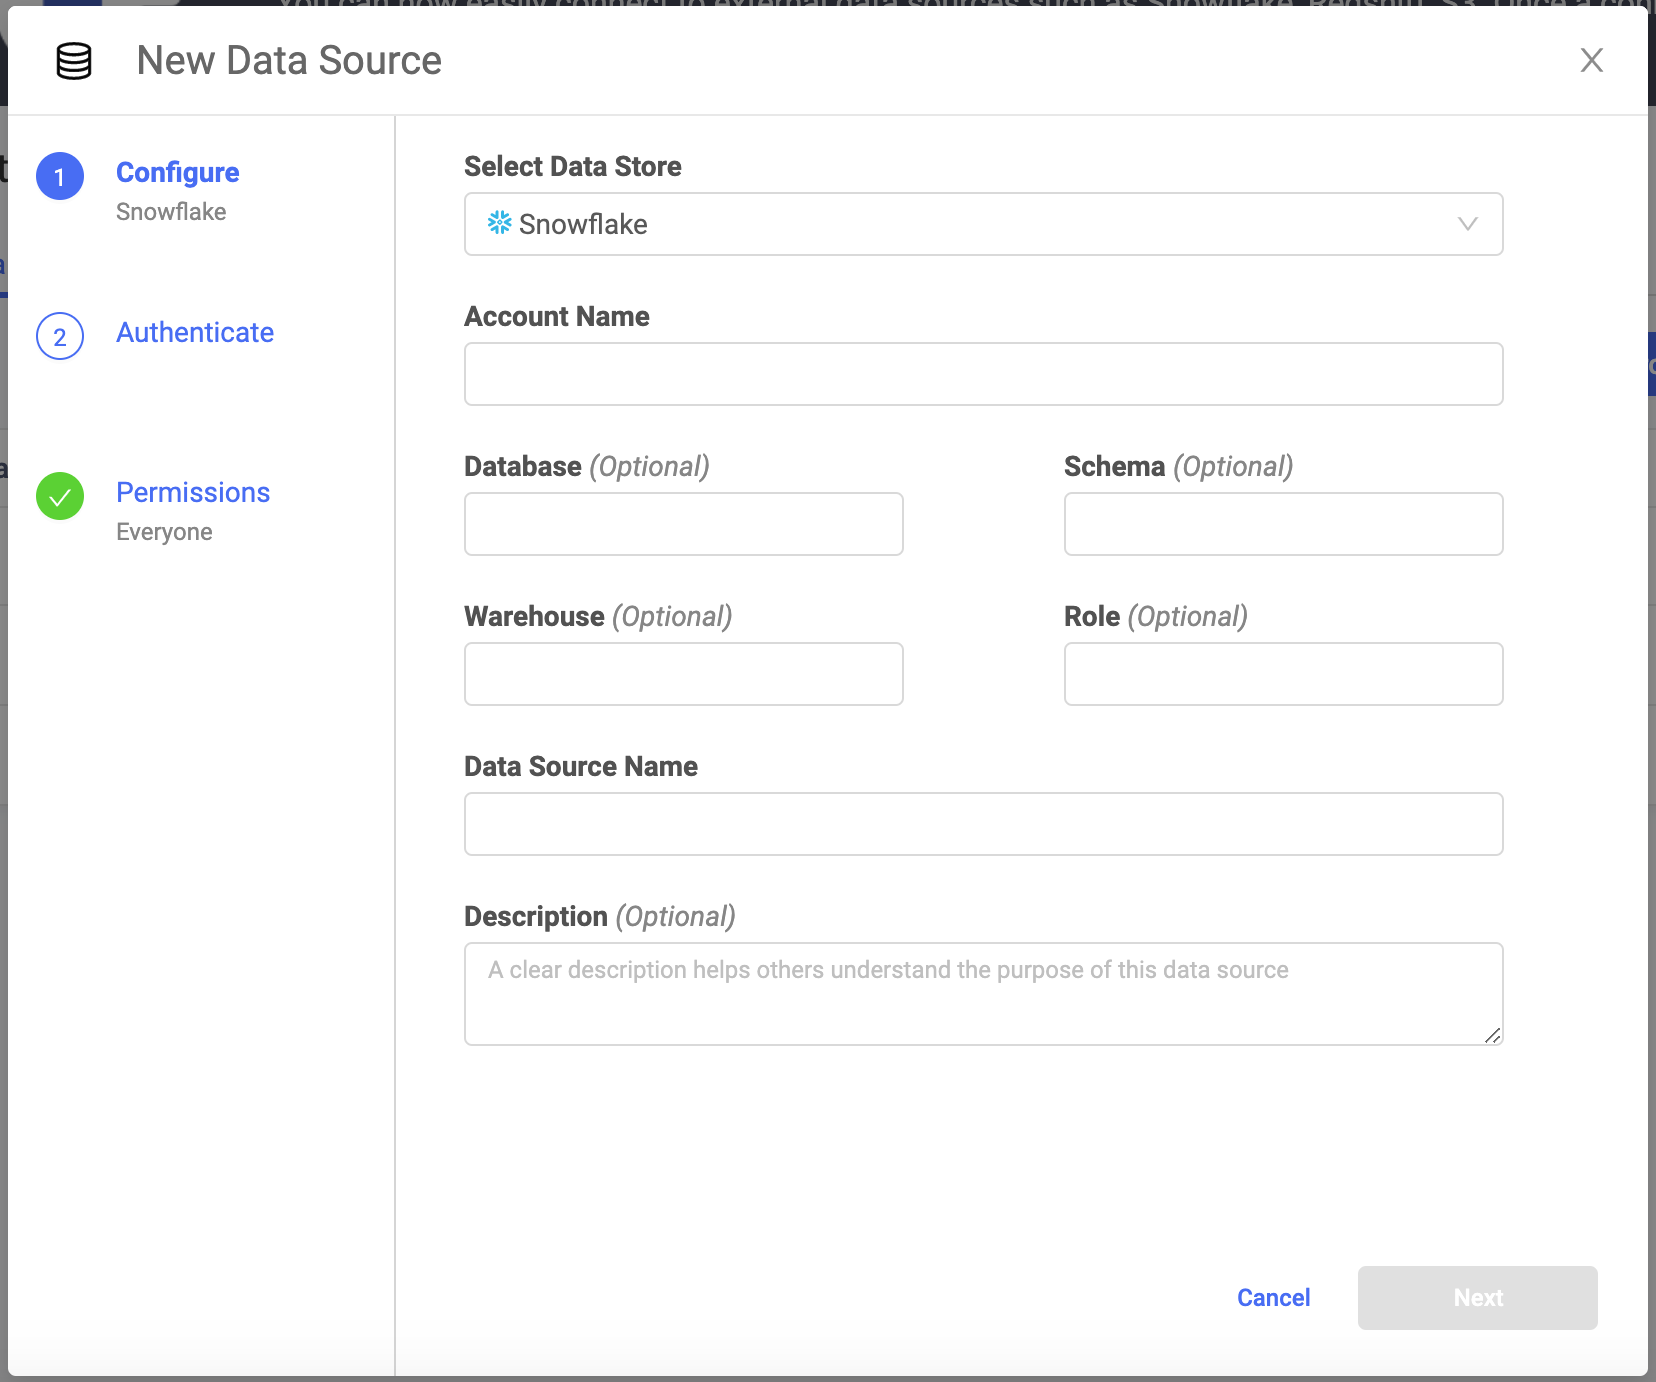
    new data source snowflake

    Account Name

    If the Domino deployment and Snowflake data source, are in the same region, enter the Account Name as <account name>. However, if the Domino deployment and Snowflake data source are in different regions, enter the Account Name as <account name>.<region>. For example, abc.us-east.

    Optional: Database

    The name of the Snowflake database that contains the data.

    Optional: Schema

    The name of the active schema for the session.

    Optional: Warehouse

    The name of all the compute resource clusters that provide the resources in Snowflake.

    Optional: Role

    The role that has privileges to the data source.

    Data Source Name

    The name that identifies the data source.

    Optional: Description

    The purpose for the data source.

  4. Click Next.

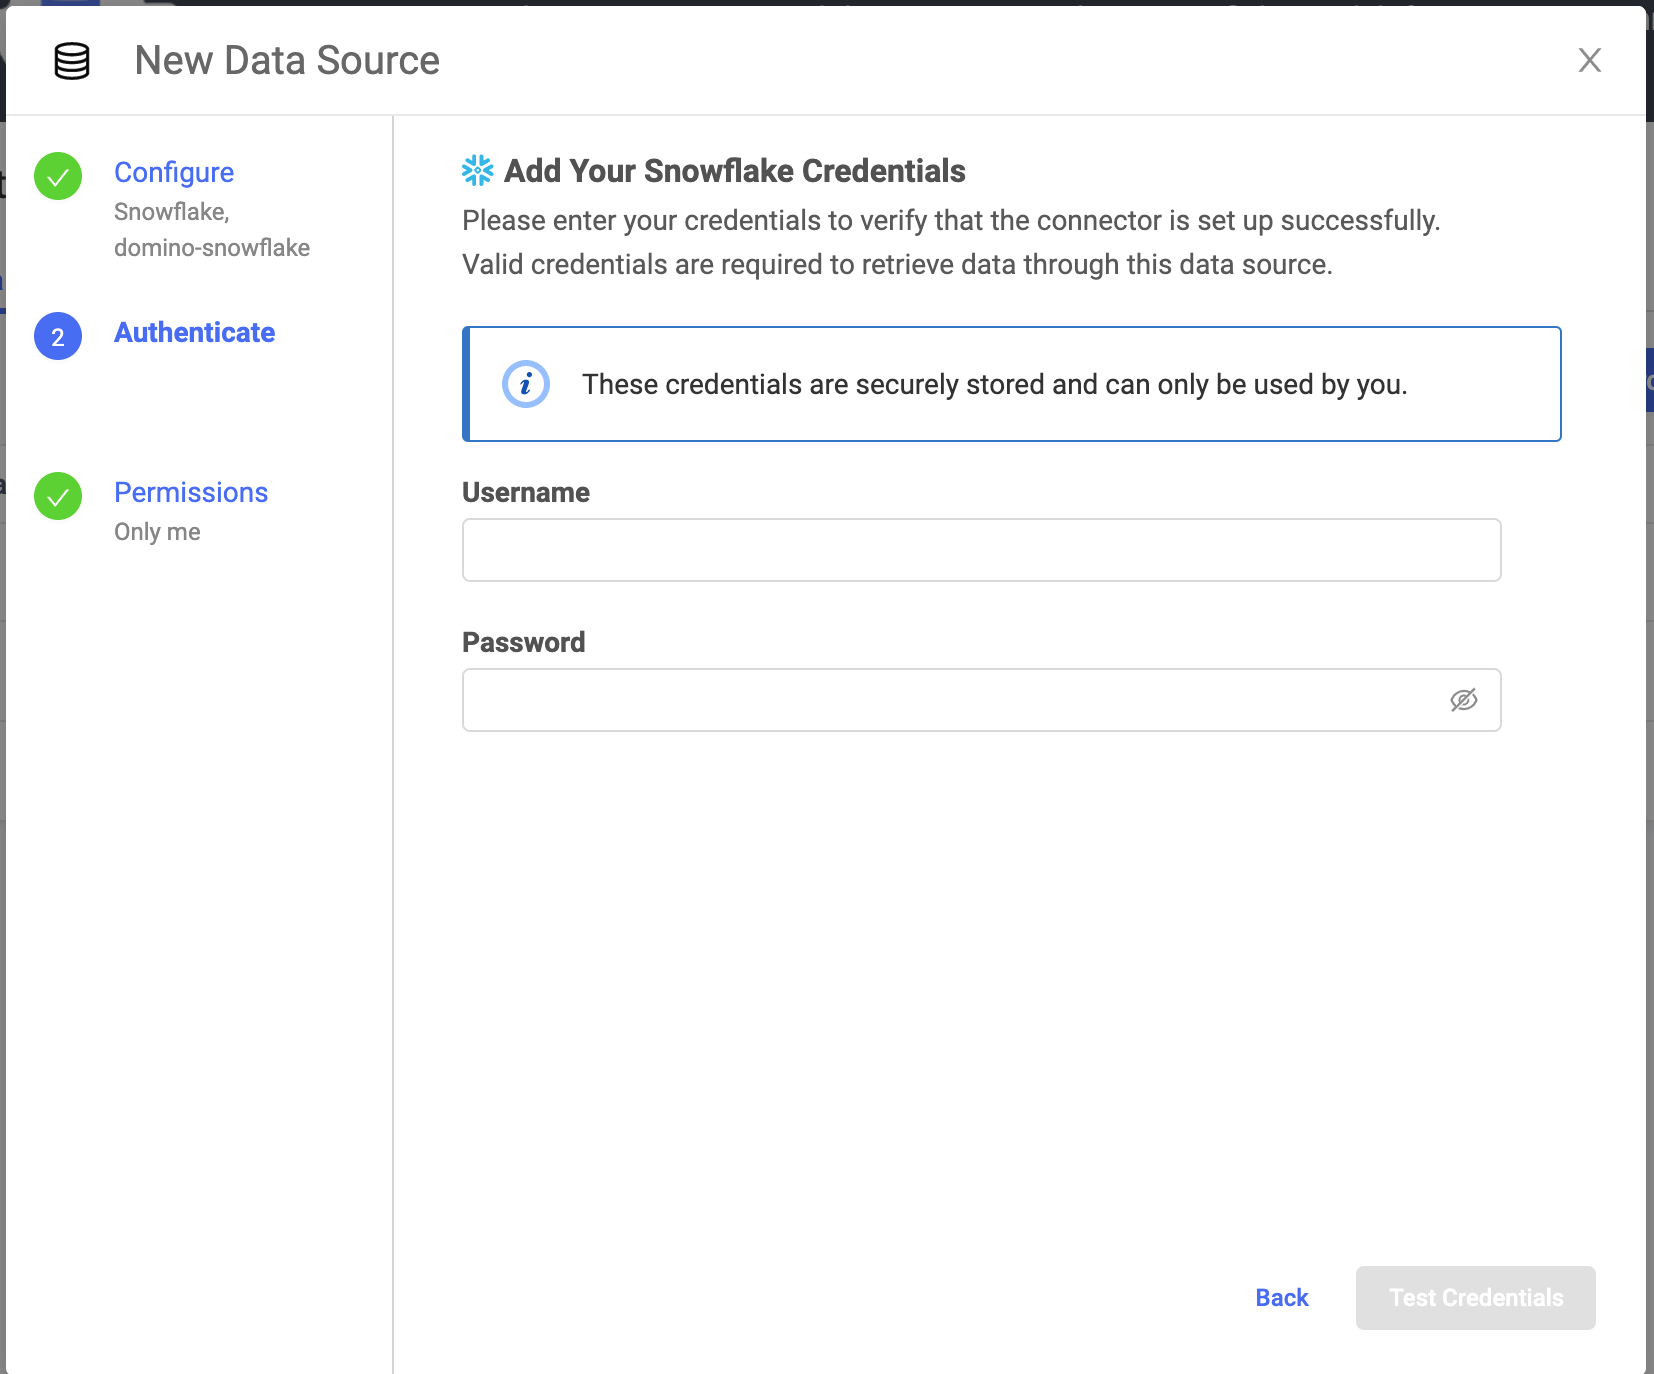
  5. Enter the Username and Password to connect to Snowflake. Only basic (username/password) authentication is supported. The Domino secret store backed by HashiCorp Vault securely stores the credentials.

    credentials data source snowflake

  6. Click Test Credentials.

  7. If the data source authenticates, click Next (or Skip for Now to configure authentication later).

  8. Select who can view and use the data source in projects.

  9. Click Finish Setup.

If your users have Domino permissions to use the data source and enter their credentials, they can now use the Domino Data API to retrieve data with the connector.

See Retrieve data for more information.

Alternate way to connect to a Snowflake data source

Warning
  1. Use the Snowflake Python connector (snowflake-connector-python).

  2. Use the following Dockerfile instruction to install snowflake-connector-python and its dependencies in your environment.

USER root

RUN apt-get install -y libssl-dev libffi-dev && \
    pip install -U pip && pip install --upgrade snowflake-connector-python

USER ubuntu

+ If you encounter an error due to your Ubuntu version, use the following Dockerfile instruction:

+

USER root
RUN pip install -U pip && pip install --upgrade snowflake-connector-python
USER ubuntu
  1. Set the following Domino environment variables to store secure information about your Snowflake connection.

    • SNOWFLAKE_USER

    • SNOWFLAKE_PASSWORD

    • SNOWFLAKE_ACCOUNT

      See Environment variables for secure credential storage to learn more about Domino environment variables.

  2. See Snowflake python connector for information about how to use the package. The following is an example.

    import snowflake.connector
    import os
    
    # Gets the version
    ctx = snowflake.connector.connect(
      user=os.environ['SNOWFLAKE_USER'],
      password=os.environ['SNOWFLAKE_PASSWORD'],
      account=os.environ['SNOWFLAKE_ACCOUNT']
    
    cs = ctx.cursor()
    try:
      cs.execute("SELECT current_version()")
      one_row = cs.fetchone()
      print(one_row[0])
    finally:
      cs.close()
    ctx.close()

    You can also use generic Python JDBC or ODBC tools to connect to Snowflake. However, they are not specialized for use with Snowflake. They can have inferior performance and will require more time to set up.

    For more information about JDBC and ODBC connections, see:

    • https://docs.snowflake.net/manuals/user-guide/jdbc.html

    • https://docs.snowflake.net/manuals/user-guide/odbc.html

Domino Data LabKnowledge BaseData Science BlogTraining
Copyright © 2022 Domino Data Lab. All rights reserved.