domino logo
Tech Ecosystem
Get started with Python
Step 0: Orient yourself to DominoStep 1: Create a projectStep 2: Configure your projectStep 3: Start a workspaceStep 4: Get your files and dataStep 5: Develop your modelStep 6: Clean up WorkspacesStep 7: Deploy your model
Get started with R
Step 0: Orient yourself to Domino (R Tutorial)Step 1: Create a projectStep 2: Configure your projectStep 3: Start a workspaceStep 4: Get your files and dataStep 5: Develop your modelStep 6: Clean up WorkspacesStep 7: Deploy your model
Get Started with MATLAB
Step 1: Orient yourself to DominoStep 2: Create a Domino ProjectStep 3: Configure Your Domino ProjectStep 4: Start a MATLAB WorkspaceStep 5: Fetch and Save Your DataStep 6: Develop Your ModelStep 7: Clean Up Your Workspace
Step 8: Deploy Your Model
Scheduled JobsLaunchers
Step 9: Working with Domino Datasets
Domino Reference
Notifications
On-Demand Open MPI
Configure MPI PrerequisitesFile Sync MPI ClustersValidate MPI VersionWork with your ClusterManage Dependencies
Projects
Projects OverviewProjects PortfolioReference ProjectsProject Goals in Domino 4+
Git Integration
Git Repositories in DominoGit-based ProjectsWorking from a Commit ID in Git
Jira Integration in DominoUpload Files to Domino using your BrowserFork and Merge ProjectsSearchSharing and CollaborationCommentsDomino File SystemCompare File Revisions
Revert Projects and Files
Revert a FileRevert a Project
Archive a Project
Advanced Project Settings
Project DependenciesProject TagsRename a ProjectSet up your Project to Ignore FilesUpload files larger than 550MBExporting Files as a Python or R PackageTransfer Project Ownership
Domino Runs
JobsDiagnostic Statistics with dominostats.jsonNotificationsResultsRun Comparison
Advanced Options for Domino Runs
Run StatesDomino Environment VariablesEnvironment Variables for Secure Credential StorageUse Apache Airflow with Domino
Scheduled Jobs
Domino Workspaces
WorkspacesUse Git in Your WorkspaceRecreate A Workspace From A Previous CommitUse Visual Studio Code in Domino WorkspacesPersist RStudio PreferencesAccess Multiple Hosted Applications in one Workspace Session
Spark on Domino
On-Demand Spark
On-Demand Spark OverviewValidated Spark VersionConfigure PrerequisitesWork with your ClusterManage DependenciesWork with Data
External Hadoop and Spark
Hadoop and Spark OverviewConnect to a Cloudera CDH5 cluster from DominoConnect to a Hortonworks cluster from DominoConnect to a MapR cluster from DominoConnect to an Amazon EMR cluster from DominoRun Local Spark on a Domino ExecutorUse PySpark in Jupyter WorkspacesKerberos Authentication
On-Demand Ray
On-Demand Ray OverviewValidated Ray VersionConfigure PrerequisitesWork with your ClusterManage DependenciesWork with Data
On-Demand Dask
On-Demand Dask OverviewValidated Dask VersionConfigure PrerequisitesWork with Your ClusterManage DependenciesWork with Data
Customize the Domino Software Environment
Environment ManagementDomino Standard EnvironmentsInstall Packages and DependenciesAdd Workspace IDEsAdding Jupyter Kernels
Use Custom Images as a Compute Environment
Pre-requisites for Automatic Custom Image CompatibilityModify the Default Workspace ToolsCreate a Domino Image with an NGC ContainerCreate a Domino Environment with a Pre-Built ImageManually Modify Images for Domino Compatibility
Partner Environments for Domino
Use MATLAB as a WorkspaceUse Stata as a WorkspaceUse SAS as a Workspace
Advanced Options for Domino Software Environment
Publish in Domino with Custom ImagesInstall Custom Packages in Domino with Git IntegrationAdd Custom DNS Servers to Your Domino EnvironmentConfigure a Compute Environment to User Private Cran/Conda/PyPi MirrorsUse TensorBoard in Jupyter Workspaces
Publish your Work
Publish a Model API
Model Publishing OverviewModel Invocation SettingsModel Access and CollaborationModel Deployment ConfigurationPromote Projects to ProductionExport Model ImageExport to NVIDIA Fleet Command
Publish a Web Application
App Publishing OverviewGet Started with DashGet Started with ShinyGet Started with FlaskContent Security Policies for Web Apps
Advanced Web Application Settings in Domino
App Scaling and PerformanceHost HTML Pages from DominoHow to Get the Domino Username of an App Viewer
Launchers
Launchers OverviewAdvanced Launcher Editor
Assets Portfolio Overview
Model Monitoring and Remediation
Monitor WorkflowsData Drift and Quality Monitoring
Set up Monitoring for Model APIs
Set up Prediction CaptureSet up Drift DetectionSet up Model Quality MonitoringSet up NotificationsSet Scheduled ChecksSet up Cohort Analysis
Set up Model Monitor
Connect a Data SourceRegister a ModelSet up Drift DetectionSet up Model Quality MonitoringSet up Cohort AnalysisSet up NotificationsSet Scheduled ChecksUnregister a Model
Use Monitoring
Access the Monitor DashboardAnalyze Data DriftAnalyze Model QualityExclude Features from Scheduled Checks
Remediation
Cohort Analysis
Review the Cohort Analysis
Remediate a Model API
Monitor Settings
API TokenHealth DashboardNotification ChannelsTest Defaults
Monitoring Config JSON
Supported Binning Methods
Model Monitoring APIsTroubleshoot the Model Monitor
Connect to your Data
Data in Domino
Datasets OverviewProject FilesDatasets Best Practices
Connect to Data Sources
External Data VolumesDomino Data Sources
Connect to External Data
Connect to Amazon S3 from DominoConnect to Azure Data Lake StorageConnect to BigQueryConnect to DataRobotConnect to Generic S3 from DominoConnect to Google Cloud StorageConnect to IBM DB2Connect to IBM NetezzaConnect to ImpalaConnect to MSSQLConnect to MySQLConnect to OkeraConnect to Oracle DatabaseConnect to PostgreSQLConnect to RedshiftConnect to Snowflake from DominoConnect to Teradata
Work with Data Best Practices
Work with Big Data in DominoWork with Lots of FilesMove Data Over a Network
Advanced User Configuration Settings
User API KeysDomino TokenOrganizations Overview
Use the Domino Command Line Interface (CLI)
Install the Domino Command Line (CLI)Domino CLI ReferenceDownload Files with the CLIForce-Restore a Local ProjectMove a Project Between Domino DeploymentsUse the Domino CLI Behind a Proxy
Browser Support
Get Help with Domino
Additional ResourcesGet Domino VersionContact Domino Technical SupportSupport Bundles
domino logo
About Domino
Domino Data LabKnowledge BaseData Science BlogTraining
User Guide
>
Domino Reference
>
On-Demand Open MPI
>
Configure MPI Prerequisites

Configure MPI Prerequisites

Note

Before using On-demand Message Passing Interface (MPI) clusters on Domino this functionality must be enabled and properly configured on your deployment.

Enable MPI on your deployment

Before you can access MPI clusters, your Domino Administrator must set the ShortLived.MpiClustersEnabled feature flag to true to enable the on-demand MPI functionality. The flag is false by default.

Create a base Open MPI cluster environment

Domino does not include an Open MPI compatible compute environment for use with the components of the cluster, by default. You can not create a cluster unless you have a compatible compute environment.

Note

mpi-cluster-env.png

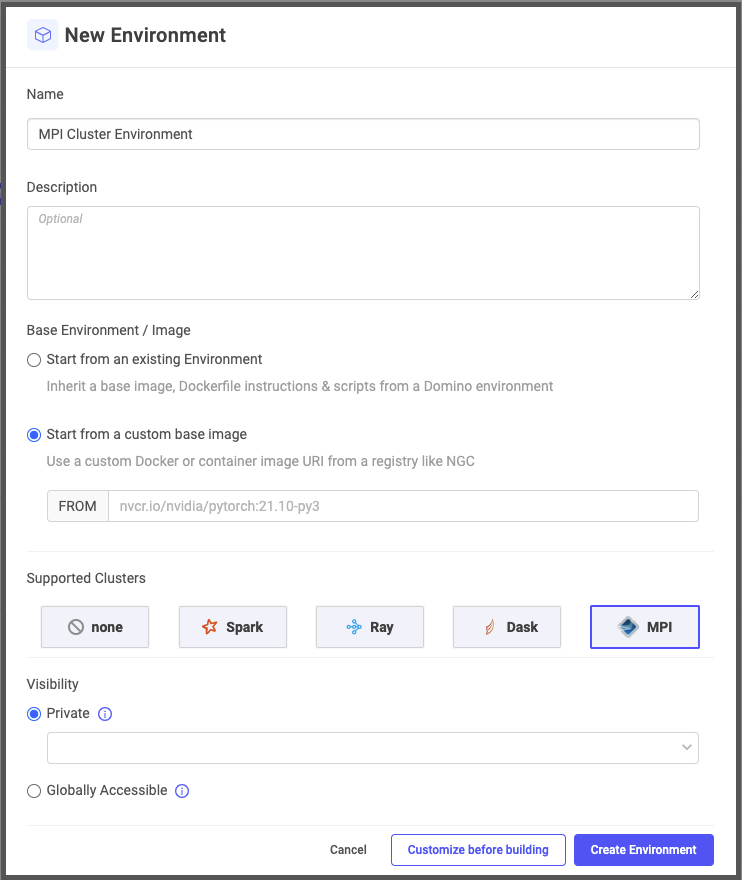
  1. To setup base image, click Start from a custom base image and enter an image URI for a deployable MPI image.

    For workloads using Horovod, Tensorflow, or Pytorch, Domino recommends basing both the cluster and compute environments on an NGC image containing Open MPI. An example is TensorFlow. The current URI is nvcr.io/nvidia/tensorflow:22.02-tf2-py3. You can use other Open MPI images such as Horovod. For simple, CPU-only workloads not needing ML libraries, use the pre-built Domino MPI images: quay.io/domino/mpi:Mpi4.1.2-Py3.8.12.

  2. To enable the environment for use when creating MPI clusters from workspaces and jobs, click MPI in the Supported Clusters list.

    Note
  3. For visibility, set this attribute to the same value as any other compute environment.

  4. To create the environment, click Create Environment. See Managing dependencies to add packages to the environment.

Prepare your Open MPI execution compute environment

You must also configure the Open MPI compute environments for workspaces and jobs that connect to your cluster. For an Open MPI compute environment you can:

  • Recommended: Use the same base image as the cluster environment to create a new environment.

  • Enhance the Docker Instructions section of an existing compute environment.

Create a new environment with the same image as the cluster environment:

  1. For your base image, click Start from a custom base image and enter a deployable MPI image.

    If you are using Horovod, Tensorflow, or Pytorch, Domino recommends basing both the cluster and compute environments on a suitable NGC image containing Open MPI. An example of this is TensorFlow. The current URI is nvcr.io/nvidia/tensorflow:22.02-tf2-py3. For simple, CPU-only workloads not needing ML libraries, use the pre-built Domino MPI image: quay.io/domino/mpi:Mpi4.1.2-Py3.8.12.

  2. Check Automatically make compatible with Domino unless you are using a Domino image.

  3. For visibility, set this attribute to the same value as any other compute environment.

  4. To create the environment, click Create Environment. See Managing dependencies to add packages to the environment.

Add Open MPI to an existing environment

  1. Open the environment and click Edit Definition.

  2. Add the following instructions to the Dockerfile Instructions, editing the instructions as needed:

    ENV OMPI_VERSION=4.1.2
    ENV OMPI_MAJOR_VERSION=4.1
    ENV OMPI_SHA256=a400719b04375cd704d2ed063a50e42d268497a3dfede342986ab7a8d7e8dcf0
    
    WORKDIR /opt
    
    #NOTE:build essentials is already present in most Domino distributions.
    
    Run \`apt-get update && apt-get -y install curl libdigest-sha-perl build-essential\'
    
    # see https://www.open-mpi.org/faq/?category=running#mpirun-prefix to find config options.
    # https://www.open-mpi.org/faq/?category=building#where-to-install
    RUN curl -o openmpi-${OMPI_VERSION}.tar.gz https://download.open-mpi.org/release/open-mpi/v${OMPI_MAJOR_VERSION}/openmpi-${OMPI_VERSION}.tar.gz && \
        echo "${OMPI_SHA256}  openmpi-${OMPI_VERSION}.tar.gz" | shasum -a 256 -c && \
        tar -xf openmpi-${OMPI_VERSION}.tar.gz && \
        cd openmpi-${OMPI_VERSION} && \
        ./configure \
            --prefix=/opt/mpi \
            --enable-mpirun-prefix-by-default && \
        make -j $(nproc) all && \
        make install
    
    # set the PATH vars appropriately using domino-defaults
    # https://www.open-mpi.org/faq/?category=running#run-prereqs
    RUN echo "export PATH=/opt/mpi/bin:\$PATH" >> /home/${DOMINO_USER}/.domino-defaults && \
        echo "export LD_LIBRARY_PATH=/opt/mpi/lib:\$LD_LIBRARY_PATH" >> /home/${DOMINO_USER}/.domino-defaults && \
        echo "export OMPI_VERSION=$OMPI_VERSION" >> /home/${DOMINO_USER}/.domino-defaults
    
    WORKDIR /
  3. Click Build.

Domino Data LabKnowledge BaseData Science BlogTraining
Copyright © 2022 Domino Data Lab. All rights reserved.