domino logo
Tech Ecosystem
Get started with Python
Step 0: Orient yourself to DominoStep 1: Create a projectStep 2: Configure your projectStep 3: Start a workspaceStep 4: Get your files and dataStep 5: Develop your modelStep 6: Clean up WorkspacesStep 7: Deploy your model
Get started with R
Step 0: Orient yourself to Domino (R Tutorial)Step 1: Create a projectStep 2: Configure your projectStep 3: Start a workspaceStep 4: Get your files and dataStep 5: Develop your modelStep 6: Clean up WorkspacesStep 7: Deploy your model
Get Started with MATLAB
Step 1: Orient yourself to DominoStep 2: Create a Domino ProjectStep 3: Configure Your Domino ProjectStep 4: Start a MATLAB WorkspaceStep 5: Fetch and Save Your DataStep 6: Develop Your ModelStep 7: Clean Up Your Workspace
Step 8: Deploy Your Model
Scheduled JobsLaunchers
Step 9: Working with Domino Datasets
Domino Reference
Notifications
On-Demand Open MPI
Configure MPI PrerequisitesFile Sync MPI ClustersValidate MPI VersionWork with your ClusterManage Dependencies
Projects
Projects OverviewProjects PortfolioReference ProjectsProject Goals in Domino 4+
Git Integration
Git Repositories in DominoGit-based ProjectsWorking from a Commit ID in Git
Jira Integration in DominoUpload Files to Domino using your BrowserFork and Merge ProjectsSearchSharing and CollaborationCommentsDomino File SystemCompare File Revisions
Revert Projects and Files
Revert a FileRevert a Project
Archive a Project
Advanced Project Settings
Project DependenciesProject TagsRename a ProjectSet up your Project to Ignore FilesUpload files larger than 550MBExporting Files as a Python or R PackageTransfer Project Ownership
Domino Runs
JobsDiagnostic Statistics with dominostats.jsonNotificationsResultsRun Comparison
Advanced Options for Domino Runs
Run StatesDomino Environment VariablesEnvironment Variables for Secure Credential StorageUse Apache Airflow with Domino
Scheduled Jobs
Domino Workspaces
WorkspacesUse Git in Your WorkspaceRecreate A Workspace From A Previous CommitUse Visual Studio Code in Domino WorkspacesPersist RStudio PreferencesAccess Multiple Hosted Applications in one Workspace Session
Spark on Domino
On-Demand Spark
On-Demand Spark OverviewValidated Spark VersionConfigure PrerequisitesWork with your ClusterManage DependenciesWork with Data
External Hadoop and Spark
Hadoop and Spark OverviewConnect to a Cloudera CDH5 cluster from DominoConnect to a Hortonworks cluster from DominoConnect to a MapR cluster from DominoConnect to an Amazon EMR cluster from DominoRun Local Spark on a Domino ExecutorUse PySpark in Jupyter WorkspacesKerberos Authentication
On-Demand Ray
On-Demand Ray OverviewValidated Ray VersionConfigure PrerequisitesWork with your ClusterManage DependenciesWork with Data
On-Demand Dask
On-Demand Dask OverviewValidated Dask VersionConfigure PrerequisitesWork with Your ClusterManage DependenciesWork with Data
Customize the Domino Software Environment
Environment ManagementDomino Standard EnvironmentsInstall Packages and DependenciesAdd Workspace IDEsAdding Jupyter Kernels
Use Custom Images as a Compute Environment
Pre-requisites for Automatic Custom Image CompatibilityModify the Default Workspace ToolsCreate a Domino Image with an NGC ContainerCreate a Domino Environment with a Pre-Built ImageManually Modify Images for Domino Compatibility
Partner Environments for Domino
Use MATLAB as a WorkspaceUse Stata as a WorkspaceUse SAS as a Workspace
Advanced Options for Domino Software Environment
Publish in Domino with Custom ImagesInstall Custom Packages in Domino with Git IntegrationAdd Custom DNS Servers to Your Domino EnvironmentConfigure a Compute Environment to User Private Cran/Conda/PyPi MirrorsUse TensorBoard in Jupyter Workspaces
Publish your Work
Publish a Model API
Model Publishing OverviewModel Invocation SettingsModel Access and CollaborationModel Deployment ConfigurationPromote Projects to ProductionExport Model ImageExport to NVIDIA Fleet Command
Publish a Web Application
App Publishing OverviewGet Started with DashGet Started with ShinyGet Started with FlaskContent Security Policies for Web Apps
Advanced Web Application Settings in Domino
App Scaling and PerformanceHost HTML Pages from DominoHow to Get the Domino Username of an App Viewer
Launchers
Launchers OverviewAdvanced Launcher Editor
Assets Portfolio Overview
Model Monitoring and Remediation
Monitor WorkflowsData Drift and Quality Monitoring
Set up Monitoring for Model APIs
Set up Prediction CaptureSet up Drift DetectionSet up Model Quality MonitoringSet up NotificationsSet Scheduled ChecksSet up Cohort Analysis
Set up Model Monitor
Connect a Data SourceRegister a ModelSet up Drift DetectionSet up Model Quality MonitoringSet up Cohort AnalysisSet up NotificationsSet Scheduled ChecksUnregister a Model
Use Monitoring
Access the Monitor DashboardAnalyze Data DriftAnalyze Model QualityExclude Features from Scheduled Checks
Remediation
Cohort Analysis
Review the Cohort Analysis
Remediate a Model API
Monitor Settings
API TokenHealth DashboardNotification ChannelsTest Defaults
Monitoring Config JSON
Supported Binning Methods
Model Monitoring APIsTroubleshoot the Model Monitor
Connect to your Data
Data in Domino
Datasets OverviewProject FilesDatasets Best Practices
Connect to Data Sources
External Data VolumesDomino Data Sources
Connect to External Data
Connect to Amazon S3 from DominoConnect to Azure Data Lake StorageConnect to BigQueryConnect to DataRobotConnect to Generic S3 from DominoConnect to Google Cloud StorageConnect to IBM DB2Connect to IBM NetezzaConnect to ImpalaConnect to MSSQLConnect to MySQLConnect to OkeraConnect to Oracle DatabaseConnect to PostgreSQLConnect to RedshiftConnect to Snowflake from DominoConnect to Teradata
Work with Data Best Practices
Work with Big Data in DominoWork with Lots of FilesMove Data Over a Network
Advanced User Configuration Settings
User API KeysDomino TokenOrganizations Overview
Use the Domino Command Line Interface (CLI)
Install the Domino Command Line (CLI)Domino CLI ReferenceDownload Files with the CLIForce-Restore a Local ProjectMove a Project Between Domino DeploymentsUse the Domino CLI Behind a Proxy
Browser Support
Get Help with Domino
Additional ResourcesGet Domino VersionContact Domino Technical SupportSupport Bundles
domino logo
About Domino
Domino Data LabKnowledge BaseData Science BlogTraining
User Guide
>
Domino Reference
>
Connect to your Data
>
Connect to Data Sources
>
Connect to External Data
>
Connect to MSSQL

Connect to MSSQL

This topic describes how to connect to a Microsoft SQL Server (MSSQL) from Domino.

Domino recommends that you use a Domino data source to connect to a MSSQL instance from Domino.

Create a MSSQL data source

  1. From the navigation pane, click Data.

  2. Click Create a Data Source.

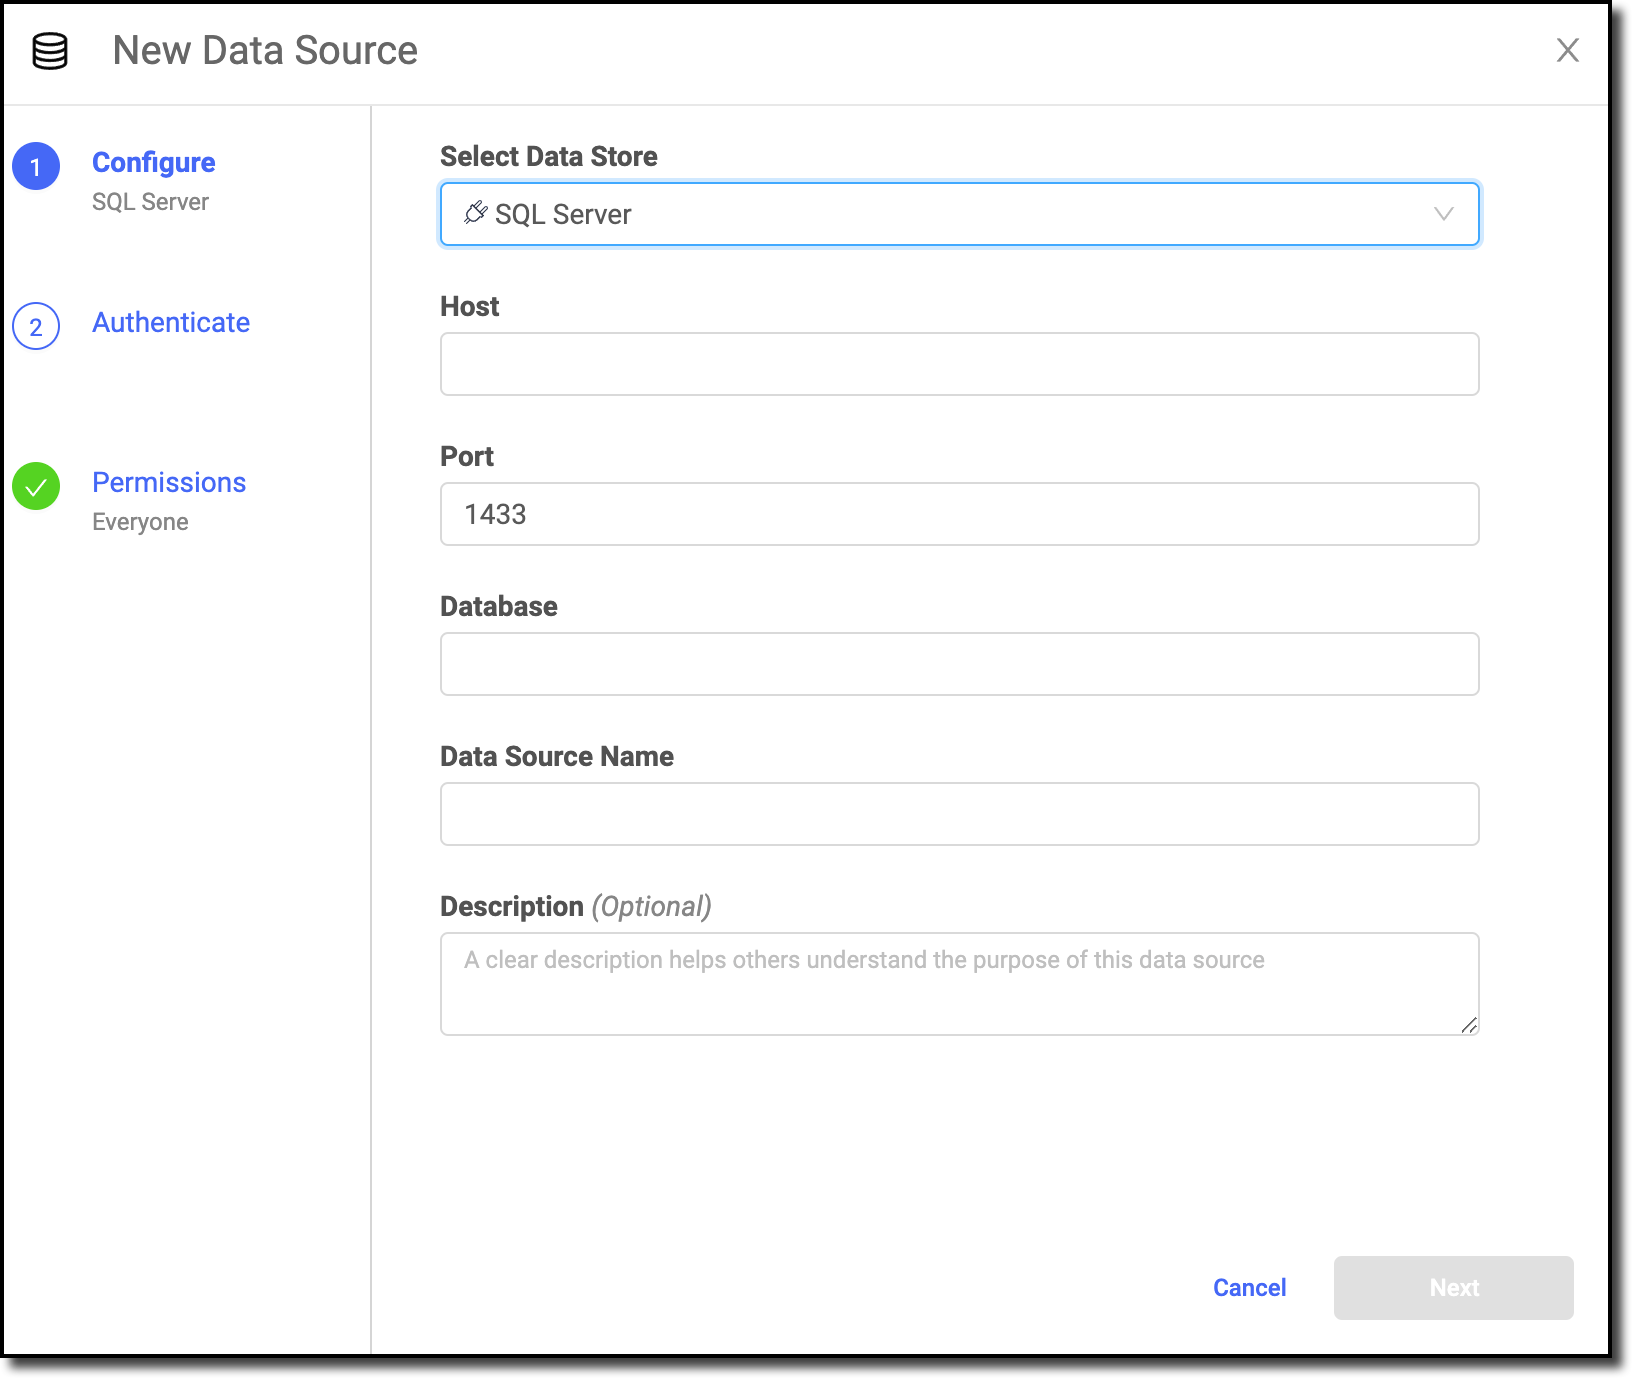
  3. In the New Data Source window, from Select Data Store, select SQL Server.

    mssql newds

  4. Enter the Host. Valid values are <host string>:3306 or <host string>.

  5. Enter the Port.

  6. Enter the name of the Database.

  7. Enter the Data Source Name.

  8. Optional: Enter a Description to explain the purpose of the data source to others.

  9. Click Next.

  10. Enter the Username and Password to connect to SQL Server. The Domino secret store backed by HashiCorp Vault securely stores the credentials.

  11. Click Test Credentials.

  12. If the data source authenticates, click Next.

  13. Select who can view and use the data source in projects.

  14. Click Finish Setup.

Alternate way to connect to a MSSQL data source

Warning
  1. To interact with MSSQL databases from Python, Domino recommends the pymssql package.

  2. Use the following Dockerfile instruction to install pymssql in your environment.

This instruction assumes you already have pip installed.

USER root
RUN pip install pymssql
USER ubuntu
  1. You must set up the following Domino environment variables to store secure information about your MSSQL connection.

    • DB_SERVER

    • DB_USERNAME

    • DB_PASSWORD

      See Environment variables for secure credential storage to learn more about Domino environment variables.

      See the pymssql documentation for detailed information about how to use the package. The following is an example for connecting to MSSQL with Python where:

    • You have set up environment variables noted previously.

    • The server hosts a database named myData with a table named addresses.

      from os import getenv
      import pymssql
      
      server = getenv("DB_SERVER")
      user = getenv("DB_USERNAME")
      password = getenv("DB_PASSWORD")
      
      conn = pymssql.connect(server, user, password, "myData")
      cursor = conn.cursor()
      
      cursor.execute('SELECT * FROM addresses')
      row = cursor.fetchone()
      while row:
          print("ID=%d, Name=%s" % (row[0], row[1]))
          row = cursor.fetchone()
      
      conn.close()

R and RODBC to MSSQL

  1. To interact with MSSQL databases from R, Domino recommends the RODBC library. You can use an alternative package if you’d like.

  2. Use the following Dockerfile instruction to add the MSSQL drivers to your Ubuntu 16.04 environment.

<<<<<<< HEAD

+ >>>>>>> 7d46d46b035def1e4bfe3d3e82afc0d8b52dac32

USER root

RUN curl https://packages.microsoft.com/keys/microsoft.asc | apt-key add -
RUN curl https://packages.microsoft.com/config/ubuntu/16.04/prod.list > /etc/apt/sources.list.d/mssql-release.list
RUN apt-get update
RUN ACCEPT_EULA=Y apt-get install msodbcsql17

USER ubuntu
  1. See Microsoft’s documentation for the Dockerfile instructions to add the MSSQL drivers to your Domino-supported Ubuntu environment.

  2. See the RStudio RODBC documentation for information about how to use the package.

Domino Data LabKnowledge BaseData Science BlogTraining
Copyright © 2022 Domino Data Lab. All rights reserved.