Domino’s Experiment Manager uses MLflow Tracking to log experiment details, such as parameters, metrics, and artifacts. Domino stores all your experiment metadata, data, and results within the project, making it easy to reproduce your work. This allows you to:
-
Monitor experiments with both automatic and manual logging.
-
Compare and review experiment runs effectively.
-
Collaborate securely with colleagues.
MLflow runs as a service in your Domino cluster and works seamlessly with your workspace and jobs. You can use your current MLflow experiments without changing any code.
Domino provides better security than standalone MLflow by using role-based access control (RBAC). Users with view access to the project can see all materials, data, results, and logs for every experiment within the project.
When you click Experiments in the Domino left navigation, you’ll see an empty dashboard unless at least one run has been logged. Domino doesn’t create experiments through the UI.
Instead:
-
You create an MLFlow experiment by calling
mlflow.set_experiment()in code. -
The experiment appears in the UI only after you log at least one run.
For example, to set a unique experiment name:
# create a new experiment
import mlflow
import os
starting_domino_user = os.environ["DOMINO_STARTING_USERNAME"]
experiment_name = f"Domino_Experiment_{starting_domino_user}"
# Replace <your_experiment_name> with the name of your experiment
mlflow.set_experiment(experiment_name="<your_experiment_name>")Tip: Experiment names need to be unique across your Domino Deployment. A good practice is to use a unique identifier (such as username) as part of your experiment name.
You can log experiments in Domino using MLflow’s auto-logging or manual logging features. Both methods record parameters, metrics, and artifacts in your Domino project. After you run either option, the experiment and its runs will appear in the Experiments tab for review.
-
From your project, click Workspaces in the left navigation.
-
Launch a workspace using any environment based on the Domino Standard Environment. These environments already have the
mlflowpackage installed. -
Open a Python script or notebook to run your experiment code.
Tip: You can also run the same code in a job for reproducible, version-controlled experiments.
Option 1: Use auto-logging
Auto-logging records parameters, metrics, and artifacts automatically for supported libraries. See MLflow Tracking for a list of supported libraries.
This snippet shows you how to auto-log a scikit-learn experiment.
# import MLflow library
import mlflow
import os

from sklearn.model_selection import train_test_split
from sklearn.datasets import load_diabetes
from sklearn.ensemble import RandomForestRegressor

# create and set a new experiment
starting_domino_user = os.environ["DOMINO_STARTING_USERNAME"]
experiment_name = f"Domino_Experiment_{starting_domino_user}"
mlflow.set_experiment(experiment_name=experiment_name)


# enable auto-logging
mlflow.autolog()

# start the run
with mlflow.start_run():
    db = load_diabetes()
    X_train, X_test, y_train, y_test = train_test_split(db.data, db.target)
    rf = RandomForestRegressor(n_estimators = 100, max_depth = 6, max_features = 3)
    rf.fit(X_train, y_train)
    rf.score(X_test, y_test)

# end the run
mlflow.end_run()
Option 2: Set up manual logging
Manual logging gives you full control over what parameters, metrics, and artifacts are recorded. MLflow Tracking offers more details and examples.
# import MLflow library
import mlflow
import os

# create a new experiment
starting_domino_user = os.environ["DOMINO_STARTING_USERNAME"]
experiment_name = f"Domino_Experiment_{starting_domino_user}"
mlflow.set_experiment(experiment_name=experiment_name)
# start a run and log parameter,metric, and artifact
with mlflow.start_run():
    mlflow.log_param("batch_size", 32)
    mlflow.log_metric("accuracy", 0.75)
    with open("example.txt", "w") as f:
        f.write("This is a sample artifact.")

    mlflow.log_artifact("example.txt")

# end the run
mlflow.end_run()
Once your workspace is running, you’re ready to write and execute code that will create and log an experiment.
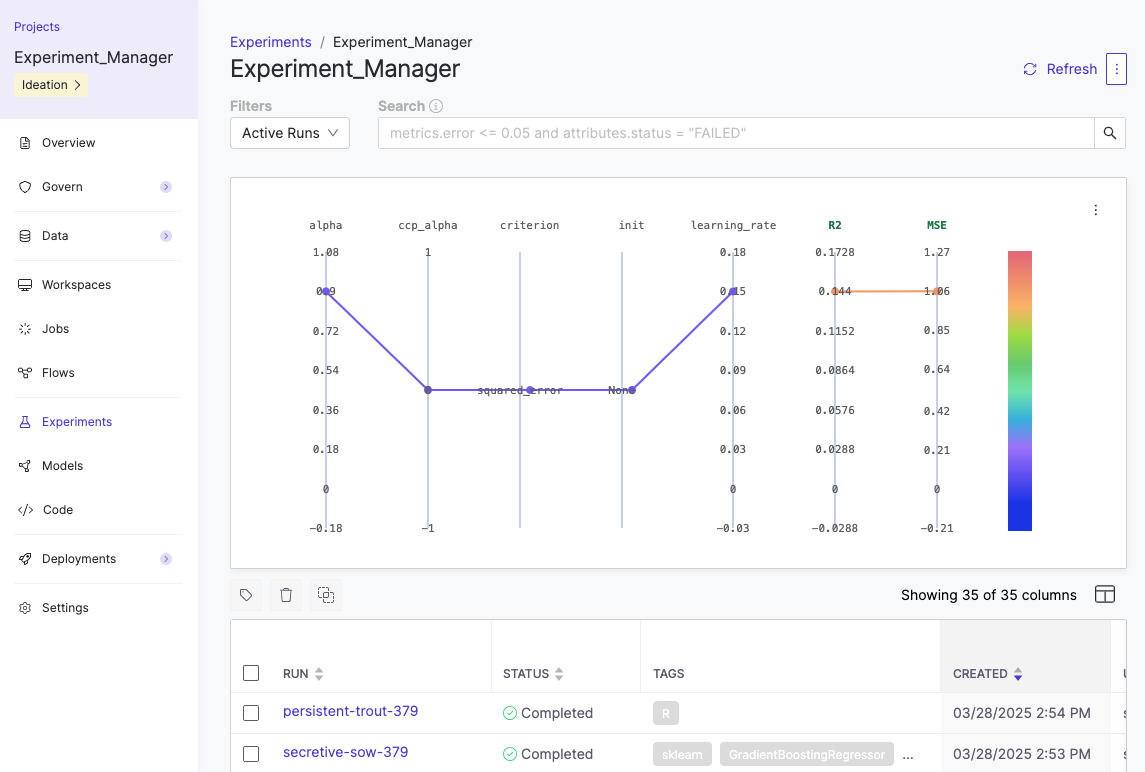
Step 2: Monitor and evaluate experiments
Once you log your runs in an experiment, use Domino to view and assess the results.
-
Click Experiments in Domino’s left navigation pane.
-
Find and click the experiment to evaluate and show its associated runs.
-
Click a run to analyze the results in detail and find reproducibility information.
-
Compare runs:
-
Select up to four runs from the table view.
-
Click Compare.
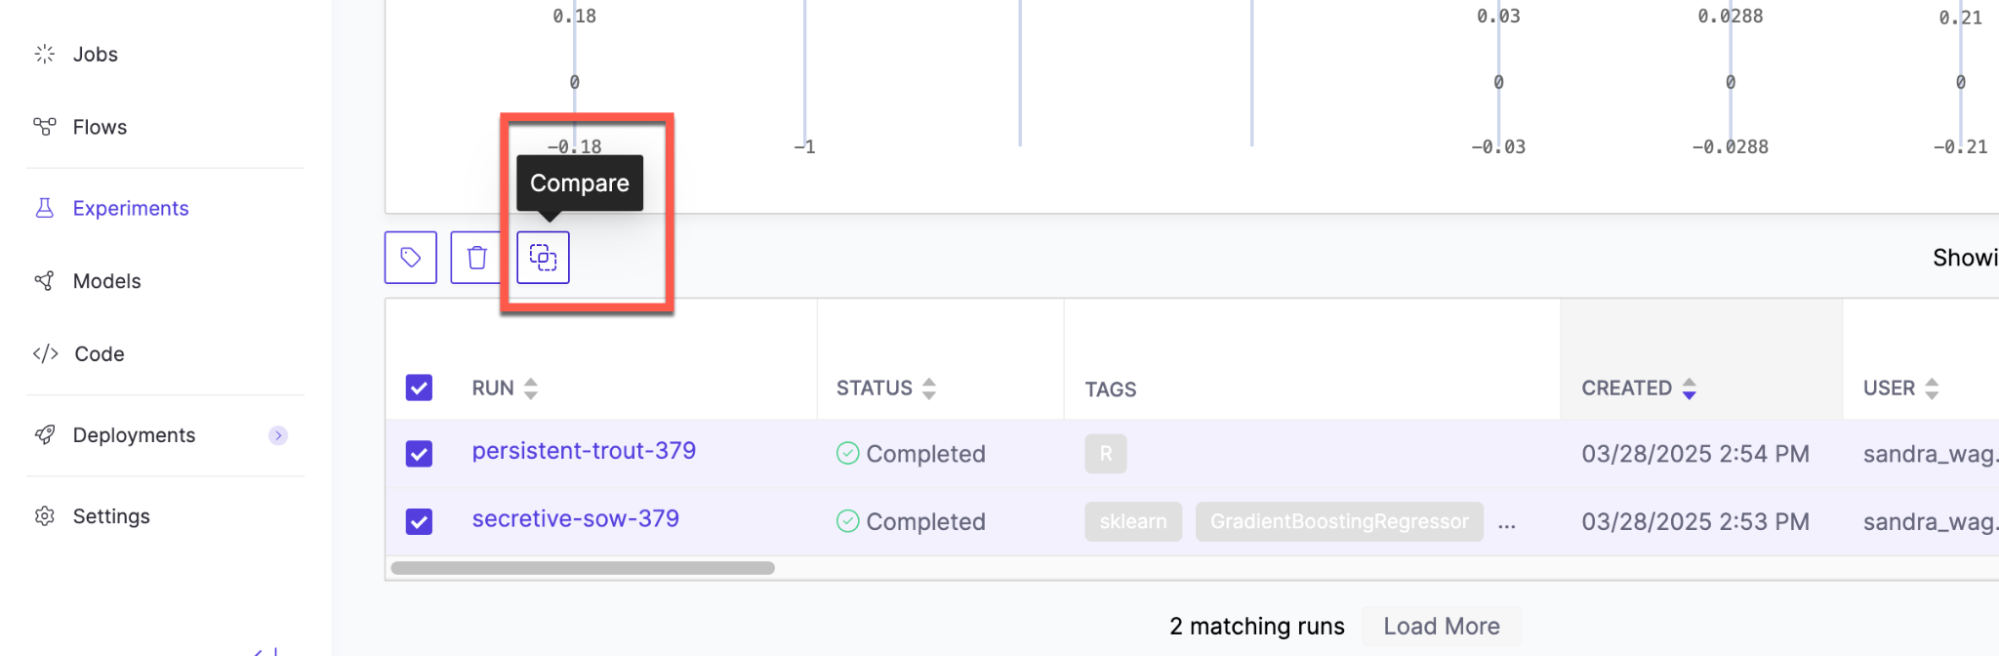
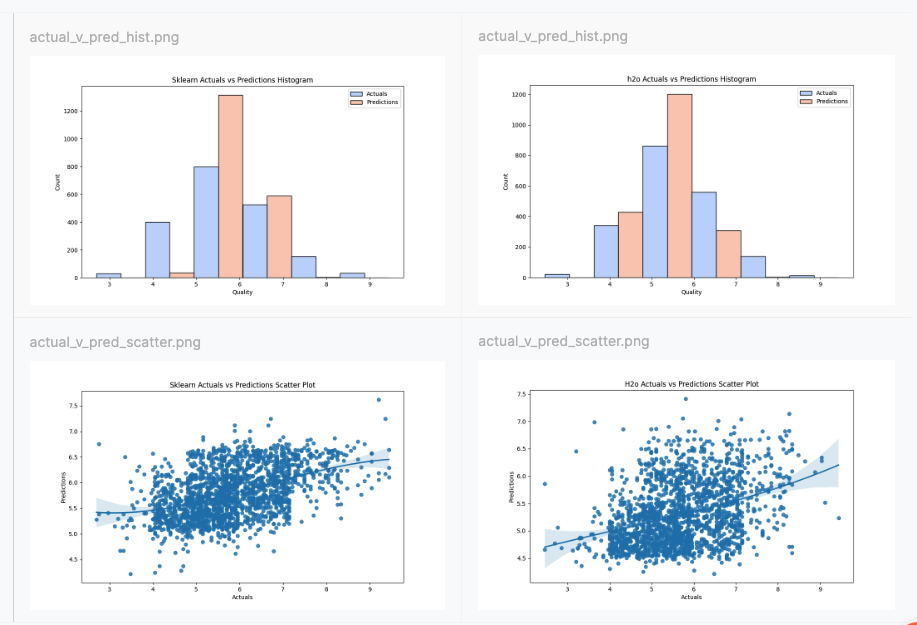
You can compare runs to see how parameters affect important metrics like model accuracy or training speed. Save your visualizations and artifacts in the root folder for visual comparison of charts.
-
Step 3: Export experiment results
You can export your single experiment results to a CSV or compare experiments and download to a PDF.
To download single experiment results:
-
Click Experiments in Domino’s left navigation pane.
-
Find and click the experiment with the results that you want to export.
-
Select the three dots in the upper right of the experiment.
-
Choose Download CSV.
To download a report of compared experiment results:
-
Click Experiments in Domino’s left navigation pane.
-
Find and click the experiment with the results that you want to export.
-
Select up to four runs to compare.
-
Click Compare.
-
Select the three dots in the upper right of the experiment.
-
Choose Export as PDF.
Step 4: Share your projects and experiments
You can set permissions for project assets, including MLflow logs, on a project level. Use these methods on your projects to control access:
-
Choose the visibility for your project. This will help you control who can see your project.
-
Searchable: Discoverable by other Domino users.
-
Private: Only viewable or discoverable by your project collaborators.
-
-
Invite collaborators and set their permissions based on project roles. This gives you detailed control over what they can access.
-
Experiment names must be unique across all projects within the same Domino instance.
-
Child runs aren’t deleted when you delete a run that has children. Delete the child runs separately.
-
You can’t stop a run from the UI. To stop a run, execute
mlflow.end_run()from your workspace or job. -
When you trigger an experiment from a workspace, the manager shows the file name. But if you are running that and editing it, it doesn’t rename the experiment automatically. After completing an experiment in a workspace, trigger a job to manage version control.
-
Best practice is to give your runs a name - otherwise it automatically creates one like
gifted-slug-123.
You can upload large artifact files directly to blob storage without going through the MLflow proxy server.
This experimental feature must be enabled inside the user notebook code by setting the environment variable MLFLOW_ENABLE_PROXY_MULTIPART_UPLOAD to true.
import os
os.environ['MLFLOW_ENABLE_PROXY_MULTIPART_UPLOAD'] = "true"
This is helpful for both log_artifact calls and registering large language models. It is currently supported only in AWS and GCP environments. There are two additional settings available for configuration:
-
MLFLOW_MULTIPART_UPLOAD_MINIMUM_FILE_SIZE- the minimum file size required to initiate multipart uploads. -
MLFLOW_MULTIPART_UPLOAD_CHUNK_SIZE- the size of each chunk of the multipart upload. Note that a file may be divided into a maximum of 1000 chunks.
Multipart upload for proxied artifact access in the MLflow documentation has more information on using this feature. Registering Hugging Face LLMs with MLflow has directions specific to Domino.
-
Get started with a detailed tutorial on workspaces, jobs, and deployment.
-
Scale-out training for larger datasets.