domino logo
Tech Ecosystem
Get started with Python
Step 0: Orient yourself to DominoStep 1: Create a projectStep 2: Configure your projectStep 3: Start a workspaceStep 4: Get your files and dataStep 5: Develop your modelStep 6: Clean up WorkspacesStep 7: Deploy your model
Get started with R
Step 0: Orient yourself to Domino (R Tutorial)Step 1: Create a projectStep 2: Configure your projectStep 3: Start a workspaceStep 4: Get your files and dataStep 5: Develop your modelStep 6: Clean up WorkspacesStep 7: Deploy your model
Get Started with MATLAB
Step 1: Orient yourself to DominoStep 2: Create a Domino ProjectStep 3: Configure Your Domino ProjectStep 4: Start a MATLAB WorkspaceStep 5: Fetch and Save Your DataStep 6: Develop Your ModelStep 7: Clean Up Your Workspace
Step 8: Deploy Your Model
Scheduled JobsLaunchers
Step 9: Working with Domino Datasets
Domino Reference
Notifications
On-Demand Open MPI
Configure MPI PrerequisitesFile Sync MPI ClustersValidate MPI VersionWork with your ClusterManage Dependencies
Projects
Projects OverviewProjects PortfolioReference ProjectsProject Goals in Domino 4+
Git Integration
Git Repositories in DominoGit-based Projects with CodeSyncWorking from a Commit ID in Git
Jira Integration in DominoUpload Files to Domino using your BrowserFork and Merge ProjectsSearchSharing and CollaborationCommentsDomino Service FilesystemCompare File RevisionsArchive a Project
Advanced Project Settings
Project DependenciesProject TagsRename a ProjectSet up your Project to Ignore FilesUpload files larger than 550MBExporting Files as a Python or R PackageTransfer Project Ownership
Domino Runs
JobsDiagnostic Statistics with dominostats.jsonNotificationsResultsRun Comparison
Advanced Options for Domino Runs
Run StatesDomino Environment VariablesEnvironment Variables for Secure Credential StorageUse Apache Airflow with Domino
Scheduled Jobs
Domino Workspaces
WorkspacesUse Git in Your WorkspaceRecreate A Workspace From A Previous CommitUse Visual Studio Code in Domino WorkspacesPersist RStudio PreferencesAccess Multiple Hosted Applications in one Workspace Session
Spark on Domino
On-Demand Spark
On-Demand Spark OverviewValidated Spark VersionConfigure PrerequisitesWork with your ClusterManage DependenciesWork with Data
External Hadoop and Spark
Hadoop and Spark OverviewConnect to a Cloudera CDH5 cluster from DominoConnect to a Hortonworks cluster from DominoConnect to a MapR cluster from DominoConnect to an Amazon EMR cluster from DominoRun Local Spark on a Domino ExecutorUse PySpark in Jupyter WorkspacesKerberos Authentication
On-Demand Ray
On-Demand Ray OverviewValidated Ray VersionConfigure PrerequisitesWork with your ClusterManage DependenciesWork with Data
On-Demand Dask
On-Demand Dask OverviewValidated Dask VersionConfigure PrerequisitesWork with Your ClusterManage DependenciesWork with Data
Customize the Domino Software Environment
Environment ManagementDomino Standard EnvironmentsInstall Packages and DependenciesAdd Workspace IDEsAdding Jupyter Kernels
Use Custom Images as a Compute Environment
Pre-requisites for Automatic Custom Image CompatibilityModify the Default Workspace ToolsCreate a Domino Image with an NGC ContainerCreate a Domino Environment with a Pre-Built ImageManually Modify Images for Domino Compatibility
Partner Environments for Domino
Use MATLAB as a WorkspaceUse Stata as a WorkspaceUse SAS as a Workspace
Advanced Options for Domino Software Environment
Publish in Domino with Custom ImagesInstall Custom Packages in Domino with Git IntegrationAdd Custom DNS Servers to Your Domino EnvironmentConfigure a Compute Environment to User Private Cran/Conda/PyPi MirrorsUse TensorBoard in Jupyter Workspaces
Publish your Work
Publish a Model API
Model Publishing OverviewModel Invocation SettingsModel Access and CollaborationModel Deployment ConfigurationPromote Projects to ProductionExport Model ImageExport to NVIDIA Fleet Command
Publish a Web Application
App Publishing OverviewGet Started with DashGet Started with ShinyGet Started with FlaskContent Security Policies for Web Apps
Advanced Web Application Settings in Domino
App Scaling and PerformanceHost HTML Pages from DominoHow to Get the Domino Username of an App Viewer
Launchers
Launchers OverviewAdvanced Launcher Editor
Manage Externally-Hosted Models
Model Requirements
Use Domino's REST API to Export a Model
Export Model ImageExport to NVIDIA Fleet Command
Create an ExportCheck the Status of an ExportPush a New VersionSet up Monitoring for an ExportArchive an ExportView Monitoring StatusTroubleshooting
Assets Portfolio Overview
Model Monitoring and Remediation
Monitor WorkflowsData Drift and Quality Monitoring
Set up Monitoring for Model APIs
Set up Prediction CaptureSet up Drift DetectionSet up Model Quality MonitoringSet up NotificationsSet Scheduled ChecksSet up Cohort Analysis
Set up Model Monitor
Connect a Data SourceRegister a ModelSet up Drift DetectionSet up Model Quality MonitoringSet up Cohort AnalysisSet up NotificationsSet Scheduled ChecksUnregister a Model
Use Monitoring
Access the Monitor DashboardAnalyze Data DriftAnalyze Model QualityExclude Features from Scheduled Checks
Remediation
Cohort Analysis
Review the Cohort Analysis
Remediate a Model API
Monitor Settings
API TokenHealth DashboardNotification ChannelsTest Defaults
Monitoring Config JSON
Supported Binning Methods
Model Monitoring APIsTroubleshoot the Model Monitor
Connect to your Data
Data in Domino
Datasets OverviewProject FilesDatasets Best Practices
Connect to Data Sources
External Data VolumesDomino Data Sources
Connect to External Data
Connect to Amazon S3 from DominoConnect to Azure Data Lake StorageConnect to BigQueryConnect to DataRobotConnect to Generic S3 from DominoConnect to Google Cloud StorageConnect to IBM DB2Connect to IBM NetezzaConnect to ImpalaConnect to MSSQLConnect to MySQLConnect to OkeraConnect to Oracle DatabaseConnect to PostgreSQLConnect to RedshiftConnect to Snowflake from DominoConnect to Teradata
Work with Data Best Practices
Work with Big Data in DominoWork with Lots of FilesMove Data Over a Network
Advanced User Configuration Settings
User API KeysDomino TokenOrganizations Overview
Use the Domino Command Line Interface (CLI)
Install the Domino Command Line (CLI)Domino CLI ReferenceDownload Files with the CLIForce-Restore a Local ProjectMove a Project Between Domino DeploymentsUse the Domino CLI Behind a Proxy
Browser Support
Get Help with Domino
Additional ResourcesGet Domino VersionContact Domino Technical SupportSupport Bundles
domino logo
About Domino
Domino Data LabKnowledge BaseData Science BlogTraining
User Guide
>
Domino Reference
>
Spark on Domino
>
External Hadoop and Spark
>
Use PySpark in Jupyter Workspaces

Use PySpark in Jupyter Workspaces

You can configure a Domino Workspace to launch a Jupyter notebook with a connection to your Spark cluster.

This allows you to operate the cluster interactively from Jupyter with PySpark.

The instructions for configuring a PySpark Workspace are below. To use them, you must have a Domino environment that meets the following prerequisites:

  • The environment must use one of the Domino Standard Environments as its base image.

  • The necessary binaries and configurations for connecting to your Spark cluster must be installed in the environment. See the provider-specific guides for setting up the environment.

Note

Add a PySpark Workspace option to your environment

  1. From the Domino main menu, click Environments.

  2. Click the name of an environment that meets the prerequisites listed previously. It must use a Domino standard base image and already have the necessary binaries and configuration files installed for connecting to your spark cluster.

  3. On the environment overview page, click Edit Definition.

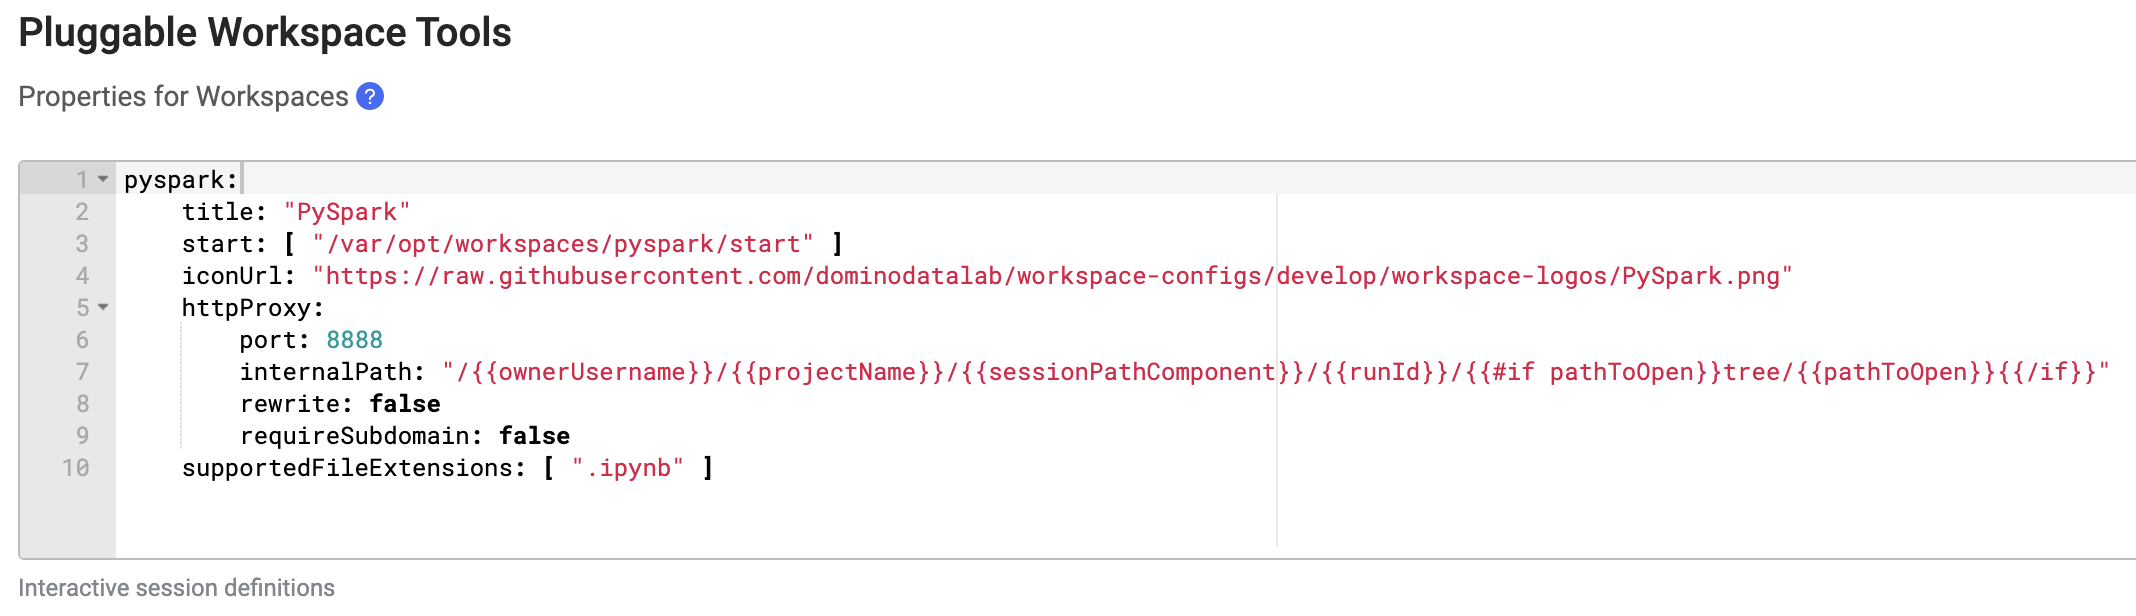
  4. In the Pluggable Workspace Tools field, paste the following YAML configuration.

    pyspark: title: "PySpark" start: [ "/var/opt/workspaces/pyspark/start" ] iconUrl: "https://raw.githubusercontent.com/dominodatalab/workspace-configs/develop/workspace-logos/PySpark.png" httpProxy: port: 8888 internalPath: "/{{ownerUsername}}/{{projectName}}/{{sessionPathComponent}}/{{runId}}/{{#if pathToOpen}}tree/{{pathToOpen}}{{/if}}" rewrite: false requireSubdomains: false supportedFileExtensions: [ ".ipynb" ]
    pyspark:
       title: "PySpark"
       start: [ "/var/opt/workspaces/pyspark/start" ]
       iconUrl: "https://raw.githubusercontent.com/dominodatalab/workspace-configs/develop/workspace-logos/PySpark.png"
       httpProxy:
          port: 8888
          internalPath: "/{{ownerUsername}}/{{projectName}}/{{sessionPathComponent}}/{{runId}}/{{#if pathToOpen}}tree/{{pathToOpen}}{{/if}}"
          rewrite: false
          requireSubdomains: false
       supportedFileExtensions: [ ".ipynb" ]

    When finished, the field should look like this:

    pyspark pluggable workspace tools

  5. Click Build to apply the changes and build a new version of the environment. Upon a successful build, the environment is ready for use.

Note

Launching PySpark Workspaces

  1. Open the project you want to use a PySpark Workspace in.

  2. Open the project settings, then follow the provider-specific instructions from the Hadoop and Spark overview on setting up a project to work with an existing Spark connection environment. This will involve enabling YARN integration in the project settings.

  3. On the Hardware & Environment tab of the project settings, choose the environment you added a PySpark configuration to in the previous section.

  4. After the previous settings are applied, you can launch a PySpark Workspace from the Workspaces dashboard.

    pyspark-pluggable-workspace-tools.png

Domino Data LabKnowledge BaseData Science BlogTraining
Copyright © 2022 Domino Data Lab. All rights reserved.