Earlier in the tutorial, you saw how to create a model that uses linear regression to predict the weather for a single station. You could then use Domino Launchers to share the model with other people who have access to Domino. However, we frequently need to share our models with other teams and applications. Domino makes that easy through Domino endpoints.
Domino endpoints wrap your models into a REST API. Domino handles the hosting, access control, and even the upscaling of your model if it needs to handle large amounts of traffic. As with all hosting, the server is persistent and will keep on running until you shut down the Domino endpoint. Domino allows you to version and provide secure access to your APIs. Domino will use Kubernetes containers to host the model, running it using the environment definition you control. Domino endpoints can even run on remote Domino Data Planes.
As a REST API, your model becomes available to every programming language that supports that standard. That includes virtually all programming languages across mobile, desktop and even embedded devices.
This document will explain how you can share your weather prediction model as an API — the best part being that you can reuse your predict_location.py launcher file.
-
To get started, click Domino endpoints in the Domino project menu bar then click the Create Domino endpoint button.
-
On the screen that appears, add an Endpoint Name (e.g.
Weather Prediction Domino endpoint), a Description and leave it associated with your current Project. Click Next. -
On the next screen, below The file containing the code to invoke (must be a Python or R file), click inside the text box. A drop down will be displayed with the files Domino can use for the Domino endpoint. Select
predict_location.py. -
For The function to invoke, select
predict_weather, which is the entrypoint function to the file. -
Choose the Environment and under Deployment Target, the hardware to use for the Domino endpoint.
-
Click Create Domino endpoint.
-
Domino will load the Domino endpoint overview screen, and will initially report a Preparing to build status, then move to a Building status, and finally to a Running status.
However, in its current state, the API will fail to launch, repeatedly switching between Starting and Running.
To get an idea of what is not working:
-
Click the Versions tab to switch to that view.
-
On the screen that will appear, click View All Instance Logs.
-
Now scroll down to see the log of the container that Domino started to host your model. You will notice the following lines towards the bottom of the log (the time and server IP address will differ on your version):
Aug 2, 2024 3:02 PM -04:00  KeyError: 'launcher_api_key'  ip-10-12-48-186.us-west-2.compute.internal  model-66ad2a6a3273e40b723dc6f3-667b666ccc-xxr4b  model-66ad2a6a3273e40b723dc6f3
Aug 2, 2024 3:02 PM -04:00  unable to load app 0 (mountpoint='') (callable not found or import error)
This means that the API attempted to start looking for the API key
launcher_apithat you stored earlier as part of the project’s environment variables. Environment variables for Domino endpoints need to be set differently. -
Click the Back button in your web browser to return to the endpoint version overview screen. In your Domino endpoint window, click on the Settings tab.
-
Now, switch to the Environment view by clicking on it in the navigation menu.
-
Click Add Variable. Domino will give you the option to add a key-value pair for the environment variable. For the Name, enter
launcher_api_key. For the Value, use the same API key as when you’ve set up the environment variable for your launcher. -
Finally, click Save Variables.
-
Switch back to the Versions tab and then click the vertical dots in the Actions column.
-
In the menu that will appear, click Start Version. This time, the endpoint will find the missing environment variable and run, showing a Running status.
-
Switch to the Overview tab.
-
Scroll down to the area titled Calling your endpoint.
-
In the box titled Request, enter the following text:
{
  "data": {
    "station_to_check": "FRE00104120",
    "days": 7
  }
}
This is a JSON snippet containing a call to your Domino endpoint. It sends the necessary two arguments to the
predict_weathermethod so that it can run. You can either use the station ID in the code above or change it. -
Click the Send button below the Request box. This will trigger the execution of your prediction script.
-
The result will appear in the Response box. For example:
{
  "model_time_in_ms": 2327,
  "release": {
    "harness_version": "0.1",
    "model_version": "66ad2a6a3273e40b723dc6f3",
    "model_version_number": 1
  },
  "request_id": "1M3TGHQURC2DBOFS",
  "result": {
    "0": 26.98301887512207,
    "1": 26.8093204498291,
    "2": 26.454402923583984,
    "3": 26.672496795654297,
    "4": 26.63031578063965,
    "5": 26.91615104675293,
    "6": 26.892757415771484
  },
  "timing": 2327.2523880004883
}
The actual prediction is in the
resultblock of the above JSON snippet that the Domino endpoint returned. -
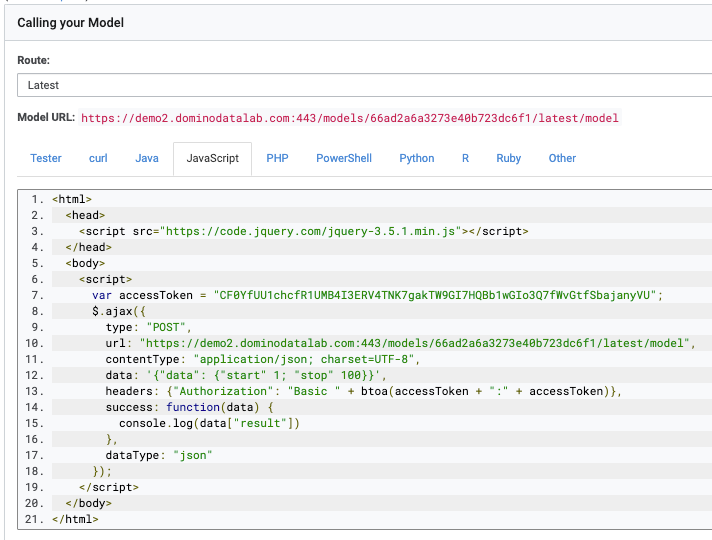
You can now share the Domino endpoint with your colleagues using the language-specific code snippets in the tabs next to the Tester. For example, this is how a JavaScript application will call your Domino endpoint:

