run [--direct][--wait][--no-sync][--tier][--local] <file> [args…]
"run" will copy all files in your project folder to the cloud, where it will execute the specified file with any arguments you have specified, unless you have specified the --local flag.
Use domino sync before domino run <script> if receiving an error like “blob file not found”.
The optional --wait flag runs your script synchronously, that is, the command does not return until your job finishes.
The optional --direct flag lets you run a shell command directly on the Domino machines.
The optional --no-sync flag runs the latest version of code on the server, without uploading any local changes on your computer.
The optional --tier flag lets you select a specific hardware tier to execute the specified file on.
The optional --local flag lets you run your script on your local machine.
The optional --title flag lets you supply a title for the run.
Local runs are useful if your desired compute environment is not immediately available, but you would like to record your results in Domino.
When a local run is invoked, Domino commits a snapshot of project files to the server and then runs the given command (for example, python main.py) on the local machine.
When the command has finished running, Domino detects results that have been produced and commits those back to the server, tracking them as “results” of the run as though the command ran on the server.
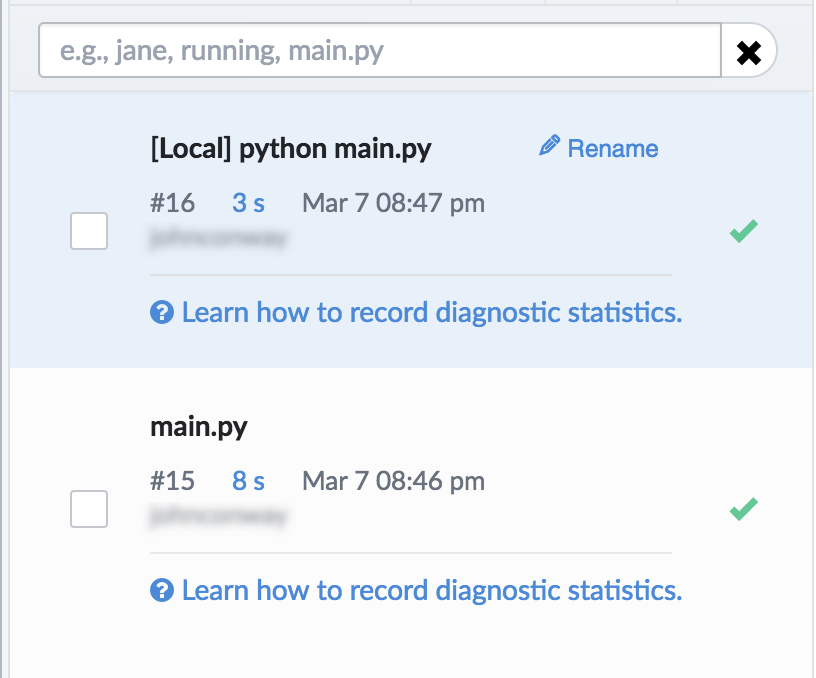
Viewing the “Results” for Run #16 will bring up a page showing the output of the main.py where colleagues can view and discuss the output.
domino run calculateStats.R
domino run runModel.m model1 .05
domino run --wait runModel.m model1 .05
domino run --direct "pip freeze | grep pandas"
domino run --tier "Large" calculateStats.R
domino run --local "python main.py"Create a new Project
create [projectName]
create will create a new Project by making a new folder on your computer and telling the Domino server about your new Project.
Optionally, you can specify the name of the Project.
If you don’t specify a name, Domino will ask you for one.
To create a Project on behalf of an organization you belong to, use the --owner flag.
domino create
domino create myProject
domino create --owner myOrg myProject
Create a Project in a directory that already has files
init [projectName]
init will create a new Domino Project inside your current folder.
This is useful if you already have a working folder and you’d like to convert it to a Domino Project.
While the "create" command creates a new folder inside your current directory, init will initialize a Project from your current folder.
The --owner flag can be used to set an organization you belong to as the Project owner.
|
Note
|
init will not upload any of your files.
You’ll have to use
upload or run after you run init.
|
domino init
domino init myProject
domino init --owner myOrg myProject
Get a Project from the server onto your computer for the first time
get [username]/projectName
get will find an existing Project on the server and copy it to your computer.
This is useful to get a project you created on a different computer or to get a Project that someone else created, and you are collaborating on.
If you are getting someone else’s Project, specify their username and the Project name. If you are getting one of your own Projects, you can omit the username.
domino get otherUser/someProject
domino get myProject
Connect a folder to an existing Project
restore
restore will connect your current directory to an existing Domino Project on the server.
Restore will look for evidence of a Project name inside .domino/config.json.
If it doesn’t find such a file, it will prompt you for the name of an existing Project to use.
This is particularly useful if you are using Domino and Git to track the same folder.
If you clone a Project with Git, Git will likely have ignored the hidden files that identify it as a Domino Project.
So you can run git clone and then domino restore to re-connect the folder to its Domino Project.
domino restoreDownload the latest version of your files
download
download will download the latest copy of your files from the cloud into your current project folder.
If you have made changes that conflict with changes in the cloud, you will see both versions of the conflicting file side-by-side.
There are two reasons files in the cloud might change: first, your collaborators on a Project might make changes; second, you might have executed a run that produced new output files.
domino downloadUpload your files without starting a run
upload [-m "message"]
upload will upload your current project folder contents to the cloud, but will not begin a new run.
The optional message flag lets you record a message, which will be displayed when browsing past commits on the
Code
tab of your project.
|
Note
| When using the CLI to upload more than 1000 files at once, a timeout error might occur during the upload process. To avoid this, upload smaller batches of files. |
domino upload -m "upload data files"|
Note
| The following Dataset CLI actions may cause you to exceed your quota threshold if your admin has created one. See Dataset quotas for more information. |
Upload folder to a Dataset
Upload all the files in a folder from your local machine to an existing dataset.
|
Caution
|
This command overwrites existing files unless you use the ‑‑fileUploadSetting option.
|
domino [--fileUploadSetting Ignore|Overwrite|Rename] [--targetRelativePath <destination path>] <project-owner>/<project-name>/<dataset-name> <folder path>The optional fileUploadSetting flag handles path collisions:
-
Ignore: If a file already exists in the Dataset, ignore the new file. -
Overwrite: If a file already exists in the Dataset, overwrite the existing file with the new file. -
Rename: If a file already exists in the Dataset, append_1to the uploaded filename. For example, if/Users/myUser/data/file.txtalready exists then the newly-uploaded file becomes/Users/myUser/data/file_1.txt.
The optional targetRelativePath flag enables uploading to a subdirectory in the Dataset:
-
<destination path>: This is the path, relative to the root directory of the Dataset, where files will be uploaded. Note that other users with access to the Dataset can alter the file structure, which may require you to modify the destination path accordingly.If
targetRelativePathis not specified, files will be uploaded to the root directory of the Dataset.
|
Note
|
fileUploadSetting, targetRelativePath, and their values are case-sensitive.
|
domino upload-dataset --fileUploadSetting Overwrite --targetRelativePath Experiments/Run1/Analysis jsmith/global-predictions/global-data /Users/myUser/dataYou can take advantage of the Datasets parallel upload capability, which allows for configurable chunk sizes and multi-threading. The two tuning parameters are:
-
DOMINO_UPLOAD_CHUNK_BYTES(Default: 3145728 (3 MB)): This configures the chunk size. Larger chunks mean less chunk setup overhead. For a fast network, the setup overhead is a larger percentage of the overall time needed to upload a chunk. -
DOMINO_UPLOAD_THREADS(Default: 8): This configures the number of parallel threads for multi-threaded uploads and parallel chunk uploads. The number of threads is proportional to the number of cores in your operating system.
export DOMINO_UPLOAD_CHUNK_BYTES=<new-value>
export DOMINO_UPLOAD_THREADS=<new-value>set [DOMINO_UPLOAD_CHUNK_BYTES=[<string>]]
set [DOMINO_UPLOAD_THREADS=[<string>]]Create a snapshot
Use the following command to create a snapshot that is visible and populated after the backend finishes copying the files in the Dataset.
|
Note
| Do not modify the files in the Dataset until the snapshot is done. |
domino create-snapshot <project-owner>/<project-name>/<dataset-name>Create a Dataset from a snapshot
Use the following command to create a Dataset from a snapshot where <snapshot-integer> maps to a valid snapshot number in the Dataset.
|
Note
| The new Dataset can take time to populate. |
domino create-dataset-from-snapshot <project-owner>/<project-name>/<dataset-name> <snapshot-number> <new-dataset-name>