Domino can integrate with existing CI/CD workflows and registries outside of Domino. Use Domino’s Model Export API to integrate model development in Domino with other production environments.
With a single API call, Domino turns your trained model into a container image with a REST interface that you can deploy into a separate production environment. You may need to host models outside of Domino for specific scenarios such as:
-
Support for sudden bursts in traffic
-
Strict latency and uptime SLAs
-
Security, legal, or locality restrictions
Domino’s Model Export API exports Docker images of Domino-built models, model artifacts, project files, dependent packages, base environments, and more. The API registers the images with Domino’s internal image registry. You then fetch it, customize it, and deploy it inside your runtime environment with existing CI/CD pipelines to facilitate tests and production-readiness steps.
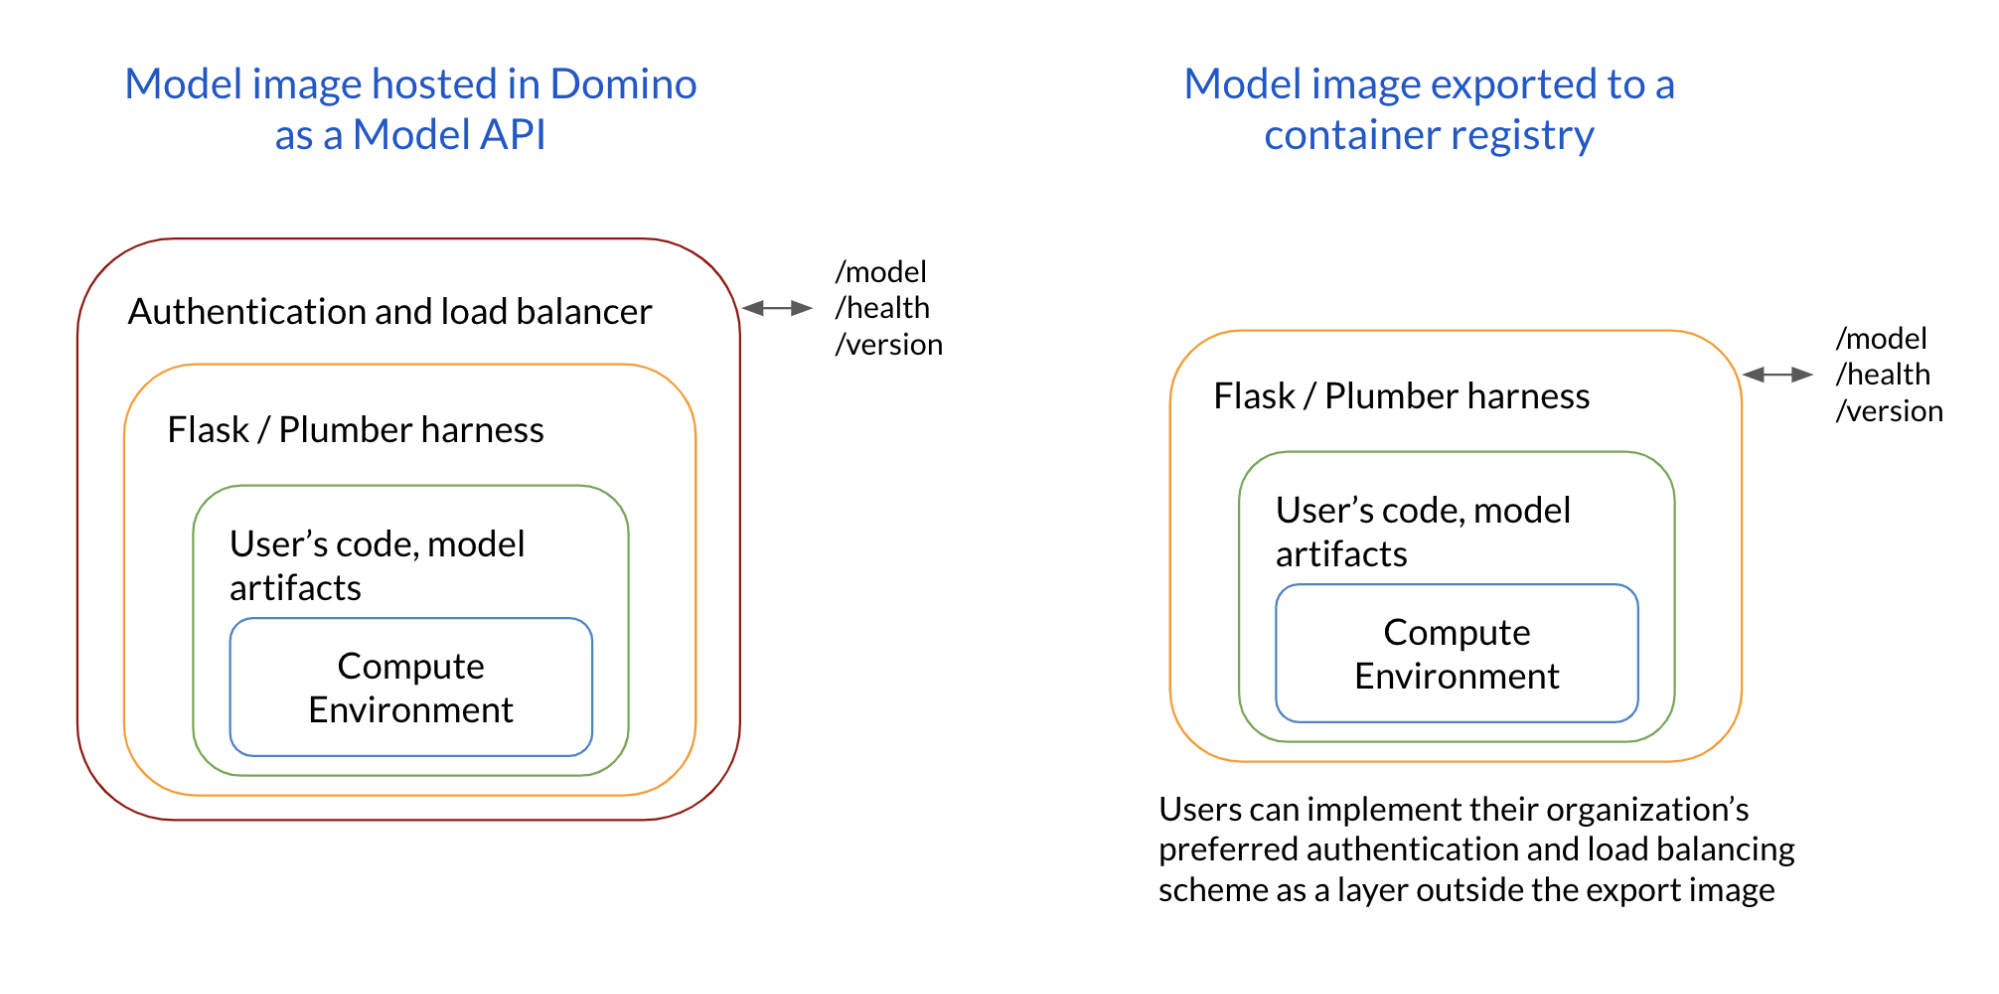
By default, all files present in a project are copied into the generated model image. The default image includes the specified compute environment, project files, a Flask/Plumber harness that exposes the REST interface, and an authentication and load balancing layer.
To control the sizes of such images, include names of specified files in the .modelignore file in the project’s root folder to omit them. Filenames, folder names, or UNIX shell regular expressions are allowed in this file.
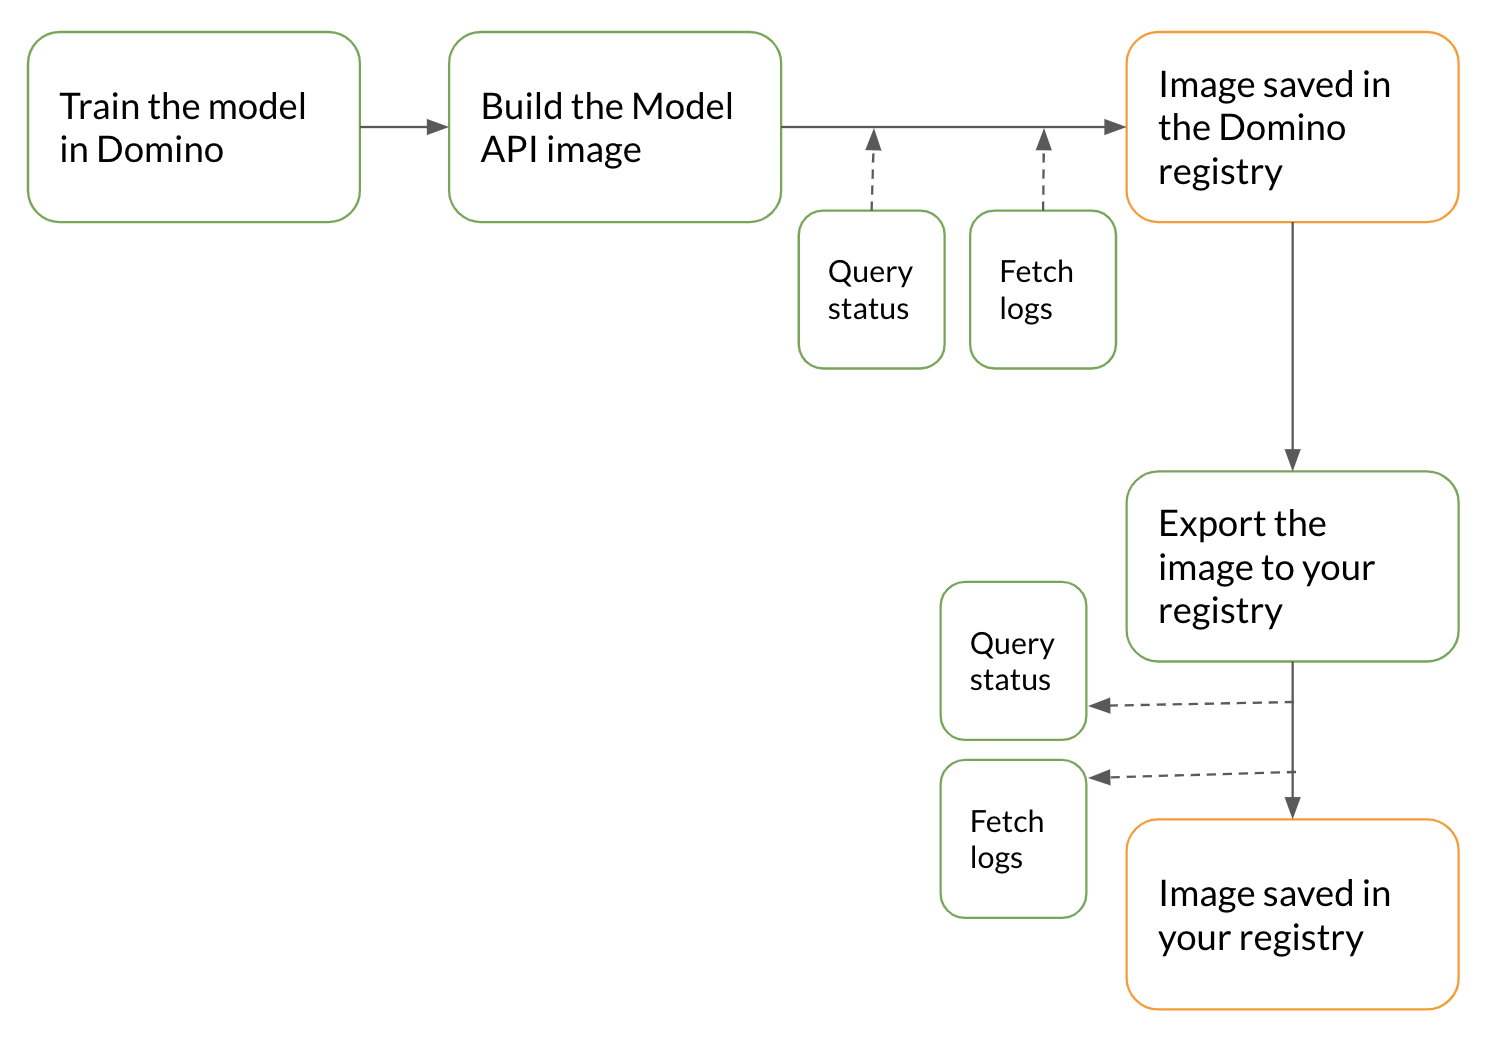
A data scientist creates a project in Domino, associates an environment with it, and conducts multiple experiments to identify the best production model. The data scientist or MLOps engineer then configures the CI/CD pipeline to run through the next steps to deploy the model from the project.
Your CI/CD pipeline calls the Build Model Image API to trigger a build process. This call builds and saves the generated model image in Domino’s internal container registry. The API response includes the model ID and the model version ID, which are used to poll for the build status or to fetch build logs. The model build process comprises Preparing, Building, Complete, or Failed.
curl --location --request POST 'https://<YOUR_DOMINO_APP_PATH>/v4/models/buildModelImage'
--header 'Content-Type: application/json'
--header 'X-Domino-Api-Key: <YOUR_DOMINO_API_TOKEN>'
--data-raw '{
  "projectId": "5e5efb400cf22210b88f36df",
  "inferenceFunctionFile": "model.py",
  "inferenceFunctionToCall": "predict",
  "environmentId": "5e4c6cc6cec7a117386a5c0a",
  "modelName": "ModelExportDemo",
  "logHttpRequestResponse": true,
  "description": ""
}'curl --location --request GET 'https://<YOUR_DOMINO_APP_PATH>/v4/models/<modelID>/<modelVersionId>/getBuildStatus'
--header 'Content-Type: application/json'
--header 'X-Domino-Api-Key: <YOUR_DOMINO_API_TOKEN>'After the image is built and registered in Domino’s internal registry, export it to your registry with Domino’s Export Model Image API. The API responds with an export process ID, which is used to poll for the status or fetch export operation logs. As part of a production workflow, ensure the image is first deployed for staging.
curl --location --request POST 'https://<YOUR_DOMINO_APP_PATH>/v4/models/<modelID>/<modelVersionId>/exportImageToRegistry'
--header 'Content-Type: application/json'
--header 'X-Domino-Api-Key: <YOUR_DOMINO_API_TOKEN>'
--data-raw '{
  "registryUrl": "quay.io/sample_url",
  "repository": "sample_prod_repo",
  "tag": "sample_tag",
  "username": "username",
  "password": "secret_token"
}'curl --location --request GET 'https://<YOUR_DOMINO_APP_PATH>/v4/models/<exportId>/getExportImageStatus'
--header 'Content-Type: application/json'
--header 'X-Domino-Api-Key: <YOUR_DOMINO_API_TOKEN>'Stand up the image in your test environment, which is often a separate K8s cluster dedicated to stage and test workflows. You can also configure your CI/CD pipeline to customize the image to prepare it for staging.
Deploy an exported model Image on an existing K8s cluster with these steps. This export assumes your K8s cluster is running and kubectl is installed. Then create the K8s manifest files, which describe your application & service and use kubectl to deploy them.
Use these Sample K8s manifest files and procedures to deploy the Image.
apiVersion: apps/v1
kind: Deployment
metadata:
  name: mymodel
  labels:
    app: mymodel
spec:
  replicas: 1
  selector:
    matchLabels:
      app: mymodel
  template:
    metadata:
      labels:
        app: mymodel
    spec:
      containers:
        - name: mymodel
          image: docker.io/myrepo:mytag
          ports:
            - name: mymodel
containerPort: 8888apiVersion: v1
kind: Service
metadata:
name: mymodel-service
spec:
type: NodePort
selector:
app: mymodel
ports:
- nodePort: 31440
name: mymodel-port
port: 90
targetPort: 8888|
Note
| If you pull from a private registry, add a secret to your K8s cluster so the pod can authenticate with the docker registry. |
$ kubectl apply -f my-model-deployment.yaml
$ kubectl apply -f my-model-service.yaml# If the kubernetes is in minikube then get the minikube IP
$ MYMODEL_IP="$(minikube ip)"# Else get IP of the mymodel-service
$ MYMODEL_IP="$(kubectl get service/mymodel-service -o jsonpath='{.spec.clusterIP}')"MYMODEL_PORT="$(kubectl get service/mymodel-service -o jsonpath='{.spec.ports[?(@.name=="mymodel-port")].nodePort}')"echo http://$MYMODEL_IP:$MYMODEL_PORT/model
>> http://192.168.99.100:31440/modelTest the exported Model
After the image is up and running, test the deployed model.
curl --location --request POST 'http://192.168.99.100:31440/model' --header 'Content-Type: application/json' --data-raw '{"data": {"start": 1, "stop": 100}}'The content of the “data” JSON object is the input to your model.
After you test the model in the staging environment and it clears the requisite production criteria, your CI/CD pipeline can deploy the model API image to a production environment. If you want to use a separate K8s cluster for this environment, substitute your desired cluster in the Run the exported image in a staging environment and Test the exported model steps.