Create a new Domino Environment to meet your language and package needs
-
From the Lab, click Environments.
-
Click Create Environment.
-
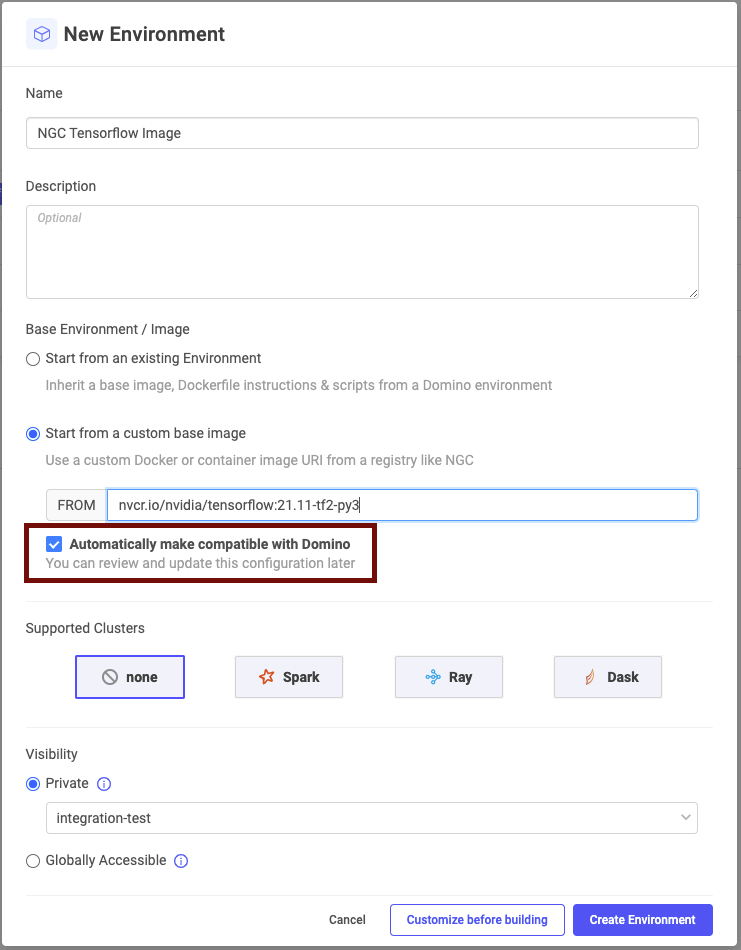
Name your new Environment and optionally give it a description.
-
Select whether you want to Start from an existing Environment or Start from a custom base image. See below for more details on custom base images.
-
Optional: Select the cluster for the Environment.
-
Set the Environment’s Visibility. Administrators can make the Environment Globally Accessible, which makes it available to all Projects.
-
Click Create Environment. The Revisions tab for the Environment opens. If you want to customize the Environment by editing the Dockerfile instructions, click Customize before Building and see Edit Environment Definition.
Although Domino comes with only the Domino Standard Environment installed, you can use the Environment images to create a new Domino Environment. This topic describes how to create a new Domino Environment or to customize one.
-
Select an Environment, choosing the correct Python and R version. Typically, you’ll want to choose the Environment from the latest release of Domino.
NoteDomino Environment Images follow the naming scheme
<ubuntuVersion-pythonVersion-rVersion-dominoVersion-optionalDescriptor>. The Domino version refers to the version of Domino where the Environment was released, but Environments can be used across different versions of Domino. TheoptionalDescriptoris typically something like gpu that describes a variation on the typical version of the Environment.NoteEnvironments tagged
_legacyare designed to work with Domino versions 4.x. The only difference between a regular and legacy Environment is the way they handle CUDA, given the switch to using nvidia-docker2 in Domino version 4.0. -
Find the appropriate name, description, image URI and pluggable notebook properties for your Environment.
NoteDSE Environments include the supported pluggable notebook properties in the image metadata under the
com.dominodatalab.Environment.workspace-propertiesfield. You can base64 decode this string to get the yaml properties this workspace supports.The Domino Standard Environments, Spark Environments, Dask Environments, and Ray Environments all support Jupyter, JupyterLab VSCode, and RStudio, whereas Domino Minimal Environment only supports Jupyter and JupyterLab. You can use the workspace properties to enable the appropriate tools for your Environment.
For example, for the Domino Standard Environment you might use:
- Title
-
Domino Standard Environment Py 3.8 R 4.1 - URI
-
quay.io/domino/standard-Environment:ubuntu18-py3.8-r4.1-domino4.6 - Description
-
Ubuntu 18.04 Mini-conda py38_4.9.2 Python 3.8 R 4.1 Jupyter, Jupyterlab, VSCode, Rstudio - Pluggable Workspace Tools (decoded from Environment metadata)
-
jupyter:
  title: "Jupyter (Python, R, Julia)"
  iconUrl: "/assets/images/workspace-logos/Jupyter.svg"
  start: [ "/opt/domino/workspaces/jupyter/start" ]
  supportedFileExtensions: [ ".ipynb" ]
  httpProxy:
    port: 8888
    rewrite: false
    internalPath: "/{{ownerUsername}}/{{projectName}}/{{sessionPathComponent}}/{{runId}}/{{#if pathToOpen}}tree/{{pathToOpen}}{{/if}}"
    requireSubdomain: false
jupyterlab:
  title: "JupyterLab"
  iconUrl: "/assets/images/workspace-logos/jupyterlab.svg"
  start: [  "/opt/domino/workspaces/jupyterlab/start" ]
  httpProxy:
    internalPath: "/{{ownerUsername}}/{{projectName}}/{{sessionPathComponent}}/{{runId}}/{{#if pathToOpen}}tree/{{pathToOpen}}{{/if}}"
    port: 8888
    rewrite: false
    requireSubdomain: false
vscode:
  title: "vscode"
  iconUrl: "/assets/images/workspace-logos/vscode.svg"
  start: [ "/opt/domino/workspaces/vscode/start" ]
  httpProxy:
    port: 8888
    requireSubdomain: false
rstudio:
  title: "RStudio"
  iconUrl: "/assets/images/workspace-logos/Rstudio.svg"
  start: [ "/opt/domino/workspaces/rstudio/start" ]
  httpProxy:
    port: 8888
    requireSubdomain: false
-
Create a new Domino Compute Environment.
-
See Environment management for how to create and manage Environments. This section also includes information about how to customize your Environment with Docker commands or pre-run scripts.
-
-
Update your Domino AMI (not required for non-cloud).
-
After you’ve created a compute Environment with a new base image, work with your administrator to update your Domino’s AMI (or if not on AWS, the GCP or Azure equivalent) by caching the new image. As Domino spins up and down new executors, if your new image is not in the AMI, it must pull that image onto the executor the first time it starts up. This can cause a ~10 minute delay for starting Workspaces on new executors. Follow the procedure to snap and update your AMI.
-
Enter the custom Docker or container image URI in the FROM line.
For example, registry.hub.docker.com/library/python:3.8-slim.
|
Note
|
The Automatically make compatible with Domino checkbox is selected by default.
Clear the checkbox if you are using a pre-built Domino image starting with |
What is automatic compatibility?
Domino:
-
Validates that automatic compatibility pre-requisites are in the image.
-
Adds the dependencies required for use with Domino in an isolated location.
-
Builds the Environment.
The functionality of your image remains untouched. Code and tools that run using the image in Domino will work when using the image outside of Domino and vice versa. The Environment is just like any other Domino Environment.
|
Note
|
|
-
In the navigation pane of the Lab, click Environments.
-
Click the name of an Environment.
-
If you have permission, click Archive Environment.
Archiving an Environment does not break reproducibility and executions based on that Environment will still run. See Sunset Environments in the Admin guide to learn more about archiving Environments.
Although Domino comes with only the Domino Standard Environment installed, you can use the environment images to create a new Domino Environment. This topic describes how to create a new Domino Environment or to customize one.
-
Select an environment, choosing the correct Python and R version. Typically, you’ll want to choose the environment from the latest release of Domino.
NoteDomino Environment Images follow the naming scheme
<ubuntuVersion-pythonVersion-rVersion-dominoVersion-optionalDescriptor>. The Domino version refers to the version of Domino where the environment was released, but environments can be used across different versions of Domino. TheoptionalDescriptoris typically something like gpu that describes a variation on the typical version of the environment.NoteEnvironments tagged
_legacyare designed to work with Domino versions 4.x. The only difference between a regular and legacy environment is the way they handle CUDA, given the switch to using nvidia-docker2 in Domino version 4.0. -
Find the appropriate name, description, image URI and pluggable notebook properties for your environment.
NoteDSE environments include the supported pluggable notebook properties in the image metadata under the
com.dominodatalab.environment.workspace-propertiesfield. You can base64 decode this string to get the yaml properties this workspace supports.The Domino Standard Environments, Spark Environments, Dask Environments, and Ray Environments all support Jupyter, JupyterLab VSCode, and RStudio, whereas Domino Minimal Environment only supports Jupyter and JupyterLab. You can use the workspace properties to enable the appropriate tools for your environment.
For example, for the Domino Standard Environment you might use:
- Title
-
Domino Standard Environment Py 3.8 R 4.1 - URI
-
quay.io/domino/standard-environment:ubuntu18-py3.8-r4.1-domino4.6 - Description
-
Ubuntu 18.04 Mini-conda py38_4.9.2 Python 3.8 R 4.1 Jupyter, Jupyterlab, VSCode, Rstudio - Pluggable Workspace Tools (decoded from environment metadata)
-
jupyter: title: "Jupyter (Python, R, Julia)" iconUrl: "/assets/images/workspace-logos/Jupyter.svg" start: [ "/opt/domino/workspaces/jupyter/start" ] supportedFileExtensions: [ ".ipynb" ] httpProxy: port: 8888 rewrite: false internalPath: "/{{ownerUsername}}/{{projectName}}/{{sessionPathComponent}}/{{runId}}/{{#if pathToOpen}}tree/{{pathToOpen}}{{/if}}" requireSubdomain: false jupyterlab: title: "JupyterLab" iconUrl: "/assets/images/workspace-logos/jupyterlab.svg" start: [ "/opt/domino/workspaces/jupyterlab/start" ] httpProxy: internalPath: "/{{ownerUsername}}/{{projectName}}/{{sessionPathComponent}}/{{runId}}/{{#if pathToOpen}}tree/{{pathToOpen}}{{/if}}" port: 8888 rewrite: false requireSubdomain: false vscode: title: "vscode" iconUrl: "/assets/images/workspace-logos/vscode.svg" start: [ "/opt/domino/workspaces/vscode/start" ] httpProxy: port: 8888 requireSubdomain: false rstudio: title: "RStudio" iconUrl: "/assets/images/workspace-logos/Rstudio.svg" start: [ "/opt/domino/workspaces/rstudio/start" ] httpProxy: port: 8888 requireSubdomain: false-
Create a new Domino Compute environment.
-
See Environment Management for how to create and manage environments. This section also includes information about how to customize your environment with Docker commands or pre-run scripts.
-
-
Update your Domino AMI (not required for non-cloud).
-
After you’ve created a compute environment with a new base image, work with your administrator to update your Domino’s AMI (or if not on AWS, the GCP or Azure equivalent) by caching the new image. As Domino spins up and down new executors, if your new image is not in the AMI, it must pull that image onto the executor the first time it starts up. This can cause a ~10 minute delay for starting workspaces on new executors. See snap and update your AMI for more information.
-
-
The Environment definition can have a large impact on startup times for executions that use that Environment. Optimize startup times by following these tips:
Reduce the Environment image size
If the Environment image for a Workspace, Job, or other execution is not present on the compute node the execution will run on, then it must be transferred from a compressed format at the image registry over the network to the compute node and then decompressed. This network transfer and decompression significantly increases startup latency and gets worse as the size of the image grows.
Follow these tips to minimize the Environment image size:
-
Choose the smallest base image that suits your needs, whether that’s an existing Domino Environment image or a custom image.
-
Install only essential software via the Dockerfile.
-
Consider creating several smaller, special-purpose Environments rather than one larger, general-purpose Environment.
Limit dependency file usage
Every package listed in a dependency file like requirements.txt is installed via a network transfer for every execution. This causes startup latency and is vulnerable to network failures.
Follow these tips to minimize usage of dependency files:
-
Move packages from dependency files to the Environment’s Dockerfile. Packages in the Dockerfile are installed just once: during Environment creation.
-
Eliminate rarely used packages from dependency files. On the rare occasions they are needed, install them by hand in the running execution or as part of your execution’s code.
Eliminate or streamline pre-run, pre-setup, and post-setup scripts
Pre-run, pre-setup, and post-setup scripts are executed during execution startup which directly affects startup time.
Follow these tips to streamline pre-run and setup scripts:
-
Keep the scripts concise.
-
Move commands to the Environment’s Dockerfile where possible.
-
Consider using Domino Datasets or External Data Volumes instead of copying data to/from external storage during execution of the scripts.