This document describes how to enhance your coding by installing the GitHub Copilot VS Code extension into a Domino Environment and using it with VS Code Workspaces in Domino.
Before you can install the GiHub Copilot extension, you’ll need to download and rehost it.
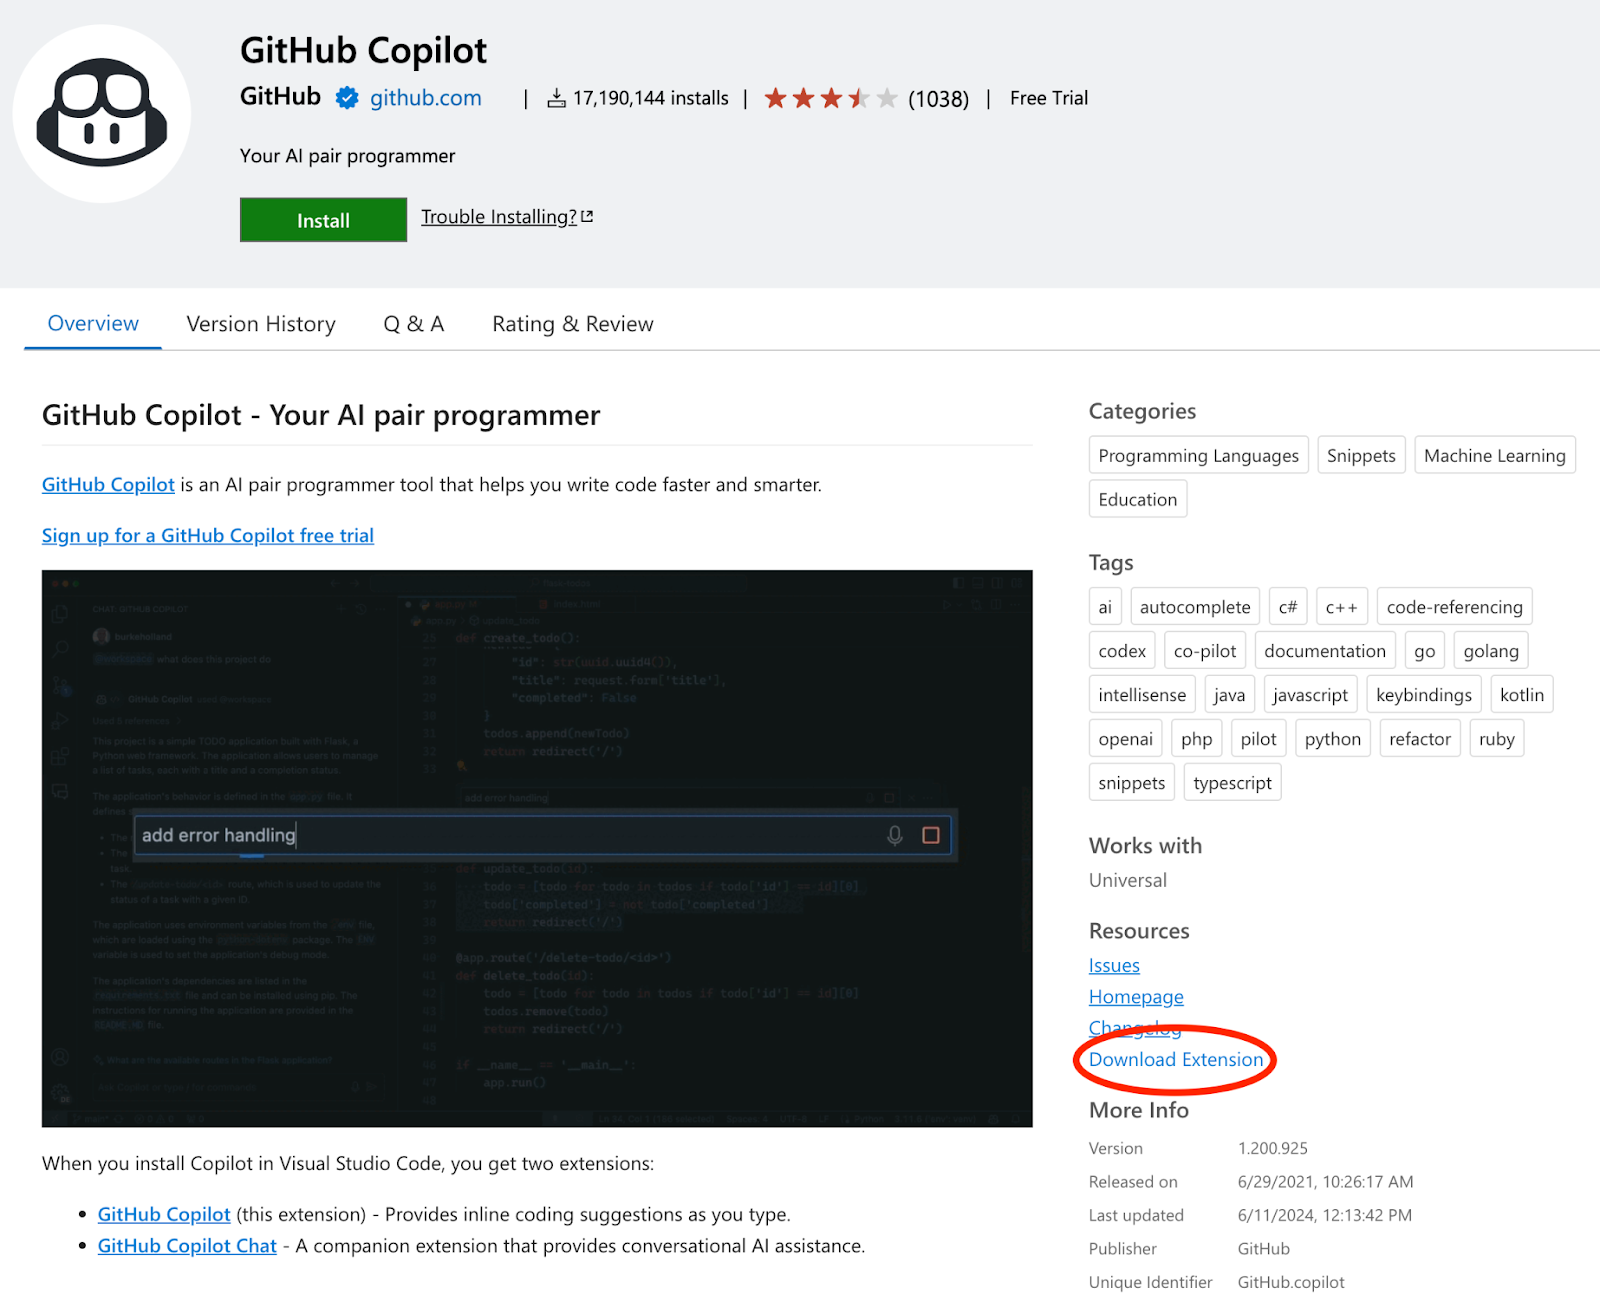
Download the extension
-
Download the GitHub Copilot extension from Visual Studio Marketplace.
-
Choose Download Extension under Resources to download the Github.copilot-1.204.942.vsix package.
Rehost the extension
To rehost the GitHub Copilot extension:
-
Upload the
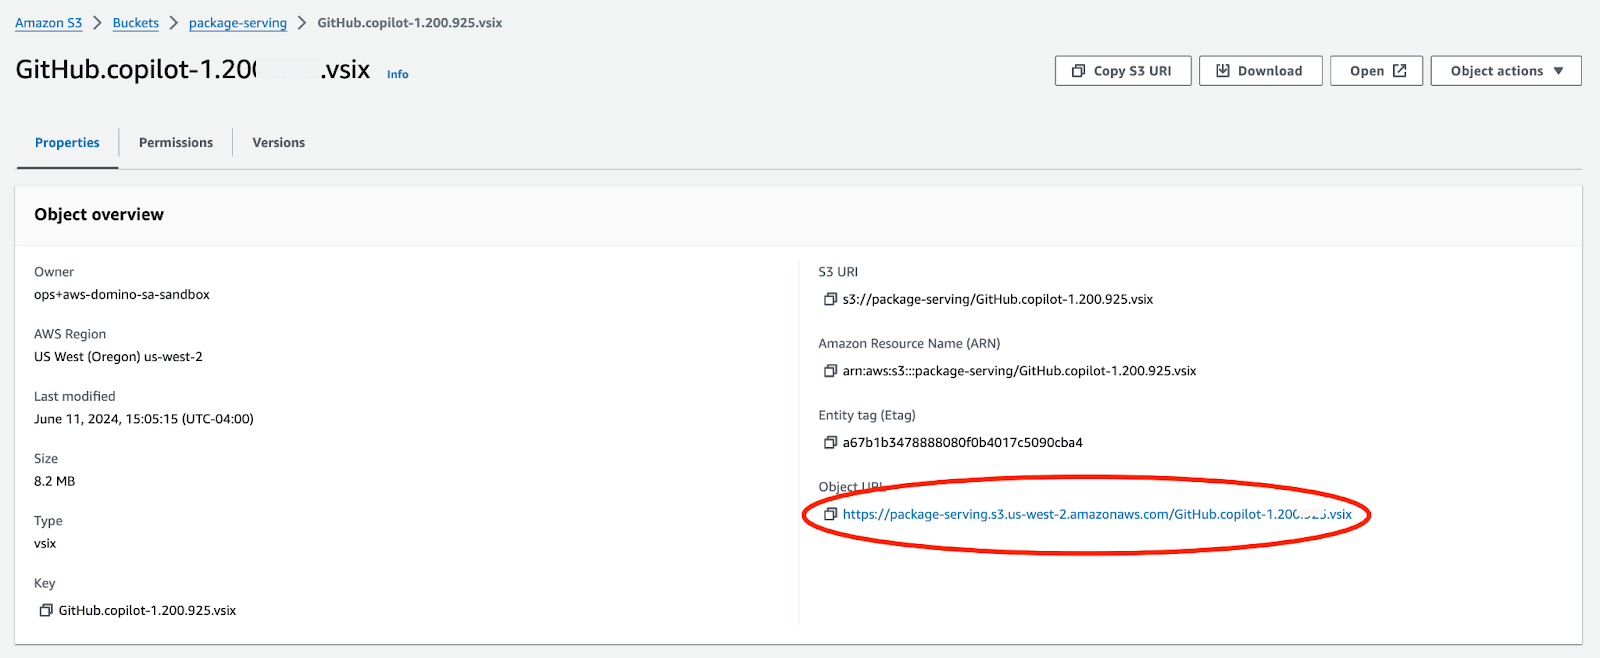
GitHub.copilot-1.204.942.vsixfile to either an S3 bucket or other similar object store. -
Make it public, or host it on a web server that your Domino deployment can reach during the container image build.
-
Make a note of the URL from which the file can be downloaded.
Now that you have the GitHub Copilot extension downloaded and rehosted, you’re ready to install and configure it for use.
Identify the VS Code version
To get the applicable VS Code version:
-
View the available versions of VS Code on GitHub’s code-server page.
-
From the list of Assets, locate the version of VS Code you are using and look for the corresponding amd64.deb build for that version.
-
Right-click on that URL to Copy link address. Make note of this address.
|
Note
| The GitHub Copilot extension generally works best with the latest version(s) of VS Code. |
Add Dockerfile instructions
Add the following Dockerfile instructions, making the following substitutions:
-
The URLs you noted earlier for your rehosted
.vsix extensionfile. -
The release of VS Code you want to install.
USER root

# Install VS Code (replace URL and update filename)
RUN curl -fOL https://github.com/coder/code-server/releases/download/v4.90.0/code-server_4.90.0_amd64.deb && \
    dpkg -i code-server_4.90.0_amd64.deb

# Add a VS Code start script
RUN mkdir -p /opt/domino/workspaces/vscode && \
    chown -R ubuntu:ubuntu /opt/domino/workspaces/vscode && \
    echo "#!/bin/bash" >> /opt/domino/workspaces/vscode/start && \
    echo "SETTINGS_DIR=\${DOMINO_WORKING_DIR}/.vscode" >> /opt/domino/workspaces/vscode/start && \
    echo "FILE=\${SETTINGS_DIR}/settings.json" >> /opt/domino/workspaces/vscode/start && \
    echo "# Add a user setting file if it doesn't exist. Add in DOMINO_WORKING_DIR so it persists across sessions" >> /opt/domino/workspaces/vscode/start && \
    echo "if [ ! -f \"\$FILE\" ]; then" >> /opt/domino/workspaces/vscode/start && \
    echo "sudo mkdir -p \"\${FILE%/*}\"" >> /opt/domino/workspaces/vscode/start && \
    echo "sudo chown -R ubuntu:ubuntu \${SETTINGS_DIR}" >> /opt/domino/workspaces/vscode/start && \
    echo "printf \"{" >> /opt/domino/workspaces/vscode/start && \
    echo "\t\\\"extensions.autoUpdate\\\": false," >> /opt/domino/workspaces/vscode/start && \
    echo "\t\\\"extensions.autoCheckUpdates\\\": false," >> /opt/domino/workspaces/vscode/start && \
    echo "\t\\\"python.pythonPath\\\": \\\"\$(which python)\\\"," >> /opt/domino/workspaces/vscode/start && \
    echo "\t\\\"workbench.startupEditor\\\": \\\"none\\\"," >> /opt/domino/workspaces/vscode/start && \
    echo "\t\\\"workbench.colorTheme\\\": \\\"Default Dark+\\\"" >> /opt/domino/workspaces/vscode/start && \
    echo "}\" > \${FILE}" >> /opt/domino/workspaces/vscode/start && \
    echo "fi" >> /opt/domino/workspaces/vscode/start && \
    echo "code-server \${DOMINO_WORKING_DIR} --user-data-dir \${SETTINGS_DIR} --auth none --bind-addr 0.0.0.0:8888 --extensions-dir \${HOME}/.local/share/code-server/extensions --disable-telemetry" >> /opt/domino/workspaces/vscode/start && \
    chmod +x /opt/domino/workspaces/vscode/start

USER ubuntu

# Install Copilot extension (replace URL and update filename)
RUN sudo wget -P /tmp/ https://package-serving.s3.us-west-2.amazonaws.com/GitHub.copilot-1.200.925.vsix && \
    code-server --install-extension /tmp/GitHub.copilot-1.200.925.vsix
Configure Pluggable Workspace Tools
Next, add the following Pluggable Workspace Tools configuration:
vscode:
   title: "vscode"
   iconUrl: "https://raw.github.com/dominodatalab/workspace-configs/develop/workspace-logos/vscode.svg?sanitize=true"
   start: [ "/opt/domino/workspaces/vscode/start" ]
   httpProxy:
      port: 8888
requireSubdomain: falseOnce the extension has been installed and configured, you can use it to start writing code by following these steps:
-
Start VS Code.
-
Authenticate with GitHub.
-
Confirm that Copilot is ready.
-
Start writing code with Copilot.
For more information about each of these steps, see the User Guide tutorial on how to Use GitHub Copilot with VS Code.