Vibe Modeling expands AI-powered code assistants beyond code generation into experimentation and analysis. You can embed assistants directly into your workflow while still benefitting from the security, governance, and reproducibility of the Domino platform.
Data scientists already use code assistants to accelerate model development. Expanding those assistants into experimentation and analysis makes it possible to move faster in exploratory work, keep assistants connected to Domino project context, and maintain reproducibility and governance without ever leaving the IDE.
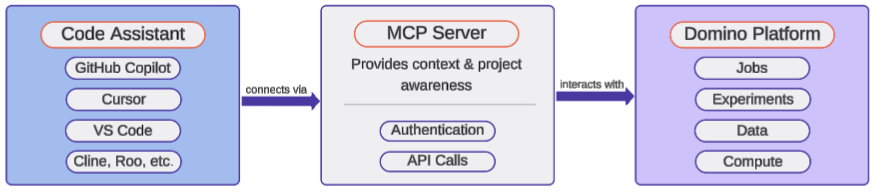
This guide explains how to use code assistants with Domino for Vibe Modeling, including connecting GitHub Copilot inside Domino or integrating local IDEs such as Cursor and VS Code. Copilot is just one example; any coding agent with an MCP client (like Roo, Cline, or Amazon Q) works.
You’ll also learn how to set up the Domino MCP server so assistants can interact directly with Domino projects. Vibe Modeling can be used in two ways:
-
Within Domino: Run VS Code inside a Domino Workspace and connect GitHub Copilot. This lets you use your assistant within a secure, reproducible environment, with access to your project’s data, compute, and experiments all in one place.
-
Outside Domino: Connect your local IDE (Cursor or VS Code) to Domino using the MCP server. Use assistants locally while interacting with your Domino project remotely.
Before you begin, make sure your setup meets the general requirements below. Then, depending on how you plan to use Vibe Modeling, follow the specific prerequisites listed for working within Domino or working outside Domino.
-
A Domino project backed by a Git repository
-
A Domino API key for MCP server authentication
-
A code assistant (such as GitHub Copilot) installed in your IDE
-
Basic familiarity with running jobs and using Workspaces in Domino
By running GitHub Copilot in a Domino Workspace, you can use your assistant without leaving the secure environment where your code, data, and results already live.
Prerequisites
Before you get started, make sure you have:
-
Access to GitHub Copilot (free or paid plan)
-
Firewall access to GitHub domains. GitHub’s Copilot documentation has a list of specific URLs that may need access granted.
Step 1: Create a Domino compute environment
Use the MCP Server environment referenced in our GitHub blueprints for this setup. This environment extends the Domino Standard Environment (DSE) and supports the same pluggable workspace tools:
-
Jupyter
-
JupyterLab
-
VS Code
-
RStudio
Step 2: Launch Workspace and Sign into Copilot
Next, you’ll create a Workspace using the environment you just set up. This gives you access to Domino’s compute and data while working directly in VS Code with GitHub Copilot enabled.
-
From your target Domino project, create a Workspace with your new environment.
-
Select the resources, data, and code you want to work with.
-
When the Workspace starts, click the Copilot icon in the lower-left corner of the IDE to sign in.
Step 4: Begin Vibe Modeling
With Copilot running and the MCP server connected, you’re ready to start modeling directly in your VS Code Workspace.
-
Open Copilot Chat using the Command Palette (
Cmd+Shift+Pon Mac orCtrl+Shift+Pon Windows) or the keyboard shortcut⌃ + ⌘ + Ion Mac. -
Begin prompting your assistant with modeling tasks, experiment questions, or data exploration requests, all within your Domino project context.
Summary: Work inside Domino
Running GitHub Copilot inside a Domino Workspace gives you a seamless, secure way to build, experiment, and analyze from within VS Code. With the MCP server connected, your assistant stays aware of your project context, making it easy to run jobs, explore data, and maintain reproducibility.
You can use Domino’s platform capabilities by connecting your assistant through the Domino MCP server. This setup lets tools like Cursor and VS Code run modeling tasks, launch jobs, and interact with Domino projects directly from your desktop.
You’ll configure your local environment to talk to Domino securely, giving your assistant full project context without leaving your preferred tools.
Step 1: Clone the MCP server repository
To get started, clone the Domino MCP server repository to your local machine. This server allows your local assistant to interact with Domino projects.
git clone https://github.com/dominodatalab/domino_mcp_server.git
cd domino_mcp_server
This repo contains the server code and configuration files you’ll need in later steps.
Step 2: Set up dependencies
Set up a Python environment and install the MCP server package locally. We recommend using a modern Python package manager like uv, but venv also works.
Using uv:
uv venv
uv pip install -e .
This creates a virtual environment and installs the MCP server in editable mode so your assistant can invoke it as a local server.
Step 3: Configure Domino credentials
To authorize the MCP server to interact with your Domino instance, add your credentials to the local environment configuration.
-
In the cloned
domino_mcp_serverdirectory, open the.envfile (or create it if it doesn’t exist). -
Add the following lines, replacing the placeholders with your actual Domino API key and host URL. Do not include a trailing slash (
/) in theDOMINO_HOSTvalue.
DOMINO_API_KEY='your_api_key_here'
DOMINO_HOST='https://your-domino-instance.com'
This allows the MCP server to authenticate with Domino when performing project-related actions.
Step 4: Add the MCP server to your IDE
To let your local assistant connect through the MCP server, add a configuration file to your IDE’s project directory.
-
In your local clone of the project (the same repo connected to your Domino project), create one of the following files:
-
For Cursor:
.cursor/mcp.json -
For VS Code:
.vscode/mcp.json
-
-
Use this example configuration and adjust the
commandvalue to match your environment. -
If you’re not using
uv, you can substitutepythonor another compatible tool in this example.
{
  "mcpServers": {
    "domino_server": {
      "command": "uv",
      "args": [
        "--directory",
        "/full/directory/path/to/domino_mcp_server",
        "run",
        "domino_mcp_server.py"
      ]
    }
  }
}
Step 5: Add a rules file
The rules file gives your assistant the context it needs to interact with Domino through the MCP server. It defines how and when to use server functions and helps the assistant behave intelligently during modeling.
-
In your project directory (the same one linked to Domino), create a rules file based on your IDE:
-
For Cursor:
.cursor/rules/domino-project-rule.mdc -
For VS Code:
.github/instructions/domino.instructions.md
-
-
Add an appropriate header, depending on your IDE.
-
Cursor header:
alwaysApply: true -
VS Code header:
applyTo: *
-
-
Below the header, include the full rules content.
Use the detailed content provided in the original blueprint. These rules describe how assistants should handle job execution, data access, project context, and reproducibility when using Domino via MCP.
Step 6: Add Domino project settings
Your assistant needs to know which Domino project it’s working with. You provide this context by creating a simple config file in your project root.
-
In your local project directory, create a file named: domino_project_settings.md
-
Add your project name and owner as shown below:
project_name="your-project-name"
user_name="project_owner_username"
This file is referenced by the rules file and allows the assistant to run jobs and access resources in the correct Domino project.
Step 7: Restart your IDE
To apply the MCP server configuration and load the rules file, restart your IDE. After restarting:
-
Confirm that the MCP server is running.
-
Switch your assistant to agent mode (if applicable).
-
Begin working with your assistant to explore data, run jobs, and interact with your Domino project.
Both Cursor and VS Code support agent mode and will use the configured rules to guide assistant behavior.
Summary: Work outside Domino
Connecting your local IDE to Domino with the MCP server gives you full assistant capabilities without leaving your desktop. You can use Cursor or VS Code to chat with your assistant, run Domino jobs, and interact with project data, all from your local environment. This setup keeps your workflow flexible while still benefiting from Domino’s governance and reproducibility.
-
Use coding assistants gives an overview of how to use coding assistants in Domino.
-
Use GitHub Copilot in VS Code directly within Domino or through Remote SSH.
-
Jupyter AI provides an AI-powered assistant that you can configure to use with Domino.