Domino Hardware Tiers define Kubernetes requests and limits and link them to specific node pools. Domino recommends the following best practices.
-
Account for overhead
-
Isolate workloads and users using node pools
-
Isolate compute cluster workloads
-
Set resource requests and limits to the same values
When designing hardware tiers, consider what resources will be available on a given node when Domino submits your workload for execution. Not all physical memory and CPU cores of your node will be available due to system overhead.
Consider the following overhead components:
-
Kubernetes management overhead
-
Domino daemon-set overhead
-
Domino execution sidecar overhead
Overhead is relevant if you want to define a hardware tier dedicated to one execution at a time per node, such as for a node with a single physical GPU. It is also relevant if you absolutely must maximize node density.
Kubernetes typically reserves a portion of each node’s capacity for daemons and pods that are required for Kubernetes itself. The amount of reserved resources usually scales with the size of the node, and also depends on the Kubernetes provider or distribution.
See the following for information about reserved resources by cloud-provider managed Kubernetes providers:
Domino runs a set of management pods that reside on each of the compute nodes. Use these for log aggregation, monitoring, and environment image caching.
The overhead of these daemon-sets is roughly 0.5 CPU core and 0.5 Gi RAM. This overhead is taken from the allocatable resources on the node.
Domino execution overhead
For each Domino execution, there is a set of supporting containers in the execution pod that manages authentication, handling request routing, loading files, and installing dependencies. These supporting containers make CPU and memory requests that Kubernetes considers when scheduling workspace, job, and app pods.
The supporting container overhead currently is roughly 1 CPU core and 1.5 GiB RAM. You can configure this so it might vary for your deployment.
Consider an m5.2xlarge EC2 node with a raw capacity of 8 CPU cores and 32 GiB of RAM.
When used as part of an EKS cluster, the node reports the following allocatable capacity of ~27GiB of RAM and 7910m CPU cores.
Capacity:
  attachable-volumes-aws-ebs:  25
  cpu:                         8
  ephemeral-storage:           104845292Ki
  hugepages-1Gi:               0
  hugepages-2Mi:               0
  memory:                      32120476Ki
  pods:                        58
Allocatable:
  attachable-volumes-aws-ebs:  25
  cpu:                         7910m
  ephemeral-storage:           95551679124
  hugepages-1Gi:               0
  hugepages-2Mi:               0
  memory:                      28372636Ki
  pods:                        58
Also, account for 500m CPU and 0.5GiB RAM for the Domino and EKS daemons.
Lastly, for a single execution add 1000m CPU and 1.5GiB RAM for sidecars, and you are left with roughly 6410m CPU and 25GiB RAM that you can use for a single large hardware tier.
If you want to partition the node into smaller hardware tiers, you must account for the sidecar overhead for every execution that you want to co-locate.
As a general rule, larger nodes allow for more flexibility as Kubernetes will take care of efficiently packing your executions onto the available capacity.
-
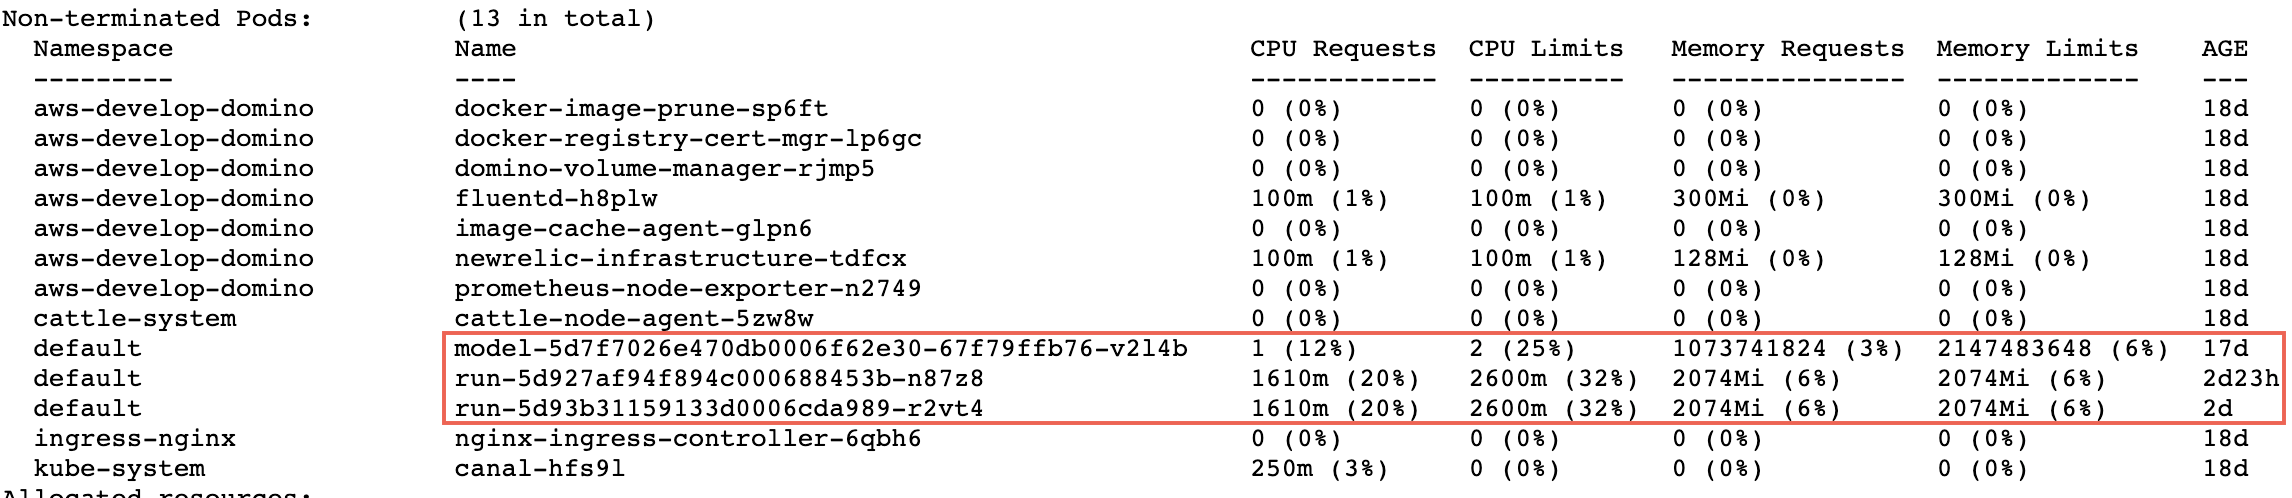
In the Admin application, click Infrastructure.
-
Click the name of a node. In the following image, there is a box around the execution pods. The other pods handle logging, caching, and other services.
-
Go to Advanced > Hardware Tiers.
-
Create or edit a hardware tier.
-
In the Node Pool field, enter
your-node-poolwhich must match the node pool label such as:dominodatalab.com/node-pool=<your-node-pool>. You can name a node pool anything you like, but Domino recommends naming them something meaningful given the intended use.
Domino typically comes pre-configured with default and default-gpu
node pools, with the assumption that most user executions will run on nodes in one of those pools.
As your compute requirements become more sophisticated, you might want to keep certain users separate from one another or provide specialized hardware to certain groups of users.
For example, if there’s a data science team in New York City that needs a specific GPU machine that other teams don’t need it, you can use the following label for the appropriate nodes: dominodatalab.com/node-pool=nyc-ds-gpu.
In the hardware tier form, you would specify nyc-ds-gpu.
To ensure only that team has access to those machines, create a NYC organization, add the correct users to the organization, and give that organization access to the new hardware tier that uses the nyc-ds-gpu node pool label.
Domino on-demand compute clusters often require pooling a large amount of compute resources on specialized hardware (for example, using larger nodes compared to your other workloads).
Consider a use case where you want a set of extra large nodes to be available for on-demand Ray workloads but not available for regular workloads.
-
Go to Advanced > Hardware Tiers.
-
Create or edit a hardware tier.
-
From Restrict to compute cluster, select the Ray checkbox.
For clusters that are comprised of multiple workload types (for example, Ray head and worker), Domino recommends that you create a separate dedicated Hardware Tier that match the requirements for each type.
In the Ray example, you can create ray-head and ray-worker Hardware Tiers.
With Kubernetes, resource limits must be greater than or equal to resource requests. So, if your memory request is 16 GiB, your limit must be greater than or equal to 16 GiB. But, although setting a request greater than limits can be useful, and there are cases where allowing bursts of CPU or memory can be useful, this is also dangerous. Kubernetes might evict a pod using more resources than initially requested. For Domino workspaces or jobs, this would cause the execution to be terminated.
For this reason, Domino recommends setting memory and CPU requests equal to limits. In this case, Python and R cannot allocate more memory than the limit, and execution pods will not be evicted.
On the other hand, if the limit is higher than the request, a user can use resources that another user’s execution pod must be able to access. This is the noisy neighbor problem that you might have experienced in other multi-user environments. But, instead of allowing the noisy neighbor to degrade performance for other pods on the node, Kubernetes will evict offending pods when necessary to free up resources.
User data on disk will not be lost, because Domino stores user data on a persistent volume that can be reused. But, anything in memory will be lost and the execution will have to be restarted.