We are introducing a new role to manage policies with Domino Governance: GovernanceAdmin.
The GovernanceAdmin has unique permissions to create, edit, and publish policies.
New policies must be approved before they can be published.
In addition to managing policies, the GovernanceAdmin can use the governance dashboard, view the audit trail, monitor compliance, and access the governance APIs.
|
Note
|
You’ll need to be assigned the GovernanceAdmin role in order to complete these tasks.
SysAdmins already have permissions associated with Domino Governance.
|
The first thing you should do is assign the GovernanceAdmin role to a couple of users:
-
In the Admin console, select Manage Resources > Users.
-
Select the user you want to promote as a
GovernanceAdmin. -
Click Edit for that user.
-
Select GovernanceAdmin (Admin role for Governance) from the list of roles.
-
Click Save.
Policies in Domino define the lifecycle of a scientific output, such as deploying a model to production, building a statistical analysis, or building an AI system. Policies could be industry standards, corporate risk policies, or regulations.
Policies are created in YAML by the GovernanceAdmin before being attached to governed bundles.
Build Domino governance policies has more robust building blocks for your custom policies.
-
Go to Govern > Policies and select Create Policy.
-
From the Policy Template menu, use None (start from scratch).
-
Name your policy and provide a short description.
-
Select Create.
-
In the Code editor, you can copy and paste this example code to create your first policy.
NoteIn order for the example code below to run successfully, replace user-organization-namewith the name of your organization to assign approvers.Example code for policy.
classification:
  rule: |
    var ans string
    ans = "Low"
    if classificationInputs["model-risk"].(string) == "High" || classificationInputs["change-type"].(string) == "Major" {
      ans = "High"
    }
    return ans
  artifacts:
    - model-risk
    - change-type
approvers:
    - user-organization-name
stages:
  - name: Business cases
    evidenceSet:
      - id: Local.guidance
        name: ''
        description: ''
        definition:
          - artifactType: guidance
            details:
              text: >-
                The type of business case as well as model risk and complexity
                can determine which process has to be followed. [Learn
                More](https://ournistpolicyreferenceurl.com)
      - id: Local.type-of-development
        name: Type of Development
        description: Describe the type of development
        definition:
          - artifactType: input
            details:
              label: What is the type of the business case?
              type: radio
              options:
                - New model development
                - Model change
          - artifactType: input
            details:
              label: What are the expected business benefits
              type: textinput
              helpText: Explain The Benefit
      - id: Local.model-risk
        name: Model Risk
        description: Describe the risk of the model
        definition:
          - artifactType: input
            aliasForClassification: model-risk
            details:
              label: How would you rate the model risk?
              type: radio
              options:
                - High
                - Low
              tooltip: guidance on how to rate the model risk within the organization
          - artifactType: input
            aliasForClassification: change-type
            details:
              label: To what extent do you expect that the model output will change?
              type: radio
              options:
                - Major
                - Moderate
                - Minor
  - name: Requirement gathering
    evidenceSet:
      - id: Local.define-requirement
        name: Define Requirement
        description: Describe the requirement
        definition:
          - artifactType: input
            details:
              label: List all the requirements
              type: textarea
      - id: Local.change-plan
        name: Define the change plan
        description: Describe the change plan
        definition:
          - artifactType: input
            details:
              label: Describe the change plan
              type: textarea
      - id: Local.Test
        name: Test visibility rule
        description: Test visibility rule question
        definition:
          - artifactType: input
            details:
              label: You can only see this when classification is High
              type: textarea
        visibilityRule: classificationValue == "High"
  - name: Validation
    approvals:
      - name: Validation sign off
        approvers:
          - user-organization-name
        evidence:
          id: Local.validation-approval-body
          name: Sign-off
          description: The checklist for approvals
          definition:
            - artifactType: input
              details:
                label: Have you read the model validation reports?
                type: radio
                options:
                  - label: 'Yes'
                    value: 'Yes'
                  - label: 'No'
                    value: 'No'
  - name: Deployment
    evidenceSet:
      - id: Local.monitoring-plan
        name: Monitoring Plan
        description: Describe the monitoring plan
        definition:
          - artifactType: input
            details:
              label: Describe the monitoring plan
              type: textarea
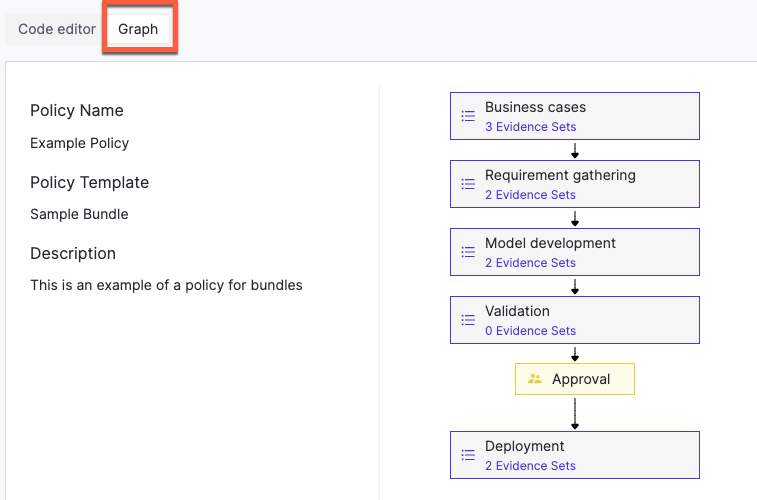
Based on the example policy code, the approver(s) will provider their evidence in the evidence set, and use that input in combination with the custom rule and visibility rules to show/hide subsequent questions.
-
Click Save and verify that the policy workflow looks correct by toggling Graph.
-
Update the example code by making a few changes, such as using different
stagesnames or approvers. -
Choose Save and then Publish.
Domino Governance includes pre-built policy templates. You can use these templates to customize policies for your organization quickly.
-
Go to Govern > Policies and select Create Policy.
-
From the Policy Template menu, select a template.
-
Name your policy and provide a short description.
-
Select Create.
-
Verify that the policy workflow looks correct by toggling Graph.
-
Toggle back to the Code editor.
-
Update the template by making a few changes, such as using different
stagesnames or approvers. -
Choose Save and then Publish.

